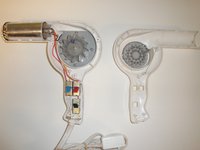
Salta al contenuto principale

Classique 087CQA Heating Element Replacement

Cosa ti serve

  1. Classique 087CQA Heating Element Replacement, Heating Element: passo 1, immagine 1 di 1
    • Begin with the side with switches

  2. Classique 087CQA Heating Element Replacement: passo 2, immagine 1 di 2 Classique 087CQA Heating Element Replacement: passo 2, immagine 2 di 2
    • Remove the Phillips PH0 bit

    • Insert the bit into the screwdriver

  3. Classique 087CQA Heating Element Replacement: passo 3, immagine 1 di 1
    • Unscrew the shell screw (1) with the screw driver

    • 5mm Phillips flat-head screw

  4. Classique 087CQA Heating Element Replacement: passo 4, immagine 1 di 1
    • Flip the hair dryer over to the side without switches

  5. Classique 087CQA Heating Element Replacement: passo 5, immagine 1 di 1
    • Unscrew the shell screw (1) with the screwdriver

    • 5mm Phillips flat-head screw

  6. Classique 087CQA Heating Element Replacement: passo 6, immagine 1 di 2 Classique 087CQA Heating Element Replacement: passo 6, immagine 2 di 2
    • Remove the bit from the screwdriver and insert the Phillips PH2 bit

  7. Classique 087CQA Heating Element Replacement: passo 7, immagine 1 di 1
    • Unscrew the remaining shell screws (5) with the screwdriver

    • 15mm Phillips round-head screws

  8. Classique 087CQA Heating Element Replacement: passo 8, immagine 1 di 2 Classique 087CQA Heating Element Replacement: passo 8, immagine 2 di 2
    • Gently pull the two sides apart

    • Separate each side

  9. Classique 087CQA Heating Element Replacement: passo 9, immagine 1 di 1
    • Remove front grill

  10. Classique 087CQA Heating Element Replacement: passo 10, immagine 1 di 2 Classique 087CQA Heating Element Replacement: passo 10, immagine 2 di 2
    • Pull up and remove the heating element assembly

  11. Classique 087CQA Heating Element Replacement: passo 11, immagine 1 di 1
    • Remove the outer sleeve and replace the heating element

Conclusione

To reassemble your device, follow these instructions in reverse order.

Un'altra persona ha completato questa guida.

0Commenti sulla guida

Aggiungi Commento

Visualizza Statistiche:

Ultime 24 Ore: 0

Ultimi 7 Giorni: 3

Ultimi 30 Giorni: 21

Tutti i Tempi: 868