Salta al contenuto principale
Unisciti alla Community delle riparazioni - Crea un account
Changing SSD disk why! N131WU

Changing SSD disk why! N131WU

Felice Suglia

Felice Suglia e un altro collaboratore

Ultimo aggiornamento il 9 gen 2024

5 minuti
Facile
Pallini!
Guida fornita dalla comunità
Introduzione Migliore
  1. Changing SSD disk why! N131WU, Remove the Screws: passo 1, immagine 1 di 1
    • Remove the case screws (red) and the keyboard screws (green).

    • Be sure not to lose these screws. You will need them to reassemble your laptop.

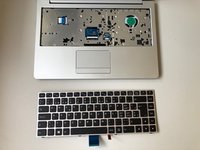
  2. Changing SSD disk why! N131WU, Remove the Keyboard: passo 2, immagine 1 di 3 Changing SSD disk why! N131WU, Remove the Keyboard: passo 2, immagine 2 di 3 Changing SSD disk why! N131WU, Remove the Keyboard: passo 2, immagine 3 di 3
    • Using the hole provided under the case (see picture), push the keyboard out using a thin screwdriver or some other solid object.

    • Hold onto the keyboard as you push the keyboard so as not to damage the two cables still attached.

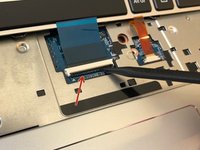
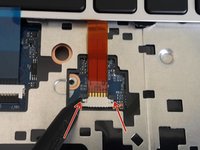
  3. Changing SSD disk why! N131WU, Remove Keyboard Connections: passo 3, immagine 1 di 3 Changing SSD disk why! N131WU, Remove Keyboard Connections: passo 3, immagine 2 di 3 Changing SSD disk why! N131WU, Remove Keyboard Connections: passo 3, immagine 3 di 3
    • (Blue Cable) Push up on the thin black portion on the connector and gently pull out the blue ribbon cable until it comes out.

    • (Orange Cable) Remove the orange cable by sliding the gray part of the connector towards the screen, then gently pull on the ribbon cable.

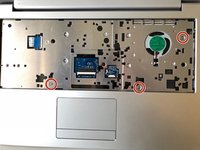
  4. Changing SSD disk why! N131WU, Remove the upper screws: passo 4, immagine 1 di 2 Changing SSD disk why! N131WU, Remove the upper screws: passo 4, immagine 2 di 2
    • Unscrew the three screws that were under the keyboard. Be sure to hold onto these.

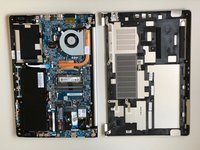
    • After these are removed, you can now remove the lower part of the case from the rest of the computer.

  5. Changing SSD disk why! N131WU, Remove the SSD: passo 5, immagine 1 di 3 Changing SSD disk why! N131WU, Remove the SSD: passo 5, immagine 2 di 3 Changing SSD disk why! N131WU, Remove the SSD: passo 5, immagine 3 di 3
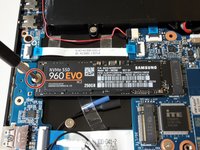
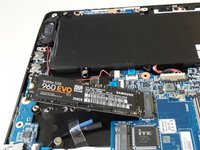
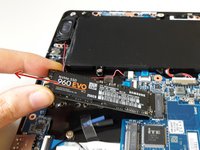
    • Remove the screw holding in the ssd.

    • Carefully remove the SSD from the connector.

Conclusione

To reassemble your device, follow these instructions in reverse order.

Un ringraziamento speciale a questi traduttori:

fr en

100%

Questi traduttori ci stanno aiutando ad aggiustare il mondo! Vuoi partecipare?
Inizia a tradurre ›

Felice Suglia

Membro da: 06/15/13

33.312 Reputazione

282 Guide realizzate

0Commenti sulla guida

Aggiungi Commento

Visualizza Statistiche:

Ultime 24 Ore: 0

Ultimi 7 Giorni: 0

Ultimi 30 Giorni: 6

Tutti i Tempi: 602