Salta al contenuto principale
Unisciti alla Community delle riparazioni - Crea un account
Cen-Tech Seven Function Digital Multimeter Dial Replacement

Cen-Tech Seven Function Digital Multimeter Dial Replacement

Anna Kihm

Anna Kihm e 3 altri collaboratori

Ultimo aggiornamento il 10 gen 2015

10 - 15 minuti
Moderato
Foto Azione

Introduzione

Vai al passo 1

If the dial is stuck in any particular position it will be necessary to replace. This guide will show how to locate and replace the dial.

Cosa ti serve

Ricambi

Strumenti

Mostra di più…

  1. Cen-Tech Seven Function Digital Multimeter Dial Replacement, Position Device: passo 1, immagine 1 di 1
    • Place the meter face down, and the back panel and screws can be seen.

  2. Cen-Tech Seven Function Digital Multimeter Dial Replacement, Remove Back Panel Screws: passo 2, immagine 1 di 2 Cen-Tech Seven Function Digital Multimeter Dial Replacement, Remove Back Panel Screws: passo 2, immagine 2 di 2
    • Unscrew the two 9mm screws on the back panel using a #0 Phillips screwdriver.

  3. Cen-Tech Seven Function Digital Multimeter Dial Replacement, Remove Back Panel: passo 3, immagine 1 di 1
    • Remove the back panel of the device by lifting upward.

    • Remove the battery from the meter before continuing.

  4. Cen-Tech Seven Function Digital Multimeter Dial Replacement, Unscrew Motherboard: passo 4, immagine 1 di 2 Cen-Tech Seven Function Digital Multimeter Dial Replacement, Unscrew Motherboard: passo 4, immagine 2 di 2
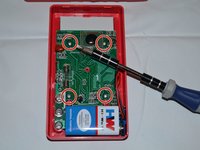
    • Remove the four 7mm Phillips screws holding the circuit board in place.

  5. Cen-Tech Seven Function Digital Multimeter Dial Replacement, Remove Motherboard: passo 5, immagine 1 di 1
    • Gently lift the circuit board away from the device casing.

    • Remove the battery after removing the back cover to reduce the chances of short-circuiting the circuit board.

  6. Cen-Tech Seven Function Digital Multimeter Dial Replacement, Locate Dial: passo 6, immagine 1 di 1
    • The dial is located in the central part of the device.

  7. Cen-Tech Seven Function Digital Multimeter Dial Replacement, Remove Dial: passo 7, immagine 1 di 1
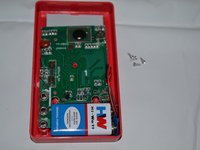
    • Carefully remove dial from device by lifting upward.

    • Clean existing dial or replace if necessary.

    • Take care not to lose the small ball bearings.

Conclusione

To reassemble your device, follow these instructions in reverse order.

Un'altra persona ha completato questa guida.

Anna Kihm

Membro da: 10/13/14

956 Reputazione

5 Guide realizzate

Team

Clemson, Team 2-4, Benson Fall 2014 Membro di Clemson, Team 2-4, Benson Fall 2014

CLEM-BENSON-F14S2G4

4 Membri

6 Guide realizzate

0Commenti sulla guida

Aggiungi Commento

Visualizza Statistiche:

Ultime 24 Ore: 0

Ultimi 7 Giorni: 0

Ultimi 30 Giorni: 6

Tutti i Tempi: 939