Salta al contenuto principale

Questa versione può contenere modifiche errate. Passa all'ultima istantanea verificata.

Guida Archiviata
Questa guida è mantenuta solo per scopi storici. Usa la versione aggiornata della guida per eseguire la riparazione.

Cosa ti serve

  1. Questo passaggio è privo di traduzione. Aiuta a tradurlo

    : passo 1, immagine 1 di 1
    • This device is waterproof and well sealed, so it is difficult to open this handset.

    • Start by opening the cover of the handset.

    • Do not use your nails to open the cover. Use the iFixit Opening Tool (refer to the image).

  2. Questo passaggio è privo di traduzione. Aiuta a tradurlo

    : passo 2, immagine 1 di 2 : passo 2, immagine 2 di 2
    • Move the orange tab to the right side to take out the battery.

    • Remove the battery.

  3. Questo passaggio è privo di traduzione. Aiuta a tradurlo

    : passo 3, immagine 1 di 2 : passo 3, immagine 2 di 2
    • Using the Phillips #00 screwdriver remove the front and back 5.0 mm screws as shown in the picture.

    • There are four screws in the back and two screws in the front.

  4. Questo passaggio è privo di traduzione. Aiuta a tradurlo

    : passo 4, immagine 1 di 3 : passo 4, immagine 2 di 3 : passo 4, immagine 3 di 3
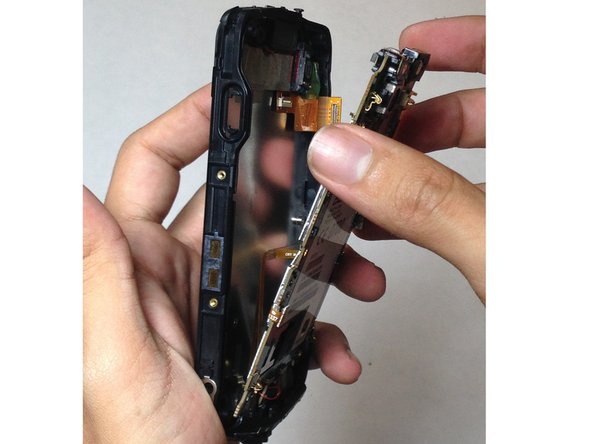
    • Gently remove the side cover from the phone by lifting up on the corners as shown in the picture.

    • Press down on the screen to help remove the plastic side cover from the phone.

    • Make sure to push gently because the frame is fragile.

  5. Questo passaggio è privo di traduzione. Aiuta a tradurlo

    : passo 5, immagine 1 di 1
    • Pull the side front cover off the face of the phone.

  6. Questo passaggio è privo di traduzione. Aiuta a tradurlo

    : passo 6, immagine 1 di 3 : passo 6, immagine 2 di 3 : passo 6, immagine 3 di 3
    • Remove the eight 2.5mm Phillips #00 screws in the holes of the casing.

  7. Questo passaggio è privo di traduzione. Aiuta a tradurlo

    : passo 7, immagine 1 di 1
    • Gently pull off the motherboard cover.

  8. Questo passaggio è privo di traduzione. Aiuta a tradurlo

    : passo 8, immagine 1 di 1
    • Using the Phillips #00, remove all 2.5 mm screws attached to the motherboard.

    • Do not touch the integrated circuits in the motherboard.

  9. Questo passaggio è privo di traduzione. Aiuta a tradurlo

    : passo 9, immagine 1 di 2 : passo 9, immagine 2 di 2
    • Gently remove the motherboard with the spudger.

Linea Traguardo

Altre 4 persone hanno completato questa guida.

Brett Boehm

Membro da: 09/25/14

281 Reputazione

2 Guide realizzate

Team

USF Tampa, Team 1-5, Brown Fall 2014 Membro di USF Tampa, Team 1-5, Brown Fall 2014

USFT-BROWN-F14S1G5

3 Membri

3 Guide realizzate

0 Commenti

Aggiungi Commento

Visualizza Statistiche:

Ultime 24 Ore: 0

Ultimi 7 Giorni: 0

Ultimi 30 Giorni: 1

Tutti i Tempi: 822