Salta al contenuto principale

Carburetor cleaning with Ultrasonic Tank - Sterwins PHT25 4CC 55 CM

Cosa ti serve

  1. Carburetor cleaning with Ultrasonic Tank - Sterwins PHT25 4CC 55 CM, Necessary tools: passo 1, immagine 1 di 2 Carburetor cleaning with Ultrasonic Tank - Sterwins PHT25 4CC 55 CM, Necessary tools: passo 1, immagine 2 di 2
    • A flathead screwdriver

    • A Phillips head screwdriver

    • A T25 torx wrench

    • A Carburetor Adjusting Hex Screwdriver

  2. Carburetor cleaning with Ultrasonic Tank - Sterwins PHT25 4CC 55 CM, Remove the air filter: passo 2, immagine 1 di 3 Carburetor cleaning with Ultrasonic Tank - Sterwins PHT25 4CC 55 CM, Remove the air filter: passo 2, immagine 2 di 3 Carburetor cleaning with Ultrasonic Tank - Sterwins PHT25 4CC 55 CM, Remove the air filter: passo 2, immagine 3 di 3
    • Unclip the air filter cover.

    • Extract the air filter.

    • Filter and carburetor case fixing screws

  3. Carburetor cleaning with Ultrasonic Tank - Sterwins PHT25 4CC 55 CM, Dismantling the carburetor: passo 3, immagine 1 di 3 Carburetor cleaning with Ultrasonic Tank - Sterwins PHT25 4CC 55 CM, Dismantling the carburetor: passo 3, immagine 2 di 3 Carburetor cleaning with Ultrasonic Tank - Sterwins PHT25 4CC 55 CM, Dismantling the carburetor: passo 3, immagine 3 di 3
    • In an anticlockwise movement, unscrew the two fixing screws using a T25 torx key.

    • Remove the two screws and then the filter case.

    • Remove the carburetor.

  4. Carburetor cleaning with Ultrasonic Tank - Sterwins PHT25 4CC 55 CM, Carburettor disassembly: passo 4, immagine 1 di 3 Carburetor cleaning with Ultrasonic Tank - Sterwins PHT25 4CC 55 CM, Carburettor disassembly: passo 4, immagine 2 di 3 Carburetor cleaning with Ultrasonic Tank - Sterwins PHT25 4CC 55 CM, Carburettor disassembly: passo 4, immagine 3 di 3
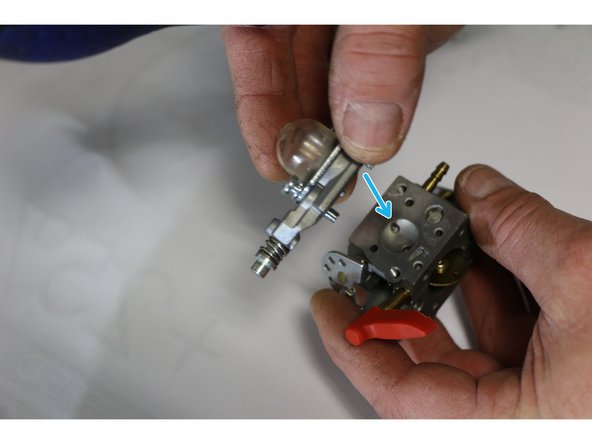
    • Unhook the accelerator cable. Make sure to remember the location.

    • Extract the transparent fuel return hose.

    • Extract the black fuel inlet hose.

  5. Carburetor cleaning with Ultrasonic Tank - Sterwins PHT25 4CC 55 CM, Carburetor Disassembly 1/5: passo 5, immagine 1 di 3 Carburetor cleaning with Ultrasonic Tank - Sterwins PHT25 4CC 55 CM, Carburetor Disassembly 1/5: passo 5, immagine 2 di 3 Carburetor cleaning with Ultrasonic Tank - Sterwins PHT25 4CC 55 CM, Carburetor Disassembly 1/5: passo 5, immagine 3 di 3
    • Unscrew the two priming pump attachment screws by turning them counterclockwise.

    • Remove the pump.

    • Peel off the pump membrane.

  6. Carburetor cleaning with Ultrasonic Tank - Sterwins PHT25 4CC 55 CM, Carburetor Disassembly 2/5: passo 6, immagine 1 di 3 Carburetor cleaning with Ultrasonic Tank - Sterwins PHT25 4CC 55 CM, Carburetor Disassembly 2/5: passo 6, immagine 2 di 3 Carburetor cleaning with Ultrasonic Tank - Sterwins PHT25 4CC 55 CM, Carburetor Disassembly 2/5: passo 6, immagine 3 di 3
    • Once the pump is disassembled, turn the carburetor 180° to access the four mounting screws.

    • Use a Phillips screwdriver to remove the four membrane cover screws.

  7. Carburetor cleaning with Ultrasonic Tank - Sterwins PHT25 4CC 55 CM, Carburetor disassembly 3/5: passo 7, immagine 1 di 3 Carburetor cleaning with Ultrasonic Tank - Sterwins PHT25 4CC 55 CM, Carburetor disassembly 3/5: passo 7, immagine 2 di 3 Carburetor cleaning with Ultrasonic Tank - Sterwins PHT25 4CC 55 CM, Carburetor disassembly 3/5: passo 7, immagine 3 di 3
    • Remove the membrane cover.

    • Remove the needle lever membrane with the membrane seal.

    • Note: The membrane lever will act on the needle lever.

  8. Carburetor cleaning with Ultrasonic Tank - Sterwins PHT25 4CC 55 CM, Carburetor disassembly 4/5: passo 8, immagine 1 di 3 Carburetor cleaning with Ultrasonic Tank - Sterwins PHT25 4CC 55 CM, Carburetor disassembly 4/5: passo 8, immagine 2 di 3 Carburetor cleaning with Ultrasonic Tank - Sterwins PHT25 4CC 55 CM, Carburetor disassembly 4/5: passo 8, immagine 3 di 3
    • Unscrew the screw that holds the needle lever shaft.

    • CAUTION: Be sure to hold the lever with your thumb to prevent the spring from popping out.

    • Remove the lever, the spring, and the needle.

  9. Carburetor cleaning with Ultrasonic Tank - Sterwins PHT25 4CC 55 CM, Carburetor disassembly 5/5: passo 9, immagine 1 di 3 Carburetor cleaning with Ultrasonic Tank - Sterwins PHT25 4CC 55 CM, Carburetor disassembly 5/5: passo 9, immagine 2 di 3 Carburetor cleaning with Ultrasonic Tank - Sterwins PHT25 4CC 55 CM, Carburetor disassembly 5/5: passo 9, immagine 3 di 3
    • Set screw

    • Unscrew the two adjustment screws counterclockwise using the specific adjustment screwdriver.

    • Extract the two screws.

  10. Carburetor cleaning with Ultrasonic Tank - Sterwins PHT25 4CC 55 CM, Cleaning the carburettor in the tank: passo 10, immagine 1 di 3 Carburetor cleaning with Ultrasonic Tank - Sterwins PHT25 4CC 55 CM, Cleaning the carburettor in the tank: passo 10, immagine 2 di 3 Carburetor cleaning with Ultrasonic Tank - Sterwins PHT25 4CC 55 CM, Cleaning the carburettor in the tank: passo 10, immagine 3 di 3
    • Immerse the carburetor in the ultrasonic bath for 15 to 20 minutes at a temperature between 25 and 35°.

    • Remove the carburetor from the ultrasonic bath.

    • Rinse the carburetor with water, dry it by blowing it out with compressed air.

  11. Carburetor cleaning with Ultrasonic Tank - Sterwins PHT25 4CC 55 CM, Carburetor reassembly: passo 11, immagine 1 di 3 Carburetor cleaning with Ultrasonic Tank - Sterwins PHT25 4CC 55 CM, Carburetor reassembly: passo 11, immagine 2 di 3 Carburetor cleaning with Ultrasonic Tank - Sterwins PHT25 4CC 55 CM, Carburetor reassembly: passo 11, immagine 3 di 3
    • Reinstall the spring and needle.

    • Use a flat screwdriver to hold the lever in place.

    • Tighten the screw that holds the axis of the lever using a Phillips screwdriver.

  12. Carburetor cleaning with Ultrasonic Tank - Sterwins PHT25 4CC 55 CM, Carburetor reassembly: passo 12, immagine 1 di 3 Carburetor cleaning with Ultrasonic Tank - Sterwins PHT25 4CC 55 CM, Carburetor reassembly: passo 12, immagine 2 di 3 Carburetor cleaning with Ultrasonic Tank - Sterwins PHT25 4CC 55 CM, Carburetor reassembly: passo 12, immagine 3 di 3
    • Reinstall the needle lever membrane and the membrane gasket

    • Reinstall the membrane cover.

    • Tighten the four cover fixing screws using a Phillips screwdriver in a clockwise direction.

  13. Carburetor cleaning with Ultrasonic Tank - Sterwins PHT25 4CC 55 CM, Carburetor reassembly: passo 13, immagine 1 di 3 Carburetor cleaning with Ultrasonic Tank - Sterwins PHT25 4CC 55 CM, Carburetor reassembly: passo 13, immagine 2 di 3 Carburetor cleaning with Ultrasonic Tank - Sterwins PHT25 4CC 55 CM, Carburetor reassembly: passo 13, immagine 3 di 3
    • Reinsert the two adjustment screws.

    • Screw them in as far as they will go without forcing them clockwise with the adjustment screwdriver.

    • Pre-adjust the carburettor by unscrewing the two screws one and a half turns counter-clockwise

  14. Carburetor cleaning with Ultrasonic Tank - Sterwins PHT25 4CC 55 CM, Carburetor reassembly: passo 14, immagine 1 di 3 Carburetor cleaning with Ultrasonic Tank - Sterwins PHT25 4CC 55 CM, Carburetor reassembly: passo 14, immagine 2 di 3 Carburetor cleaning with Ultrasonic Tank - Sterwins PHT25 4CC 55 CM, Carburetor reassembly: passo 14, immagine 3 di 3
    • Take the pump cover.

    • Reposition the pump membrane and its seal.

    • Replace the pump cover and tighten the two fixing screws clockwise using a Phillips screwdriver.

  15. Carburetor cleaning with Ultrasonic Tank - Sterwins PHT25 4CC 55 CM, Carburetor reassembly: passo 15, immagine 1 di 3 Carburetor cleaning with Ultrasonic Tank - Sterwins PHT25 4CC 55 CM, Carburetor reassembly: passo 15, immagine 2 di 3 Carburetor cleaning with Ultrasonic Tank - Sterwins PHT25 4CC 55 CM, Carburetor reassembly: passo 15, immagine 3 di 3
    • Reinstall the black fuel inlet hose.

    • Reinstall the transparent fuel return hose.

    • Reattach the throttle cable.

  16. Carburetor cleaning with Ultrasonic Tank - Sterwins PHT25 4CC 55 CM, Carburetor reassembly: passo 16, immagine 1 di 3 Carburetor cleaning with Ultrasonic Tank - Sterwins PHT25 4CC 55 CM, Carburetor reassembly: passo 16, immagine 2 di 3 Carburetor cleaning with Ultrasonic Tank - Sterwins PHT25 4CC 55 CM, Carburetor reassembly: passo 16, immagine 3 di 3
    • Insert the two fixing screws in the air filter housing and then in the carburetor body.

    • ATTENTION: Make sure that the fixing screws align with the holes of the gasket.

    • Tighten the fixing screws clockwise using the T25 Torx key.

  17. Carburetor cleaning with Ultrasonic Tank - Sterwins PHT25 4CC 55 CM, Refitting the air filter: passo 17, immagine 1 di 2 Carburetor cleaning with Ultrasonic Tank - Sterwins PHT25 4CC 55 CM, Refitting the air filter: passo 17, immagine 2 di 2
    • Refit the air filter.

    • Reclips the filter cover.

Linea Traguardo

Un'altra persona ha completato questa guida.

Un ringraziamento speciale a questi traduttori:

fr en

100%

Questi traduttori ci stanno aiutando ad aggiustare il mondo! Vuoi partecipare?
Inizia a tradurre ›

iRobot

Membro da: 09/24/09

1 Reputazione

636 Guide realizzate

0 Commenti

Aggiungi Commento

Visualizza Statistiche:

Ultime 24 Ore: 3

Ultimi 7 Giorni: 11

Ultimi 30 Giorni: 67

Tutti i Tempi: 4,956