Salta al contenuto principale
Unisciti alla Community delle riparazioni - Crea un account
Capresso Perfectea 260 Control System Replacement

Capresso Perfectea 260 Control System Replacement

Kenji Anzai

Kenji Anzai e un altro collaboratore

Ultimo aggiornamento il 24 giu 2015

30 - 45 minuti
Moderato
Immagini Non Adeguate

Introduzione

Vai al passo 1

If you need to repair any of the wires or computer chips, use this guide to remove these components for repair and replacement.

Cosa ti serve

Strumenti

Mostra di più…

  1. Capresso Perfectea 260 Control System Replacement, Motherboard: passo 1, immagine 1 di 1
    • First, take the base of the device and flip it over.

  2. Capresso Perfectea 260 Control System Replacement: passo 2, immagine 1 di 2 Capresso Perfectea 260 Control System Replacement: passo 2, immagine 2 di 2
    • Remove the four 12 mm Phillips #2 screws surrounding the base then lift the bottom half of the base to expose the circuit boards inside the device.

  3. Capresso Perfectea 260 Control System Replacement: passo 3, immagine 1 di 1
    • Remove the two 7.5 mm Phillips #2 screws holding in the motherboard

  4. Capresso Perfectea 260 Control System Replacement: passo 4, immagine 1 di 1
    • Unplug the wire going into the side of the motherboard

  5. Capresso Perfectea 260 Control System Replacement: passo 5, immagine 1 di 2 Capresso Perfectea 260 Control System Replacement: passo 5, immagine 2 di 2
    • Use the metal spudger to cut open the rubber covering the latch where it clamps onto the copper tab.

    • Unplug wire at heating element by first using the metal spudger to push the latch in and then pushing it out.

    • Be careful when unplugging the wire as if it is done too forcefully it can damage the connection and make it difficult to connect a new motherboard

  6. Capresso Perfectea 260 Control System Replacement: passo 6, immagine 1 di 1
    • Lift the motherboard out of the device

  7. Capresso Perfectea 260 Control System Replacement, Control System: passo 7, immagine 1 di 2 Capresso Perfectea 260 Control System Replacement, Control System: passo 7, immagine 2 di 2
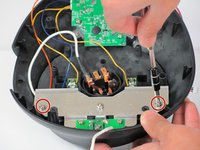
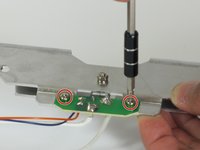
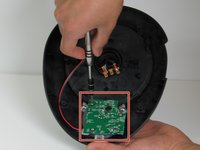
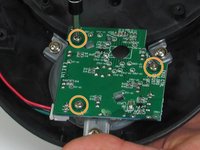
    • Remove the two 7.5mm Phillips #2 screws from the metal frame.

    • Remove the frame from the assembly.

  8. Capresso Perfectea 260 Control System Replacement: passo 8, immagine 1 di 3 Capresso Perfectea 260 Control System Replacement: passo 8, immagine 2 di 3 Capresso Perfectea 260 Control System Replacement: passo 8, immagine 3 di 3
    • Remove the two 6mm fine thread Phillips #2 screws attaching the small computer chip to the metal frame.

    • Flip over and remove the 7.5 mm fine thread Phillips #2 screw from the back while holding the 5mm nut on the front securely.

  9. Capresso Perfectea 260 Control System Replacement: passo 9, immagine 1 di 3 Capresso Perfectea 260 Control System Replacement: passo 9, immagine 2 di 3 Capresso Perfectea 260 Control System Replacement: passo 9, immagine 3 di 3
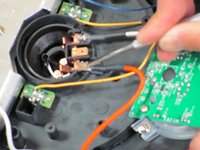
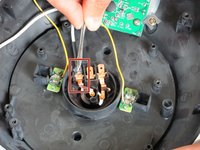
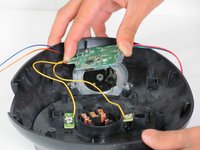
    • Find the cable that attaches the small computer chip to the heating element connections.

    • Use the spudger to cut open the rubber coating on the latch where it clamps onto the copper tab.

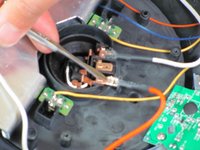
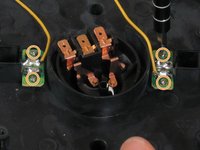
    • Insert the metal spudger into the rectangular hole on the latch and push toward the tab (away from the wire) to unbend the tab.

    • Push the latch off the tab with the spudger.

    • The tab will come loose suddenly. Make sure that you apply force in a controlled manner to avoid injuring yourself or damaging the other components.

  10. Capresso Perfectea 260 Control System Replacement: passo 10, immagine 1 di 3 Capresso Perfectea 260 Control System Replacement: passo 10, immagine 2 di 3 Capresso Perfectea 260 Control System Replacement: passo 10, immagine 3 di 3
    • Identify the two computer chips that connect the two yellow wires to the temperature controls.

    • Remove the four 5 mm Phillips #1 screws.

    • Remove the two computer chips from their places.

    • The two computer chips are held in place by plastic interference pins. Wiggle the board free of these pins to remove.

  11. Capresso Perfectea 260 Control System Replacement: passo 11, immagine 1 di 3 Capresso Perfectea 260 Control System Replacement: passo 11, immagine 2 di 3 Capresso Perfectea 260 Control System Replacement: passo 11, immagine 3 di 3
    • Find the computer chip over the dial.

    • Remove the three 6mm Phillips #2 screws.

    • Remove the computer chip.

    • Remember the orientation of the computer chip on the dial and which peg goes into which hole.

    • Keep the plastic frame on the bottom of the chip attached.

  12. Capresso Perfectea 260 Control System Replacement: passo 12, immagine 1 di 1
    • Unplug the four cables on the left side of the chip.

    • Remember which cable goes to which plug.

Conclusione

To reassemble your device, follow these instructions in reverse order.

Un'altra persona ha completato questa guida.

Kenji Anzai

Membro da: 04/14/15

594 Reputazione

4 Guide realizzate

Team

Cal Poly, Team 6-17, Maness Spring 2015 Membro di Cal Poly, Team 6-17, Maness Spring 2015

CPSU-MANESS-S15S6G17

4 Membri

6 Guide realizzate

0Commenti sulla guida

Aggiungi Commento

Visualizza Statistiche:

Ultime 24 Ore: 0

Ultimi 7 Giorni: 9

Ultimi 30 Giorni: 35

Tutti i Tempi: 2,464