Salta al contenuto principale

Questa guida ha delle modifiche più recenti. Passa all'ultima versione non verificata.

Canon Powershot SD550 Motherboard Replacement

Cosa ti serve

  1. Canon Powershot SD550 Motherboard Replacement, Outer Case: passo 1, immagine 1 di 1
    • Remove the battery and SD card from the camera.

  2. Canon Powershot SD550 Motherboard Replacement: passo 2, immagine 1 di 1
    • Remove the three 3.8 mm screws from the underside of the camera.

    • Each of the screws is slightly different, so it is important that you note the original location of each screw.

  3. Canon Powershot SD550 Motherboard Replacement: passo 3, immagine 1 di 3 Canon Powershot SD550 Motherboard Replacement: passo 3, immagine 2 di 3 Canon Powershot SD550 Motherboard Replacement: passo 3, immagine 3 di 3
    • Remove the 3.2 mm screw from the right side of the camera.

    • Remove the 2.2 mm screw from the right side of the camera.

    • One of these screws is hidden under the USB port cover.

    • Lift the side panel off.

    • Remove the 1.8 mm screw from underneath the side panel.

  4. Canon Powershot SD550 Motherboard Replacement: passo 4, immagine 1 di 3 Canon Powershot SD550 Motherboard Replacement: passo 4, immagine 2 di 3 Canon Powershot SD550 Motherboard Replacement: passo 4, immagine 3 di 3
    • Remove the two 2.2 mm screws from the left side of the camera.

    • Lift the plate from the camera.

  5. Canon Powershot SD550 Motherboard Replacement: passo 5, immagine 1 di 3 Canon Powershot SD550 Motherboard Replacement: passo 5, immagine 2 di 3 Canon Powershot SD550 Motherboard Replacement: passo 5, immagine 3 di 3
    • Gently lift the rear of the case to remove it from the camera.

  6. Canon Powershot SD550 Motherboard Replacement: passo 6, immagine 1 di 3 Canon Powershot SD550 Motherboard Replacement: passo 6, immagine 2 di 3 Canon Powershot SD550 Motherboard Replacement: passo 6, immagine 3 di 3
    • Remove the front of the camera body.

    • Be sure to keep track of the rubber ring.

  7. Canon Powershot SD550 Motherboard Replacement, LCD Screen: passo 7, immagine 1 di 3 Canon Powershot SD550 Motherboard Replacement, LCD Screen: passo 7, immagine 2 di 3 Canon Powershot SD550 Motherboard Replacement, LCD Screen: passo 7, immagine 3 di 3
    • Peel the navigation buttons from the button panel and set them aside.

    • To free the LCD display, remove the 2.9 mm screw in the top left corner.

    • Rotate the screen clockwise until it lifts away from the camera.

    • There are two ribbon cables attached to the rear of the screen. Do not try to pull the screen off at this point.

  8. Canon Powershot SD550 Motherboard Replacement: passo 8, immagine 1 di 2 Canon Powershot SD550 Motherboard Replacement: passo 8, immagine 2 di 2
    • To unplug the ribbon cables, pull them straight out of their plugs. Do this gently to avoid damaging the connections.

    • After disconnecting both cables, pull the screen away from the camera to remove it.

  9. Canon Powershot SD550 Motherboard Replacement, Motherboard: passo 9, immagine 1 di 2 Canon Powershot SD550 Motherboard Replacement, Motherboard: passo 9, immagine 2 di 2
    • Unscrew the two .135 inch screws still holding the button contact panel onto the camera.

    • Using the spudger, disconnect the ribbon cable attaching the button contact panel to the motherboard.

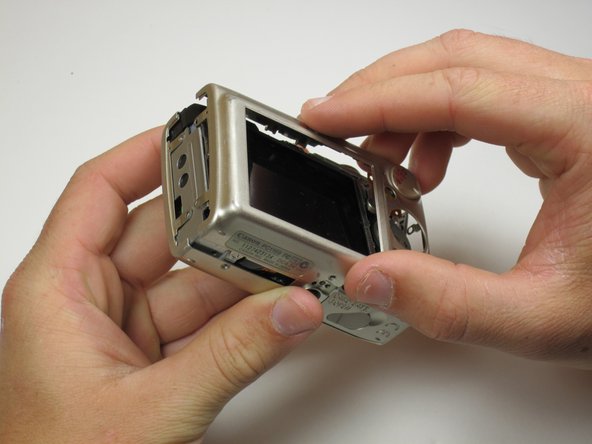
    • Gently pull the button contact panel away from the motherboard.

  10. Canon Powershot SD550 Motherboard Replacement: passo 10, immagine 1 di 2 Canon Powershot SD550 Motherboard Replacement: passo 10, immagine 2 di 2
    • Underneath the button contact panel, you will find a large connector.

    • Using the spudger as leverage, unplug the connector and pull it away from the motherboard.

  11. Canon Powershot SD550 Motherboard Replacement: passo 11, immagine 1 di 3 Canon Powershot SD550 Motherboard Replacement: passo 11, immagine 2 di 3 Canon Powershot SD550 Motherboard Replacement: passo 11, immagine 3 di 3
    • The last ribbon is held in place by the blue flap. Insert the spudger under the blue flap.

    • Using the spudger as leverage, flip the blue flap up, unlocking the ribbon.

    • Place the spudger into the hole in the ribbon and pull the ribbon away from the connector.

  12. Canon Powershot SD550 Motherboard Replacement: passo 12, immagine 1 di 1
    • The motherboard is now disconnected from the camera.

    • Remove the motherboard by pulling it out with either tweezers or the spudger.

Conclusione

To reassemble your device, follow these instructions in reverse order.

Luke Thompson

Membro da: 04/17/11

11 Reputazione

1 Guida realizzata

Team

Cal Poly, Team 18-23, Garner Spring 2011 Membro di Cal Poly, Team 18-23, Garner Spring 2011

CPSU-GARNER-S11S18G23

5 Membri

7 Guide realizzate

0 Commenti

Aggiungi Commento

Visualizza Statistiche:

Ultime 24 Ore: 0

Ultimi 7 Giorni: 0

Ultimi 30 Giorni: 1

Tutti i Tempi: 1,580