Salta al contenuto principale

Questa guida ha delle modifiche più recenti. Passa all'ultima versione non verificata.

Canon Powershot S200 Motherboard Replacement

Cosa ti serve

  1. Canon Powershot S200 Motherboard Replacement, Battery: passo 1, immagine 1 di 2 Canon Powershot S200 Motherboard Replacement, Battery: passo 1, immagine 2 di 2
    • Slide the grey latch to open the battery compartment.

  2. Canon Powershot S200 Motherboard Replacement: passo 2, immagine 1 di 2 Canon Powershot S200 Motherboard Replacement: passo 2, immagine 2 di 2
    • Push and slide the orange retaining clip to the right to remove the battery.

  3. Canon Powershot S200 Motherboard Replacement: passo 3, immagine 1 di 1
    • Remove battery from the camera.

  4. Canon Powershot S200 Motherboard Replacement, Motherboard: passo 4, immagine 1 di 1
    • Remove the lanyard.

  5. Canon Powershot S200 Motherboard Replacement: passo 5, immagine 1 di 1
    • Be careful to keep track of the different screw sizes as you proceed with this guide.

    • Find the bottom face of the camera. Remove the two 2.3mm screws beneath the name plate and the two 2.8 mm screws surrounding the threaded tripod mount.

  6. Canon Powershot S200 Motherboard Replacement: passo 6, immagine 1 di 1
    • Remove the 3.8mm screw from the back face of the camera.

  7. Canon Powershot S200 Motherboard Replacement: passo 7, immagine 1 di 1
    • Remove the two 2.3mm screws from the right face of the camera.

  8. Canon Powershot S200 Motherboard Replacement: passo 8, immagine 1 di 1
    • Remove the two outer 3.2mm screws from the left side of the camera

    • Remove the two inner 3.7mm screws from the left side of the camera.

  9. Canon Powershot S200 Motherboard Replacement: passo 9, immagine 1 di 1
    • Pull the back face panel away from the front end of the body. This may take some wiggling and force.

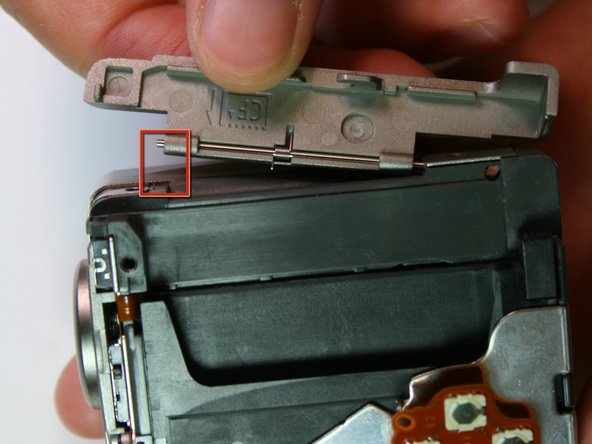
  10. Canon Powershot S200 Motherboard Replacement: passo 10, immagine 1 di 2 Canon Powershot S200 Motherboard Replacement: passo 10, immagine 2 di 2
    • Remove the CF card door from the left side of the camera body.

  11. Canon Powershot S200 Motherboard Replacement: passo 11, immagine 1 di 2 Canon Powershot S200 Motherboard Replacement: passo 11, immagine 2 di 2
    • Slide the rubber digital a/v cap out of place on the front plate.

  12. Canon Powershot S200 Motherboard Replacement: passo 12, immagine 1 di 1
    • Remove the front face by sliding it off.

  13. Canon Powershot S200 Motherboard Replacement: passo 13, immagine 1 di 1
    • Remove the rubber seal that covers the right side of the viewfinder.

  14. Canon Powershot S200 Motherboard Replacement: passo 14, immagine 1 di 1
    • Remove the two 3.9mm screws that hold the laminated cooper sheet.

  15. Canon Powershot S200 Motherboard Replacement: passo 15, immagine 1 di 2 Canon Powershot S200 Motherboard Replacement: passo 15, immagine 2 di 2
    • Remove the wire connections that connect along the bottom of the motherboard.

  16. Canon Powershot S200 Motherboard Replacement: passo 16, immagine 1 di 1
    • Remove the single 3.8mm screw that is on the motherboard.

  17. Canon Powershot S200 Motherboard Replacement: passo 17, immagine 1 di 1
    • Remove the motherboard from the main frame of the camera body.

Conclusione

To reassemble your device, follow these instructions in reverse order.

Orlando Zuniga

Membro da: 04/14/11

11 Reputazione

1 Guida realizzata

Team

Cal Poly, Team 20-70, Walters Spring 2011 Membro di Cal Poly, Team 20-70, Walters Spring 2011

CPSU-WALTERS-S11S20G70

5 Membri

4 Guide realizzate

0 Commenti

Aggiungi Commento

Visualizza Statistiche:

Ultime 24 Ore: 0

Ultimi 7 Giorni: 1

Ultimi 30 Giorni: 2

Tutti i Tempi: 1,879