Salta al contenuto principale
Unisciti alla Community delle riparazioni - Crea un account

Canon PowerShot SD850 IS Motherboard Replacement

Cosa ti serve

    1. Canon PowerShot SD850 IS Motherboard Replacement, Battery: passo 1, immagine 1 di 3 Canon PowerShot SD850 IS Motherboard Replacement, Battery: passo 1, immagine 2 di 3 Canon PowerShot SD850 IS Motherboard Replacement, Battery: passo 1, immagine 3 di 3
      • Slide the light grey tab toward the edge of the camera using your fingernail.

      • Pull the light grey tab up to open the door.

      • These photos do not show the camera’s memory card or battery, which should be visible inside.

      Chiedi a FixBot

      Aggiungi Commento

    2. Canon PowerShot SD850 IS Motherboard Replacement: passo 2, immagine 1 di 2 Canon PowerShot SD850 IS Motherboard Replacement: passo 2, immagine 2 di 2
      • Slide the small brown tab toward the edge of the camera using your fingernail.

      • Let go of the brown tab when the battery pops up.

      • Grab battery and pull straight up to remove from holder.

      • When inserting the battery, orient it so that the terminals connect.

      Chiedi a FixBot

      Aggiungi Commento

    1. Canon PowerShot SD850 IS Motherboard Replacement, Case: passo 3, immagine 1 di 2 Canon PowerShot SD850 IS Motherboard Replacement, Case: passo 3, immagine 2 di 2
      • Remove the following 4 screws:

      • Two 2.8 mm Phillips #00 at the bottom of the camera.

      • Two 2.75 mm Phillips #00 on the opposite side of the wrist strap.

      Chiedi a FixBot

      Aggiungi Commento

    2. Canon PowerShot SD850 IS Motherboard Replacement: passo 4, immagine 1 di 3 Canon PowerShot SD850 IS Motherboard Replacement: passo 4, immagine 2 di 3 Canon PowerShot SD850 IS Motherboard Replacement: passo 4, immagine 3 di 3
      • Open the A/V OUT DIGITAL flap on the side of the wrist strap.

      • Remove the 2.75 mm Phillips #00 under the A/V OUT DIGITAL flap on the side of the wrist strap.

      Chiedi a FixBot

      Aggiungi Commento

    3. Canon PowerShot SD850 IS Motherboard Replacement: passo 5, immagine 1 di 2 Canon PowerShot SD850 IS Motherboard Replacement: passo 5, immagine 2 di 2
      • On the bottom of the camera, use your fingernail to slide the light gray tab towards the edge of the camera.

      • Slide light gray door and pull up to open the door.

      • Remove the 8.35 mm Phillips #00 next to the brown tab that holds the battery.

      Chiedi a FixBot

      Aggiungi Commento

    4. Canon PowerShot SD850 IS Motherboard Replacement: passo 6, immagine 1 di 2 Canon PowerShot SD850 IS Motherboard Replacement: passo 6, immagine 2 di 2
      • Gently pull the front cover straight out from the camera. This will expose the wiring on the front of the camera.

      Chiedi a FixBot

      Aggiungi Commento

    5. Canon PowerShot SD850 IS Motherboard Replacement: passo 7, immagine 1 di 1
      • Remove the 2.75 mm Phillips #00 next to A/V OUT DIGITAL.

      Chiedi a FixBot

      Aggiungi Commento

    6. Canon PowerShot SD850 IS Motherboard Replacement: passo 8, immagine 1 di 1
      • Slide the back casing (with the screen protector) off to reveal the LCD and back wiring.

      Chiedi a FixBot

      Aggiungi Commento

    1. Canon PowerShot SD850 IS Motherboard Replacement, LCD Screen: passo 9, immagine 1 di 1
      • Remove the 1.75 mm Phillips #00 located at the top left of the LCD screen.

      Chiedi a FixBot

      Aggiungi Commento

    2. Canon PowerShot SD850 IS Motherboard Replacement: passo 10, immagine 1 di 1
      • Remove the two 3.4 mm Phillips #00 located at the bottom of the camera.

      Chiedi a FixBot

      Aggiungi Commento

    3. Canon PowerShot SD850 IS Motherboard Replacement: passo 11, immagine 1 di 2 Canon PowerShot SD850 IS Motherboard Replacement: passo 11, immagine 2 di 2
      • Remove the two metal frames that hold the LCD panel in place.

      Chiedi a FixBot

      Aggiungi Commento

    4. Canon PowerShot SD850 IS Motherboard Replacement: passo 12, immagine 1 di 1
      • The LCD screen should now only be attached by two LCD data cables.

      • Lift the screen from the left side and use a spudger or a small flat head screwdriver to flip the black portion of the connector upward to unlock it.

      • Carefully slide the data cable out of the connector.

      Chiedi a FixBot

      Aggiungi Commento

    5. Canon PowerShot SD850 IS Motherboard Replacement: passo 13, immagine 1 di 1
      • The LCD should still be connected by the backlight cable.

      • To remove the backlight cable, use a spudger or a small flat head screwdriver to unlock the backlight cable.

      • Carefully slide out the backlight cable.

      • The LCD screen can now be fully detached from the camera body.

      Chiedi a FixBot

      Aggiungi Commento

    6. Canon PowerShot SD850 IS Motherboard Replacement: passo 14, immagine 1 di 2 Canon PowerShot SD850 IS Motherboard Replacement: passo 14, immagine 2 di 2
      • The LCD screen and housing are now in three pieces:

      • LCD screen

      • LCD screen frame

      • LCD back housing

      • The LCD screen itself can now be removed and fixed/replaced.

      Chiedi a FixBot

      Aggiungi Commento

    1. Canon PowerShot SD850 IS Motherboard Replacement, Flash Unit: passo 15, immagine 1 di 1
      • Remove the 1.85 mm #00 Phillips located on the left side of the camera.

      Chiedi a FixBot

      Aggiungi Commento

    2. Canon PowerShot SD850 IS Motherboard Replacement: passo 16, immagine 1 di 2 Canon PowerShot SD850 IS Motherboard Replacement: passo 16, immagine 2 di 2
      Strumento utilizzato in questo passaggio:
      Tweezers
      $4.99
      • Use a set of tweezers to remove the speaker located at the top of the camera on the flash unit.

      • Next use the tweezers to carefully remove the speaker cable off its respective holders.

      Chiedi a FixBot

      Aggiungi Commento

    3. Canon PowerShot SD850 IS Motherboard Replacement: passo 17, immagine 1 di 1
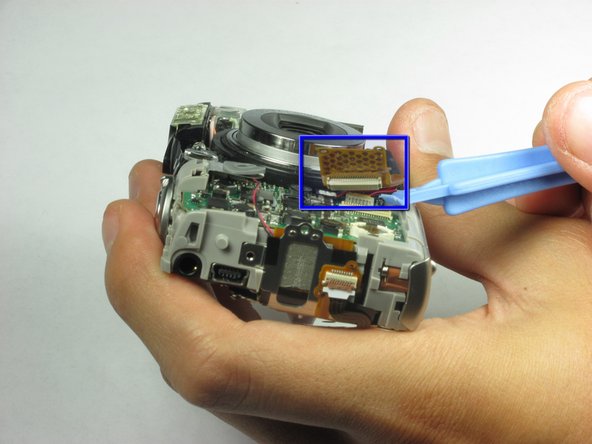
      • Use a spudger or a flathead screwdriver to remove the camera lens cable located in the front of the camera.

      Chiedi a FixBot

      Aggiungi Commento

    4. Canon PowerShot SD850 IS Motherboard Replacement: passo 18, immagine 1 di 2 Canon PowerShot SD850 IS Motherboard Replacement: passo 18, immagine 2 di 2
      • Use a spudger or a flathead screwdriver and carefully pry out the first flash cable from the bottom of the cable. The white 2 prong power cable pops UP (use spudger below red/black insertion and put upward pressure). For the yellow one, apply pressure horizontally.

      • Next use a spudger or a flathead screwdriver and carefully pry out the second flash cable.

      Chiedi a FixBot

      Aggiungi Commento

    5. Canon PowerShot SD850 IS Motherboard Replacement: passo 19, immagine 1 di 1
      • Gently remove the flash component from the rest of the camera.

      • Use a spudger or a flathead screwdriver and carefully pry off the plastic piece on top of the flash unit.

      • The flash unit can now be removed and replaced.

      • Be careful not to touch the capacitor attached to the flash unit as it may still be holding a charge!

      Chiedi a FixBot

      Aggiungi Commento

    1. Canon PowerShot SD850 IS Motherboard Replacement, Camera Lens: passo 20, immagine 1 di 1
      • Remove four screws located on the back of the camera:

      • 6.15 mm #00 Phillips

      • 2.75 mm #00 Phillips

      • 2.15 mm #00 Phillips

      • 2.7 mm #00 Phillips

      Chiedi a FixBot

      Aggiungi Commento

    2. Canon PowerShot SD850 IS Motherboard Replacement: passo 21, immagine 1 di 1
      • Use a spudger or a flathead screwdriver and carefully pry out the bulb located in the front of the camera on top of the camera lens.

      Chiedi a FixBot

      Aggiungi Commento

    3. Canon PowerShot SD850 IS Motherboard Replacement: passo 22, immagine 1 di 1
      • Gently remove the camera lens from the rest of the camera.

      Chiedi a FixBot

      Aggiungi Commento

    1. Canon PowerShot SD850 IS Motherboard Replacement, Motherboard: passo 23, immagine 1 di 1
      • Remove the 2.6 mm Phillips #00 located near the shutter release button.

      Chiedi a FixBot

      Aggiungi Commento

    2. Canon PowerShot SD850 IS Motherboard Replacement: passo 24, immagine 1 di 2 Canon PowerShot SD850 IS Motherboard Replacement: passo 24, immagine 2 di 2
      • Use a prying device or your fingers to release the ribbon from its holder.

      • Gently remove the shutter release component from the camera.

      Chiedi a FixBot

      Aggiungi Commento

    3. Canon PowerShot SD850 IS Motherboard Replacement: passo 25, immagine 1 di 2 Canon PowerShot SD850 IS Motherboard Replacement: passo 25, immagine 2 di 2
      • Remove the 3.4 mm Phillips #00 located under the camera.

      • Next use a prying device or your fingers to release the power trigger cable from its holder.

      Chiedi a FixBot

      Aggiungi Commento

    4. Canon PowerShot SD850 IS Motherboard Replacement: passo 26, immagine 1 di 1
      • Use a prying device or your fingers to release the ribbon from their respective holders located at the top of the camera.

      Chiedi a FixBot

      Aggiungi Commento

    5. Canon PowerShot SD850 IS Motherboard Replacement: passo 27, immagine 1 di 2 Canon PowerShot SD850 IS Motherboard Replacement: passo 27, immagine 2 di 2
      • Use a spudger or a flathead screwdriver to unlock the ribbon located at the back of the camera.

      • Then gently slide out the ribbon.

      Chiedi a FixBot

      Aggiungi Commento

    6. Canon PowerShot SD850 IS Motherboard Replacement: passo 28, immagine 1 di 1
      • The whole ribbon and metal casing can now be easily removed from the remains of the camera.

      Chiedi a FixBot

      Aggiungi Commento

    7. Canon PowerShot SD850 IS Motherboard Replacement: passo 29, immagine 1 di 1
      • Use a spudger or a flathead screwdriver to release the motherboard cable.

      Chiedi a FixBot

      Aggiungi Commento

    8. Canon PowerShot SD850 IS Motherboard Replacement: passo 30, immagine 1 di 1
      • Next remove the 3.4 mm Phillips #00 located in front of the camera. wisdom here.

      Chiedi a FixBot

      Aggiungi Commento

    9. Canon PowerShot SD850 IS Motherboard Replacement: passo 31, immagine 1 di 1
      • Now the motherboard can be gently removed from the metal casing.

      Chiedi a FixBot

      Aggiungi Commento

Conclusione

To reassemble your device, follow these instructions in reverse order.

Annulla: non ho completato questa guida.

Peter Tran

Membro da: 10/06/10

252 Reputazione

6 guide realizzate

Team

Cal Poly, Team 20-7, Maness Fall 2010 Membro di Cal Poly, Team 20-7, Maness Fall 2010

CPSU-MANESS-F10S20G7

6 Membri

84 guide realizzate

0Commenti sulla guida

Aggiungi Commento

Visualizza statistiche:

Ultime 24 ore: 1

Ultimi 7 giorni: 26

Ultimi 30 giorni: 52

Tutti i Tempi: 3,450