Salta al contenuto principale

Canon PowerShot ELPH 310 HS Shutter Button Replacement

Cosa ti serve

  1. Canon PowerShot ELPH 310 HS Shutter Button Replacement, External Panels: passo 1, immagine 1 di 1
    • Use the Phillips #000 screwdriver from the iFixit tool kit to unscrew the two image stabilizer panel’s 2 mm Phillips head screws.

    • Using your hands, remove the image stabilizer panel.

  2. Canon PowerShot ELPH 310 HS Shutter Button Replacement: passo 2, immagine 1 di 2 Canon PowerShot ELPH 310 HS Shutter Button Replacement: passo 2, immagine 2 di 2
    • Unscrew the two 4 mm Phillips head screws from the bottom side of the camera.

  3. Canon PowerShot ELPH 310 HS Shutter Button Replacement: passo 3, immagine 1 di 2 Canon PowerShot ELPH 310 HS Shutter Button Replacement: passo 3, immagine 2 di 2
    • Using your hand, open the battery portal located on the bottom left of the camera. The screw is in the bottom left of the battery portal.

    • Unscrew the hidden 4mm Phillips head screw inside the battery portal.

  4. Canon PowerShot ELPH 310 HS Shutter Button Replacement: passo 4, immagine 1 di 2 Canon PowerShot ELPH 310 HS Shutter Button Replacement: passo 4, immagine 2 di 2
    • Remove the HDMI side panel with your hands.

    • Unscrew the four 4 mm Phillips head screws from the inside of the camera.

  5. Canon PowerShot ELPH 310 HS Shutter Button Replacement: passo 5, immagine 1 di 1
    • The back side of the camera should pop off or be removed by hand.

  6. Canon PowerShot ELPH 310 HS Shutter Button Replacement: passo 6, immagine 1 di 2 Canon PowerShot ELPH 310 HS Shutter Button Replacement: passo 6, immagine 2 di 2
    • Unscrew the one 3 mm Phillips head screw on the top of the camera.

  7. Canon PowerShot ELPH 310 HS Shutter Button Replacement: passo 7, immagine 1 di 1
    • Manually remove the front panel from the camera.

  8. Canon PowerShot ELPH 310 HS Shutter Button Replacement, Shutter Button: passo 8, immagine 1 di 1
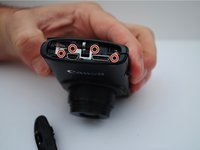
    • Using your hand, lift and remove the shutter button deck from the top of camera.

    • The front clasp is fragile.

  9. Canon PowerShot ELPH 310 HS Shutter Button Replacement: passo 9, immagine 1 di 1
    • Unclip the cables from the front of the motherboard, using your hands.

Conclusione

To reassemble your device, follow these instructions in reverse order.

Brandon

Membro da: 09/24/15

101 Reputazione

1 Guida realizzata

0 Commenti

Aggiungi Commento

Visualizza Statistiche:

Ultime 24 Ore: 0

Ultimi 7 Giorni: 0

Ultimi 30 Giorni: 5

Tutti i Tempi: 478