Salta al contenuto principale

Canon EOS Rebel XTi Soft Touch Grip Replacement

Cosa ti serve

  1. Canon EOS Rebel XTi Soft Touch Grip Replacement, Battery: passo 1, immagine 1 di 1
    • Place the camera upside down, and position it to where the back of the camera is visible.

  2. Canon EOS Rebel XTi Soft Touch Grip Replacement: passo 2, immagine 1 di 1
    • Pull the orange tab to the right to release the primary battery.

  3. Canon EOS Rebel XTi Soft Touch Grip Replacement: passo 3, immagine 1 di 1
    • To remove the secondary battery, reposition the camera to where the display screen is facing upwards.

    • Place your finger inside the empty battery compartment and pull away from the camera on the ridged battery tab.

  4. Canon EOS Rebel XTi Soft Touch Grip Replacement, Memory Card: passo 4, immagine 1 di 1
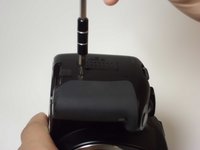
    • Place the camera on its side with the soft touch grip facing up and the top of the camera facing right.

  5. Canon EOS Rebel XTi Soft Touch Grip Replacement: passo 5, immagine 1 di 1
    • Slide the memory card door in the direction of the arrow engraved on the camera.

    • Once the door has slid open to its full position, lift up on the door.

  6. Canon EOS Rebel XTi Soft Touch Grip Replacement: passo 6, immagine 1 di 1
    • With the door open, push down the small black plunger next to the CF slot. The CF card will disengage from the slot and be ejected far enough that you can grasp it between thumb and forefinger and remove it from the slot.

    • The plunger will stay in its depressed position until a CF card is again inserted in the slot.

  7. Canon EOS Rebel XTi Soft Touch Grip Replacement, Back Casing: passo 7, immagine 1 di 1
    • Remove the three black 4 mm JIS #0 screws on the bottom of the camera.

  8. Canon EOS Rebel XTi Soft Touch Grip Replacement: passo 8, immagine 1 di 2 Canon EOS Rebel XTi Soft Touch Grip Replacement: passo 8, immagine 2 di 2
    • Remove the two black 6 mm Phillips screws from the right side of the camera.

  9. Canon EOS Rebel XTi Soft Touch Grip Replacement: passo 9, immagine 1 di 3 Canon EOS Rebel XTi Soft Touch Grip Replacement: passo 9, immagine 2 di 3 Canon EOS Rebel XTi Soft Touch Grip Replacement: passo 9, immagine 3 di 3
    • Remove the two black 4 mm Phillips screws on each side of the camera under the strap hooks.

  10. Canon EOS Rebel XTi Soft Touch Grip Replacement: passo 10, immagine 1 di 1
    • Remove the two black 4 mm Phillips head screws on the side of the camera opposite to the hand grip.

  11. Canon EOS Rebel XTi Soft Touch Grip Replacement: passo 11, immagine 1 di 1
    • Remove the three 1 mm Phillips #0 screws located in the memory card slot.

    • Two of these screws are black, and the third is silver.

  12. Canon EOS Rebel XTi Soft Touch Grip Replacement: passo 12, immagine 1 di 1
    • Gently pry off the back casing.

    • Before completely removing the back casing, be sure to disconnect the single ribbon cable running from the motherboard to the LCD display.

    • Use a spudger to lift the tab on the ribbon cable's ZIF connector.

    • Gently pull the ribbon cable out of the connector.

  13. Canon EOS Rebel XTi Soft Touch Grip Replacement, Front Casing: passo 13, immagine 1 di 1
    • Remove the single silver 3 mm Phillips screw.

  14. Canon EOS Rebel XTi Soft Touch Grip Replacement: passo 14, immagine 1 di 1
    • Remove the single 6 mm Phillips screw.

    • Remove the single 4 mm Phillips screw.

    • Remove the single 3 mm Phillips screw on the bottom of the lens.

  15. Canon EOS Rebel XTi Soft Touch Grip Replacement: passo 15, immagine 1 di 1
    • Gently pry off the front casing.

    • There are no ribbon cables to remove for this portion of the disassembly.

  16. Canon EOS Rebel XTi Soft Touch Grip Replacement, Soft Touch Grip: passo 16, immagine 1 di 1
    • Remove the two 3 mm Phillips screws behind the grip.

  17. Canon EOS Rebel XTi Soft Touch Grip Replacement: passo 17, immagine 1 di 1
    • Remove the grip from the front casing by simply pulling on it and releasing the pins which hold it in place.

    • Be careful not to break any clips or rip the rubber while removing the grip.

Conclusione

To reassemble your device, follow these instructions in reverse order.

Luis Calle

Membro da: 08/30/15

416 Reputazione

3 Guide realizzate

Team

USF Tampa, Team 8-6, Eyestone Fall 2015 Membro di USF Tampa, Team 8-6, Eyestone Fall 2015

USFT-EYESTONE-F15S8G6

3 Membri

18 Guide realizzate

0 Commenti

Aggiungi Commento

Visualizza Statistiche:

Ultime 24 Ore: 2

Ultimi 7 Giorni: 5

Ultimi 30 Giorni: 18

Tutti i Tempi: 1,154