Introduzione
Use this guide to replace a cracked or malfunctioning rear LCD screen on your EOS 6D.
Cosa ti serve
-
-
Remove the viewfinder cover by pinching the sides and sliding it upward.
-
-
-
Open the covers to the HDMI/AV/MIC ports on the side of the camera by gently pulling outward on the bottom of the covers.
-
Rotate the covers to the side so that you can see the connection ports inside.
-
Remove the following screws:
-
Two silver 5mm Phillips #00
-
One black 6mm Phillips #00
-
-
-
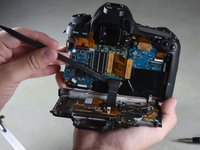
Attrezzo utilizzato in questo passaggio:Tweezers$4.99
-
Detach the two light brown ribbon wires from the back of the LCD screen by firmly gripping each with tweezers and gently pulling straight to the left.
-


To reassemble your device, follow these instructions in reverse order.
Annulla: non ho completato questa guida.
Altre 12 persone hanno completato questa guida.
Team

Cal Poly, Team 11-48, Amido Spring 2014 Membro di Cal Poly, Team 11-48, Amido Spring 2014
CPSU-AMIDO-S14S11G48
4 Membri
18 Guide realizzate
5Commenti sulla guida
Thank you! Thank you!! I rescued my 6D. All your steps and details were very useful.
Few points to add:
1. I think the black screw (yellow circle) from step 7 is 3 mm.
2. Lift the light brown flap that holds the ribbon cable before removing the LCD panel.
3. When you remove the LCD panel from the metal housing, you will have to pry the two strips of adhesive that is there.
4. Be careful when tightening the screws back.