Salta al contenuto principale
Canon ELPH Z3 Camera Shutter Button Replacement

Canon ELPH Z3 Camera Shutter Button Replacement

Nathan Barros

Nathan Barros e 2 altri collaboratori

Ultimo aggiornamento il February 19, 2020

5 - 10 minuti
Facile

Introduzione

Vai al passo 1

The shutter button is one of the most important components of a camera. The shutter button is the button one would press in order to take a picture. It is not uncommon for issues to arise with shutter buttons because they are heavily used. Any issues ranging from dirt build up or a connection malfunction. This easy to follow guide will show you how to gain access to the shutter button for cleaning and how to fully replace the shutter button for the Canon ELPH Z3.

Cosa ti serve

Strumenti

  1. Canon ELPH Z3 Camera Shutter Button Replacement, Shutter Button: passo 1, immagine 1 di 3 Canon ELPH Z3 Camera Shutter Button Replacement, Shutter Button: passo 1, immagine 2 di 3 Canon ELPH Z3 Camera Shutter Button Replacement, Shutter Button: passo 1, immagine 3 di 3
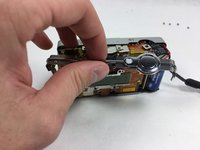
    • Unscrew the 7 4.1mm screws around the camera using a PH000 screwdriver.

  2. Canon ELPH Z3 Camera Shutter Button Replacement: passo 2, immagine 1 di 3 Canon ELPH Z3 Camera Shutter Button Replacement: passo 2, immagine 2 di 3 Canon ELPH Z3 Camera Shutter Button Replacement: passo 2, immagine 3 di 3
    • Split the front and back coverings of the camera.

    • Remove the back covering completely.

    • This allows for easier access to the shutter button carrier.

  3. Canon ELPH Z3 Camera Shutter Button Replacement: passo 3, immagine 1 di 2 Canon ELPH Z3 Camera Shutter Button Replacement: passo 3, immagine 2 di 2
    • Slide the shutter button carrier off of the camera.

    • Notice shutter button is on the right hand side of the carrier.

  4. Canon ELPH Z3 Camera Shutter Button Replacement: passo 4, immagine 1 di 3 Canon ELPH Z3 Camera Shutter Button Replacement: passo 4, immagine 2 di 3 Canon ELPH Z3 Camera Shutter Button Replacement: passo 4, immagine 3 di 3
    • Press upward on the shutter button from the underside of the carrier by using your thumb.

    • Separate the shutter button from the carrier.

Conclusione

To reassemble your device, follow these instructions in reverse order.

Team

UMass Dartmouth, Team 1-7, Catania Fall 2016 Membro di UMass Dartmouth, Team 1-7, Catania Fall 2016

UMASSD-CATANIA-F16S1G7

3 Membri

10 Guide realizzate

0Commenti sulla guida

Aggiungi Commento

Visualizza Statistiche:

Ultime 24 Ore: 1

Ultimi 7 Giorni: 3

Ultimi 30 Giorni: 12

Tutti i Tempi: 404