Salta al contenuto principale
Bugaboo Cameleon 1 and 3  Handlebar Clip Replacement

Bugaboo Cameleon 1 and 3 Handlebar Clip Replacement

Rebecca Dowling

Rebecca Dowling e 2 altri collaboratori

Ultimo aggiornamento il May 14, 2019

5 minuti
Facile
Dare To Repair
Guida fornita dalla comunità

Introduzione

Vai al passo 1

The ability to adjust the height of the handlebar is a very convenient feature of the stroller, especially if people of different heights use the stroller daily. This guide will show you how to replace a broken handlebar clip with a custom 3D printed part.

This guide is created by five students of the TU Delft, Pieter, Mansour, Yvo, Suzanne and Rebecca, to make older models of Bugaboo strollers more repairable if spare parts are no longer available. The Bugaboo frames are very durable, and often outlive the period in which spare parts are available for order.

Parts that most often break were 3D-modeled, and the files were used to print new parts with a performance that is acceptable and safe according to Bugaboo requirements.

Cosa ti serve

Strumenti

  1. Bugaboo Cameleon 1 and 3  Handlebar Clip Replacement, Remove old part: passo 1, immagine 1 di 2 Bugaboo Cameleon 1 and 3  Handlebar Clip Replacement, Remove old part: passo 1, immagine 2 di 2
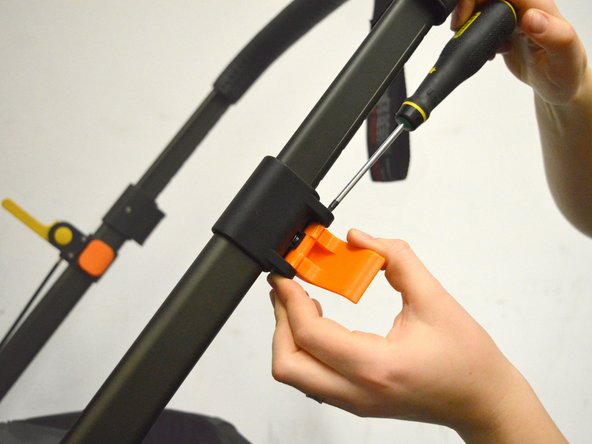
    • Loosen the screw using the torx screwdriver.

    • Make sure to catch the nut that will fall out at the bottom, by holding the other hand underneath the clip.

    • Make sure not to lose the screw since you will need it later for the reassembly.

  2. Bugaboo Cameleon 1 and 3  Handlebar Clip Replacement, Remove screw: passo 2, immagine 1 di 1
    • Use the screwdriver to push the screw up and out of the black part.

  3. Bugaboo Cameleon 1 and 3  Handlebar Clip Replacement: passo 3, immagine 1 di 1
    • Remove the broken handlebar clip and the small part with the spring.

    • Make sure to keep the part with the spring, since that is not included if you use the 3D model used for this repair guide.

  4. Bugaboo Cameleon 1 and 3  Handlebar Clip Replacement: passo 4, immagine 1 di 2 Bugaboo Cameleon 1 and 3  Handlebar Clip Replacement: passo 4, immagine 2 di 2
    • Put the part with the spring back in.

    • Hold it in place while putting the new part back in place

  5. Bugaboo Cameleon 1 and 3  Handlebar Clip Replacement: passo 5, immagine 1 di 2 Bugaboo Cameleon 1 and 3  Handlebar Clip Replacement: passo 5, immagine 2 di 2
    • Place the torx screw back in place, and place the nut back onto the underside of the screw.

    • Hold it in place with one hand, while using the other hand to fasten the screw using the torx screwdriver.

  6. Bugaboo Cameleon 1 and 3  Handlebar Clip Replacement: passo 6, immagine 1 di 1
    • Adjust the handlebar according to your needs.

    • Close the clip. All done!

Linea Traguardo

Altre 2 persone hanno completato questa guida.

Documenti Allegati

0Commenti sulla guida

Aggiungi Commento

Visualizza Statistiche:

Ultime 24 Ore: 0

Ultimi 7 Giorni: 4

Ultimi 30 Giorni: 43

Tutti i Tempi: 2,031