Salta al contenuto principale

Braun Satin Hair 3 Hairdryer Disassembly

Cosa ti serve

  1. Braun Satin Hair 3 Hairdryer Disassembly, Braun Satin Hair 3 Hairdryer Disassembly: passo 1, immagine 1 di 2 Braun Satin Hair 3 Hairdryer Disassembly, Braun Satin Hair 3 Hairdryer Disassembly: passo 1, immagine 2 di 2
    • Before disassembly, unplug the device.

    • Make sure the device was not on for the last 10 minutes, because it might still be hot.

    • Using a Spanner 4.0 screwdriver, unscrew the 1.5mm screw from the exterior of the hairdryer.

  2. Braun Satin Hair 3 Hairdryer Disassembly: passo 2, immagine 1 di 3 Braun Satin Hair 3 Hairdryer Disassembly: passo 2, immagine 2 di 3 Braun Satin Hair 3 Hairdryer Disassembly: passo 2, immagine 3 di 3
    Attrezzo utilizzato in questo passaggio:
    Jimmy
    $7.95
    Compra
    • Begin at the cord end of the product. Gently pry the two halves of the external casing open with the help of a Jimmy and push the front cap up and away from the external casing. The snap-fit should come loose.

    • After opening the first snap-fit, remove the gray cord protector by slightly pulling it backwards while keeping the gap open with your other hand.

    • Slide the cord protector down the electrical cord and out of the way.

  3. Braun Satin Hair 3 Hairdryer Disassembly: passo 3, immagine 1 di 3 Braun Satin Hair 3 Hairdryer Disassembly: passo 3, immagine 2 di 3 Braun Satin Hair 3 Hairdryer Disassembly: passo 3, immagine 3 di 3
    Attrezzo utilizzato in questo passaggio:
    iFixit Opening Picks (Set of 6)
    $4.99
    Compra
    • Continue loosening the front cap from the external casing using the Jimmy. The snap-fits tend to snap back in place, so to prevent that use opening picks to keep the separated halves from snapping back closed.

    • Work your way around the product, opening one snap-fit at a time.

    • Take care while opening the snap-fits. If done gently, damaging the product can be prevented. It might take some time and patience, but prevents breaking the casing as a whole.

    • It is advised to open the snap-fits that are easier to access, and finish with the snapfits in the harder-to-reach spots, namely those in the area where the handle meets the head of the hairdryer (shown in the third picture).

  4. Braun Satin Hair 3 Hairdryer Disassembly: passo 4, immagine 1 di 3 Braun Satin Hair 3 Hairdryer Disassembly: passo 4, immagine 2 di 3 Braun Satin Hair 3 Hairdryer Disassembly: passo 4, immagine 3 di 3
    • Places where the snap-fits are located. Those are the most important points for opening it.

  5. Braun Satin Hair 3 Hairdryer Disassembly: passo 5, immagine 1 di 2 Braun Satin Hair 3 Hairdryer Disassembly: passo 5, immagine 2 di 2
    • After opening the last snap-fit of the front cap, it comes loose from the external case halves. Slide the front cap off the external casing and put it aside.

  6. Braun Satin Hair 3 Hairdryer Disassembly: passo 6, immagine 1 di 2 Braun Satin Hair 3 Hairdryer Disassembly: passo 6, immagine 2 di 2
    Attrezzo utilizzato in questo passaggio:
    Tweezers
    $4.99
    Compra
    • Using either tweezers or pliers, pinch and remove the sliders and button from the front cap.

    • The sliders can only be removed at the specific place, marked in the second picture. Here the slit is a bit wider, making it possible to push the sliders through.

  7. Braun Satin Hair 3 Hairdryer Disassembly: passo 7, immagine 1 di 1
    • Using the same driver as before, remove the 1.5mm Spanner 4.0 screw that becomes accessible after removal of the front cap.

  8. Braun Satin Hair 3 Hairdryer Disassembly: passo 8, immagine 1 di 2 Braun Satin Hair 3 Hairdryer Disassembly: passo 8, immagine 2 di 2
    Attrezzo utilizzato in questo passaggio:
    iFixit Opening Tool
    $1.99
    Compra
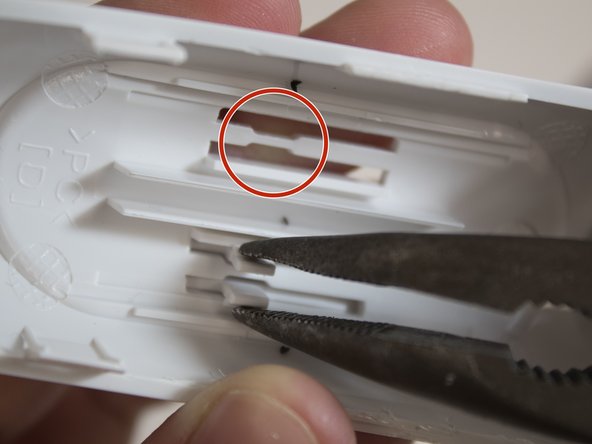
    • At the back of the product, the two halves of the case are connected with a snap-fit cap. Loosen this cap by putting a screwdriver or other opening tool under the cap using it as a lever.

    • Unfortunately, to further access the insides of the product, it is necessary to break the snap-fit cap. There is no way to reach this part from the back.

  9. Braun Satin Hair 3 Hairdryer Disassembly: passo 9, immagine 1 di 3 Braun Satin Hair 3 Hairdryer Disassembly: passo 9, immagine 2 di 3 Braun Satin Hair 3 Hairdryer Disassembly: passo 9, immagine 3 di 3
    • Using the same tools and methods as before, pry the two external halves open the rest of the way.

    • The snap-fits joining these two halves are tougher than those of the front cap. You might need to use more force to release them.

  10. Braun Satin Hair 3 Hairdryer Disassembly: passo 10, immagine 1 di 3 Braun Satin Hair 3 Hairdryer Disassembly: passo 10, immagine 2 di 3 Braun Satin Hair 3 Hairdryer Disassembly: passo 10, immagine 3 di 3
    • Unscrew the third and last 1.5mm spanner 4.0 screw keeping the fan down, using the same spanner driver again.

    • Unscrew the 1.3mm Phillips #2 screw holding the circuit board down, using a Phillips #2 screwdriver or bit.

    • Slide out the inner components as a whole.

  11. Braun Satin Hair 3 Hairdryer Disassembly: passo 11, immagine 1 di 2 Braun Satin Hair 3 Hairdryer Disassembly: passo 11, immagine 2 di 2
    Attrezzo utilizzato in questo passaggio:
    Phillips #1 Screwdriver
    $5.49
    Compra
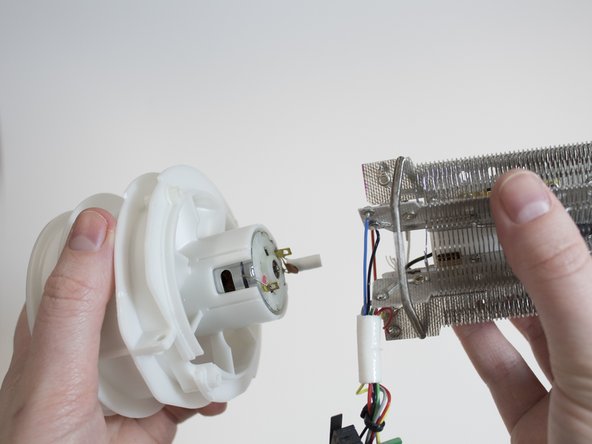
    • Separate the black inner casing from the other parts by removing the three 1.4mm Phillips #1 screws with a Phillips #1 screwdriver or bit and sliding it off.

  12. Braun Satin Hair 3 Hairdryer Disassembly: passo 12, immagine 1 di 2 Braun Satin Hair 3 Hairdryer Disassembly: passo 12, immagine 2 di 2
    • Pull apart the fan from the heating element and the circuit board.

    • This is the furthest this tear down can go without needing to solder it back together during reassembly.

Conclusione

To reassemble your device, follow these instructions in reverse order.

Altre 8 persone hanno completato questa guida.

8 Commenti

Do never open it…

It’s a disaster!

ZK A - Replica

Thanks a lot. It’s hard to disassemble without cosmetic damage(

Lessandro Kalmykoff - Replica

Thanks a lot. It worked for me. It's a shame they don't make it with a removable rear guard to remove hair build up on the fan. A bit of cosmetic damage but cleaned up with a sharp knife

cwhetter - Replica

Good job, exactly the info I needed. I would say difficulty is higher as it is almost impossible to execute this without damaging the edges.

Andras - Replica

Thanks a lot for the great description. I succeeded in repairing my hairdryer. The fan stopped spinning at the highest speed due to hairs caught in it. I removed them. Btw. I used tools for reparing a mobile phone which were very useful. I will add some pictures where I put crosses on the casing just to get an idea where the snap-fit caps are located. It helps to concentrate on these areas. I also succeeded in not breaking the snap-fit cap : )

K Mueller - Replica

Aggiungi Commento

Visualizza Statistiche:

Ultime 24 Ore: 13

Ultimi 7 Giorni: 65

Ultimi 30 Giorni: 307

Tutti i Tempi: 11,676