Salta al contenuto principale

BlackBerry Curve 8530 Keypad Replacement

Cosa ti serve

  1. BlackBerry Curve 8530 Keypad Replacement, Battery: passo 1, immagine 1 di 2 BlackBerry Curve 8530 Keypad Replacement, Battery: passo 1, immagine 2 di 2
    • Place the phone on a flat surface with the screen facing down.

    • Remove the plastic backplate by pulling up on the bottom of the cover.

  2. BlackBerry Curve 8530 Keypad Replacement: passo 2, immagine 1 di 1
    • Remove the battery by pulling up from the top of the battery.

  3. BlackBerry Curve 8530 Keypad Replacement, Keypad: passo 3, immagine 1 di 2 BlackBerry Curve 8530 Keypad Replacement, Keypad: passo 3, immagine 2 di 2
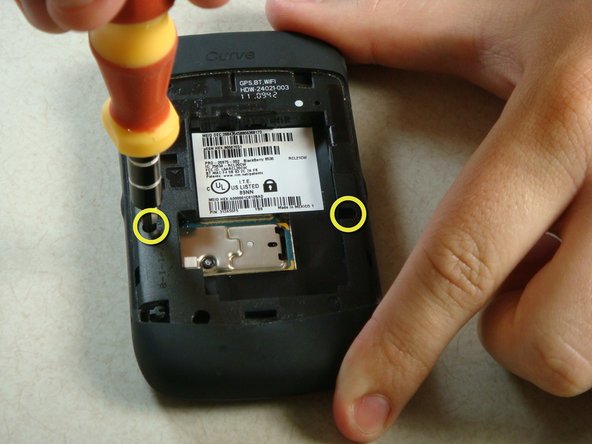
    • Remove the two screws midway up the phone on the left and right sides using a T6 Torx Screwdriver.

    • Warning: One screw will have warranty tape covering the screw. Removing this screw will likely void the phones warranty.

  4. BlackBerry Curve 8530 Keypad Replacement: passo 4, immagine 1 di 2 BlackBerry Curve 8530 Keypad Replacement: passo 4, immagine 2 di 2
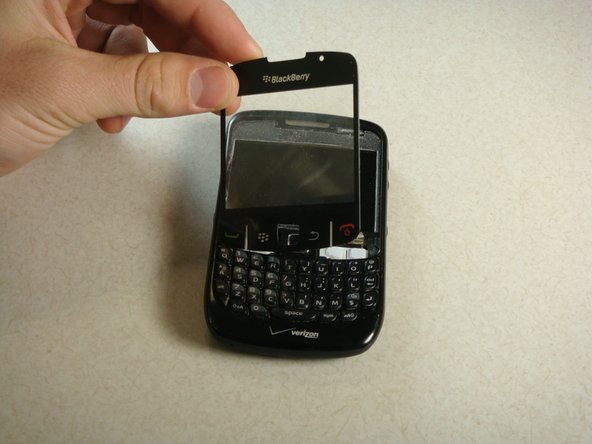
    • Flip the phone over so the keyboard faces up.

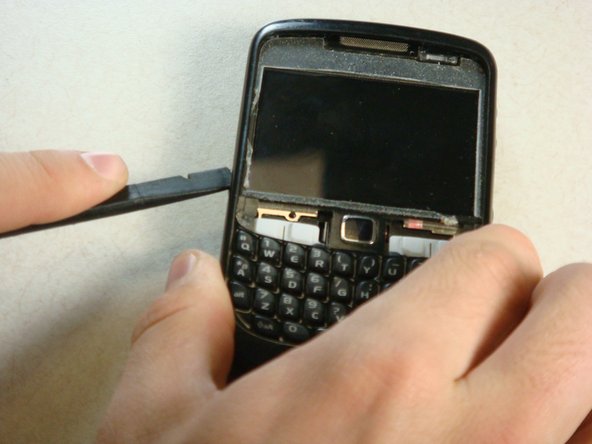
    • Insert a plastic spudger into the screen where speaker resides.

    • I recommend going from the side. There are two layers to the cover. You need to make sure you get underneath the bottom layer if you plan on reusing this cover.

    • Gently lift up plastic screen cover until screen cover separates from screen.

    • Continue until screen cover is completely removed.

  5. BlackBerry Curve 8530 Keypad Replacement: passo 5, immagine 1 di 3 BlackBerry Curve 8530 Keypad Replacement: passo 5, immagine 2 di 3 BlackBerry Curve 8530 Keypad Replacement: passo 5, immagine 3 di 3
    • Insert the spudger into the top of the plastic siding on the front of the phone and lift up until the siding lifts up.

    • Slide the tool around the entire perimeter of the phone until the plastic siding is completely removed.

  6. BlackBerry Curve 8530 Keypad Replacement: passo 6, immagine 1 di 2 BlackBerry Curve 8530 Keypad Replacement: passo 6, immagine 2 di 2
    • The keyboard should slide off of the phone now that the plastic siding has been removed.

Conclusione

To reassemble the device, follow the instructions in reverse order.

Altre 4 persone hanno completato questa guida.

Cory Davis

Membro da: 04/19/11

503 Reputazione

3 Guide realizzate

Team

Cal Poly, Team 15-13, Regan Spring 2011 Membro di Cal Poly, Team 15-13, Regan Spring 2011

CPSU-REGAN-S11S15G13

3 Membri

5 Guide realizzate

Un commento

This is a handy technique I will use it when next time I fix my phone and if you get time do visit us we fix these type of problems in India, Kolkata here is our site link https://techyuga.com/kolkata/

Ankita - Replica

Aggiungi Commento

Visualizza Statistiche:

Ultime 24 Ore: 0

Ultimi 7 Giorni: 1

Ultimi 30 Giorni: 6

Tutti i Tempi: 6,398