Salta al contenuto principale

BlackBerry Curve 8520 Motherboard Replacement

Cosa ti serve

  1. BlackBerry Curve 8520 Motherboard Replacement, Back Panel: passo 1, immagine 1 di 2 BlackBerry Curve 8520 Motherboard Replacement, Back Panel: passo 1, immagine 2 di 2
    • Insert a plastic opening tool into the small notch on the rear cover of the phone.

    • Pry the rear cover up from the phone.

  2. BlackBerry Curve 8520 Motherboard Replacement, Battery: passo 2, immagine 1 di 2 BlackBerry Curve 8520 Motherboard Replacement, Battery: passo 2, immagine 2 di 2
    • Locate the slit between the top of the battery and the casing.

    • Gently apply pressure on the top of the battery to trigger the spring release.

  3. BlackBerry Curve 8520 Motherboard Replacement, Keyboard Cover: passo 3, immagine 1 di 2 BlackBerry Curve 8520 Motherboard Replacement, Keyboard Cover: passo 3, immagine 2 di 2
    • Remove the two Torx T6 screws to the left and right of the battery.

  4. BlackBerry Curve 8520 Motherboard Replacement: passo 4, immagine 1 di 2 BlackBerry Curve 8520 Motherboard Replacement: passo 4, immagine 2 di 2
    • Using hairdryer or heat gun, warm the front panel to soften the adhesive beneath.

    • Starting from one side, use a plastic opening tool to pry up the screen cover.

    • Work carefully to avoid bending the screen cover.

    • Once one side is loose, gently peel up the entire cover.

  5. BlackBerry Curve 8520 Motherboard Replacement: passo 5, immagine 1 di 3 BlackBerry Curve 8520 Motherboard Replacement: passo 5, immagine 2 di 3 BlackBerry Curve 8520 Motherboard Replacement: passo 5, immagine 3 di 3
    • Insert the plastic opening tool in the seam along the side of the device.

    • Slide the tool along the length of the seam, applying moderate force with the plastic opening tool.

    • Carefully remove the faceplate.

  6. BlackBerry Curve 8520 Motherboard Replacement: passo 6, immagine 1 di 3 BlackBerry Curve 8520 Motherboard Replacement: passo 6, immagine 2 di 3 BlackBerry Curve 8520 Motherboard Replacement: passo 6, immagine 3 di 3
    • Remove four T6 Torx screws from the front of the phone.

    • Using tweezers, remove the keyboard buttons from the phone.

  7. BlackBerry Curve 8520 Motherboard Replacement, Motherboard: passo 7, immagine 1 di 2 BlackBerry Curve 8520 Motherboard Replacement, Motherboard: passo 7, immagine 2 di 2
    • Remove the two T6 Torx screws securing the small plastic bracket at the bottom of the phone.

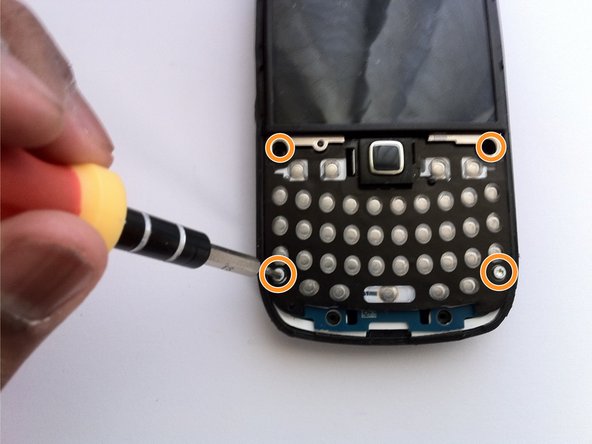
    • Remove the four T6 Torx screws from the corners of the keyboard.

  8. BlackBerry Curve 8520 Motherboard Replacement: passo 8, immagine 1 di 2 BlackBerry Curve 8520 Motherboard Replacement: passo 8, immagine 2 di 2
    • Using a plastic opening tool, gently pry the motherboard assembly from the device's frame.

Conclusione

To reassemble your device, follow these instructions in reverse order.

Altre 32 persone hanno completato questa guida.

Matt

Membro da: 04/07/11

1.722 Reputazione

5 Guide realizzate

Team

Cal Poly, Team 9-62, Walters Spring 2011 Membro di Cal Poly, Team 9-62, Walters Spring 2011

CPSU-WALTERS-S11S9G62

5 Membri

5 Guide realizzate

Un commento

hi sir can u provide me the dead 8520 cuvre mobile phone

hunkerbhullar - Replica

Aggiungi Commento

Visualizza Statistiche:

Ultime 24 Ore: 0

Ultimi 7 Giorni: 2

Ultimi 30 Giorni: 8

Tutti i Tempi: 36,779