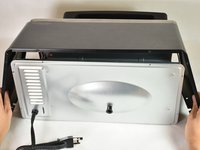
Salta al contenuto principale

Black and Decker TO1303SB, TO1313B Top Cover Replacement

Solo Prerequisita
Questa guida è destinata a essere usata solo come prerequisito per altre guide. Da sola è incompleta.

Cosa ti serve

  1. Black and Decker TO1303SB, TO1313B Top Cover Replacement, Top Cover: passo 1, immagine 1 di 2 Black and Decker TO1303SB, TO1313B Top Cover Replacement, Top Cover: passo 1, immagine 2 di 2
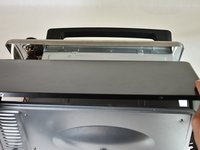
    • Remove the six 9.5mm screws on the back panel using a #2 Phillips screwdriver.

  2. Black and Decker TO1303SB, TO1313B Top Cover Replacement: passo 2, immagine 1 di 1
    • Remove the two 13mm screws, located between the feet on the bottom of the cover, using a Torx T15 screw driver.

    • On the TO1313SB, a Security Torx T15 driver is required — the screws have a center pin that prevents use of a regular T15 driver.

  3. Black and Decker TO1303SB, TO1313B Top Cover Replacement: passo 3, immagine 1 di 1
    • Using the metal spudger, carefully pry out the rubber base on each foot to access the screws.

  4. Black and Decker TO1303SB, TO1313B Top Cover Replacement: passo 4, immagine 1 di 1
    • Remove the 11.5 mm screws using a #2 Phillips screwdriver.

  5. Black and Decker TO1303SB, TO1313B Top Cover Replacement: passo 5, immagine 1 di 2 Black and Decker TO1303SB, TO1313B Top Cover Replacement: passo 5, immagine 2 di 2
    • Remove the back cover by gently pulling the sides of the cover apart from the rest of the oven. Then, tilt the cover towards the face and pull back at an upward angle. The cover should slide right off.

Conclusione

To reassemble your device, follow these instructions in reverse order.

Barrett Lowe

Membro da: 10/08/15

210 Reputazione

2 Guide realizzate

Team

Cal Poly, Team 5-11, Maness Fall 2015 Membro di Cal Poly, Team 5-11, Maness Fall 2015

CPSU-MANESS-F15S5G11

4 Membri

5 Guide realizzate

0Commenti sulla guida

Aggiungi Commento

Visualizza Statistiche:

Ultime 24 Ore: 0

Ultimi 7 Giorni: 9

Ultimi 30 Giorni: 20

Tutti i Tempi: 98