Salta al contenuto principale

Asus X502CA-BCL0901D Screen Replacement

Cosa ti serve

  1. Asus X502CA-BCL0901D Screen Replacement, Screen Frame: passo 1, immagine 1 di 2 Asus X502CA-BCL0901D Screen Replacement, Screen Frame: passo 1, immagine 2 di 2
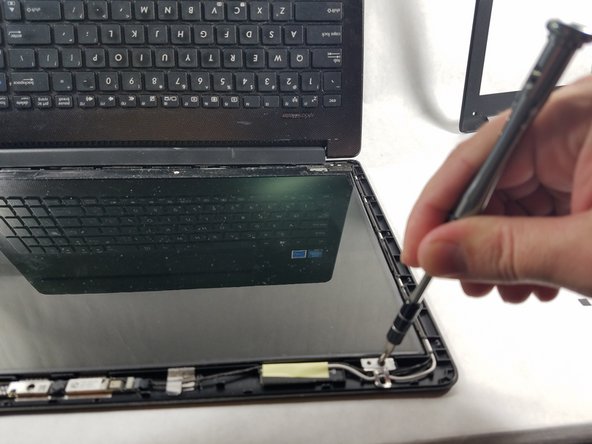
    • Using the tweezers, remove the 2 black plastic adhesive covers from the bottom corners of the screen frame.

  2. Asus X502CA-BCL0901D Screen Replacement: passo 2, immagine 1 di 1
    • Use the Philips #00 screwdriver to remove the 2 screws that were revealed in the previous step.

    • The screws are 20 mm in diameter and 50 mm long.

  3. Asus X502CA-BCL0901D Screen Replacement: passo 3, immagine 1 di 1
    • Using the plastic opening tool, pry the screen frame away from the screen.

  4. Asus X502CA-BCL0901D Screen Replacement: passo 4, immagine 1 di 1
    • Using your hands, grasp the screen frame at it's base near the laptop hinge.

    • While pulling the base of the screen frame away from the hinge horizontally, also lift up on the screen frame to disconnect it from the laptop hinge.

    • The space between the screen frame and laptop hinge is very small and the plastic for both parts is weak. However, a fair amount of force is required to disconnect the screen frame from the laptop hinge. Be careful during this step, or either of these plastic pieces may break.

  5. Asus X502CA-BCL0901D Screen Replacement, Screen: passo 5, immagine 1 di 1
    • Flip the laptop around and lay the screen flat on your work space with the laptop hinge away from you and the keyboard assembly standing vertical.

  6. Asus X502CA-BCL0901D Screen Replacement: passo 6, immagine 1 di 2 Asus X502CA-BCL0901D Screen Replacement: passo 6, immagine 2 di 2
    • Using the Philips #00 screwdriver, remove the 4 screws holding the laptop screen in place.

    • The screws are 15 mm in diameter and 45 mm long.

  7. Asus X502CA-BCL0901D Screen Replacement: passo 7, immagine 1 di 1
    • Lift the screen away from the laptop starting with the edge furthest from the laptop hinge.

    • Take care while lifting the screen, as it is still connected to the laptop by a wire.

  8. Asus X502CA-BCL0901D Screen Replacement: passo 8, immagine 1 di 1
    • Using the tweezers, peel back the tape securing the screen wire to the laptop.

  9. Asus X502CA-BCL0901D Screen Replacement: passo 9, immagine 1 di 1
    • Using the tweezers, unplug the screen from the laptop.

  10. Asus X502CA-BCL0901D Screen Replacement: passo 10, immagine 1 di 1
    • Lift the laptop screen away from the remainder of the laptop.

Conclusione

To reassemble your device, follow these instructions in reverse order.

Team

0 Commenti

Aggiungi Commento

Visualizza Statistiche:

Ultime 24 Ore: 0

Ultimi 7 Giorni: 0

Ultimi 30 Giorni: 2

Tutti i Tempi: 167