Questa versione può contenere modifiche errate. Passa all'ultima istantanea verificata.
Cosa ti serve
-
Questo passaggio è privo di traduzione. Aiuta a tradurlo
-
Turn the laptop over so that the back is facing upwards.
-
-
Questo passaggio è privo di traduzione. Aiuta a tradurlo
-
To unlock the left tab, make sure the tab on the left has red showing.
-
-
Questo passaggio è privo di traduzione. Aiuta a tradurlo
-
To unlock the right tab, push the right slider to the left with one hand.
-
Push the battery out with the other hand.
-
-
Questo passaggio è privo di traduzione. Aiuta a tradurlo
-
Using the Phillips #00 screwdriver unscrew all nine screws from the bottom of the laptop, as well as the additional two screws inside the battery compartment.
-
-
-
Questo passaggio è privo di traduzione. Aiuta a tradurlo
-
Turn the laptop over and open the top so the keyboard is facing you.
-
-
Questo passaggio è privo di traduzione. Aiuta a tradurlo
-
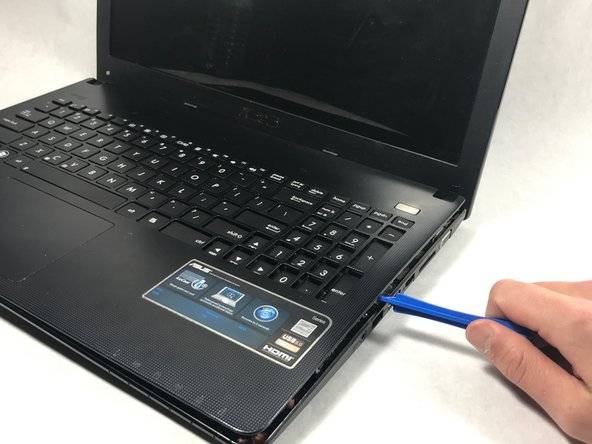
Pry off the keyboard cover on the edge using the plastic opening tool.
-
Start from one side. Once it is lose, carry out the same procedure on the front and other side.
-
-
Questo passaggio è privo di traduzione. Aiuta a tradurlo
-
Slowly lift the keyboard upward, but do not remove completely.
-
Remove the two data cables that attach the keyboard to the motherboard.
-
-
Questo passaggio è privo di traduzione. Aiuta a tradurlo
-
Use tweezers to pull the white plastic piece up that is attached to the data cable.
-
Repeat this process for the big black cable as well.
-
-
Questo passaggio è privo di traduzione. Aiuta a tradurlo
-
Unscrew the three screws using the Phillips #00 screwdriver.
-
-
Questo passaggio è privo di traduzione. Aiuta a tradurlo
-
Unscrew the three screws on the left hand side of the big motherboard.
-
This will loosen the motherboard, which will allow for better access to the cables in the next step.
-
-
Questo passaggio è privo di traduzione. Aiuta a tradurlo
-
Remove the connector cable attached to the bottom of the motherboard.
-
Take the black plastic spudger and press down on the lower half of the white plastic piece to remove the connector cable.
-


Annulla: non ho completato questa guida.
Un'altra persona ha completato questa guida.
Team

UMass Dartmouth, Team S3-G3, Bailey Fall 2017 Membro di UMass Dartmouth, Team S3-G3, Bailey Fall 2017
UMASSD-BAILEY-F17S3G3
3 Membri
8 Guide realizzate