Salta al contenuto principale

Asus X501A-RH31 Fan Replacement

Cosa ti serve

  1. Asus X501A-RH31 Fan Replacement, Battery: passo 1, immagine 1 di 1
    • Turn the laptop over so that the back is facing upwards.

  2. Asus X501A-RH31 Fan Replacement: passo 2, immagine 1 di 1
    • To unlock the left tab, make sure the tab on the left has red showing.

  3. Asus X501A-RH31 Fan Replacement: passo 3, immagine 1 di 2 Asus X501A-RH31 Fan Replacement: passo 3, immagine 2 di 2
    • To unlock the right tab, push the right slider to the left with one hand.

    • Push the battery out with the other hand.

  4. Asus X501A-RH31 Fan Replacement, Keyboard: passo 4, immagine 1 di 2 Asus X501A-RH31 Fan Replacement, Keyboard: passo 4, immagine 2 di 2
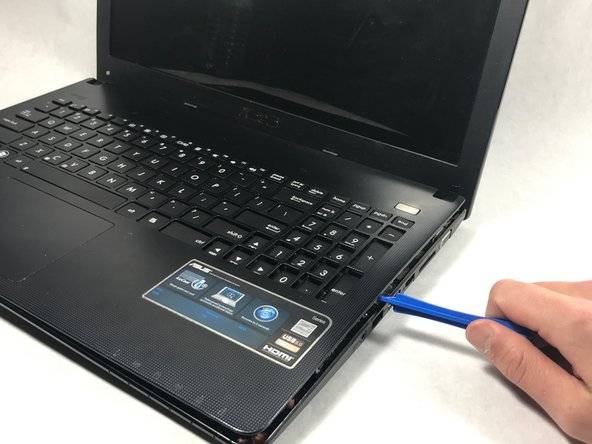
    • Using the Phillips #00 screwdriver unscrew all nine screws from the bottom of the laptop, as well as the additional two screws inside the battery compartment.

    • Nine of the screws are 5 mm long, 4.5 mm in diameter, while two screws closest to the hinges are 7 mm long.

  5. Asus X501A-RH31 Fan Replacement: passo 5, immagine 1 di 1
    • Turn the laptop over and open the top so the keyboard is facing you.

  6. Asus X501A-RH31 Fan Replacement: passo 6, immagine 1 di 2 Asus X501A-RH31 Fan Replacement: passo 6, immagine 2 di 2
    • Pry off the keyboard cover on the edge using the plastic opening tool.

    • Start from one side. Once it is lose, carry out the same procedure on the front and other side.

    • Only do little sections at a time as the keyboard may break if you attempt to take the whole thing off from a single point.

  7. Asus X501A-RH31 Fan Replacement: passo 7, immagine 1 di 1
    • Slowly lift the keyboard upward, but do not remove completely.

    • Remove the two data cables that attach the keyboard to the motherboard.

  8. Asus X501A-RH31 Fan Replacement: passo 8, immagine 1 di 1
    • Use tweezers to pull the white plastic piece up that is attached to the data cable.

    • Repeat this process for the big black cable as well.

    • Use caution when unlatching the data cables from the motherboard. The cables are extremely delicate and can break.

  9. Asus X501A-RH31 Fan Replacement, Fan: passo 9, immagine 1 di 1
    • Unscrew the three screws using the Phillips #00 screwdriver.

    • The three screws are 5 mm in length, 4.2 mm in diameter.

  10. Asus X501A-RH31 Fan Replacement: passo 10, immagine 1 di 1
    • Unscrew the three screws on the left hand side of the big motherboard.

    • This will loosen the motherboard, which will allow for better access to the cables in the next step.

    • The three screws are 5 mm in length, 4.2 mm in diameter and Phillips head screws.

  11. Asus X501A-RH31 Fan Replacement: passo 11, immagine 1 di 3 Asus X501A-RH31 Fan Replacement: passo 11, immagine 2 di 3 Asus X501A-RH31 Fan Replacement: passo 11, immagine 3 di 3
    • Remove the connector cable attached to the bottom of the motherboard.

    • Take the black plastic spudger and press down on the lower half of the white plastic piece to remove the connector cable.

Conclusione

To reassemble your device, follow these instructions in reverse order.

Un'altra persona ha completato questa guida.

Christopher

Membro da: 10/19/17

359 Reputazione

3 Guide realizzate

Team

0 Commenti

Aggiungi Commento

Visualizza Statistiche:

Ultime 24 Ore: 0

Ultimi 7 Giorni: 1

Ultimi 30 Giorni: 4

Tutti i Tempi: 514