Salta al contenuto principale

Questa guida ha delle modifiche più recenti. Passa all'ultima versione non verificata.

Asus Vivobook Max X541SA-PD0703X CD drive Replacement

Cosa ti serve

  1. Asus Vivobook Max X541SA-PD0703X CD drive Replacement, Hard Drive: passo 1, immagine 1 di 1
    • Flip the laptop upside down so that the back of the laptop faces you.

  2. Asus Vivobook Max X541SA-PD0703X CD drive Replacement: passo 2, immagine 1 di 1
    • Remove the following ten Phillips #0 screws from the bottom of the laptop:

    • Six 13mm screws.

    • Four 11mm screws.

  3. Asus Vivobook Max X541SA-PD0703X CD drive Replacement: passo 3, immagine 1 di 3 Asus Vivobook Max X541SA-PD0703X CD drive Replacement: passo 3, immagine 2 di 3 Asus Vivobook Max X541SA-PD0703X CD drive Replacement: passo 3, immagine 3 di 3
    • Using a plastic opening tool, pry up the palm rest from the bottom case of the laptop.

    • Don't completely remove as there are ribbon cables connecting the two halves.

  4. Asus Vivobook Max X541SA-PD0703X CD drive Replacement: passo 4, immagine 1 di 3 Asus Vivobook Max X541SA-PD0703X CD drive Replacement: passo 4, immagine 2 di 3 Asus Vivobook Max X541SA-PD0703X CD drive Replacement: passo 4, immagine 3 di 3
    • Use a spudger to flip up the retaining flaps on both keyboard ribbon cable ZIF sockets.

    • Pull the ribbon cables out of their sockets.

  5. Asus Vivobook Max X541SA-PD0703X CD drive Replacement: passo 5, immagine 1 di 1
    • Remove the three 6mm Phillips #0 screws from the motherboard.

  6. Asus Vivobook Max X541SA-PD0703X CD drive Replacement: passo 6, immagine 1 di 2 Asus Vivobook Max X541SA-PD0703X CD drive Replacement: passo 6, immagine 2 di 2
    • Pull the Wi-Fi card out of the motherboard.

  7. Asus Vivobook Max X541SA-PD0703X CD drive Replacement: passo 7, immagine 1 di 1
    • Remove the hard drive by pulling it towards the right, and removing it from the laptop case

  8. Asus Vivobook Max X541SA-PD0703X CD drive Replacement, Disc Drive: passo 8, immagine 1 di 1
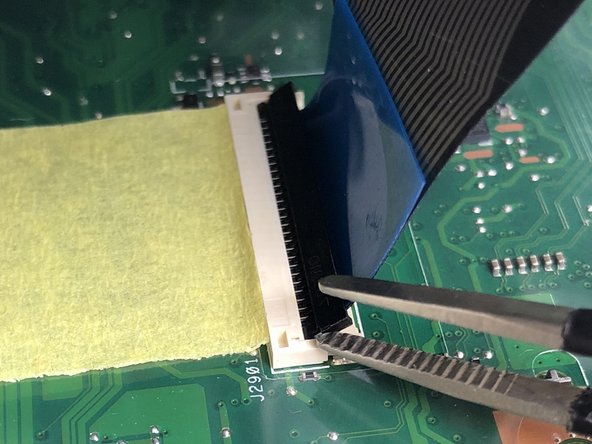
    • Remove the disc drive by sliding it towards the right and removing it from the laptop case

Conclusione

To reassemble your device, follow these instructions in reverse order.

Team

USF Tampa, Team S1-G4, Cagle Spring 2018 Membro di USF Tampa, Team S1-G4, Cagle Spring 2018

USFT-CAGLE-S18S1G4

4 Membri

7 Guide realizzate

0 Commenti

Aggiungi Commento

Visualizza Statistiche:

Ultime 24 Ore: 0

Ultimi 7 Giorni: 2

Ultimi 30 Giorni: 3

Tutti i Tempi: 729