Salta al contenuto principale

Asus Transformer Pad TF103C Screen Replacement

Cosa ti serve

  1. Asus Transformer Pad TF103C Screen Replacement, Battery: passo 1, immagine 1 di 1
    • Make sure the power is off.

    • Insert the plastic opening tool into a crack on side of the tablet.

    • You can use a thin screwdriver if you don't have the opening tool.

    • Carefully pull the tool upwards to and pry open the Transformer pad.

    • Make sure the SD card slot is empty first.

    Before beginning this procedure be sure that the micro SD card slot is empty otherwise damage may result.

    melissa21158 - Replica

  2. Asus Transformer Pad TF103C Screen Replacement: passo 2, immagine 1 di 1
    • Slide the tool in the gap along all four sides, continually pulling the tool upwards.

  3. Asus Transformer Pad TF103C Screen Replacement: passo 3, immagine 1 di 1
    • Remove the back cover once it is loose and set it aside.

    • Rotate the tablet so it matches the picture.

  4. Asus Transformer Pad TF103C Screen Replacement: passo 4, immagine 1 di 1
    • Carefully unplug the battery cable from the motherboard by grabbing the wires close to the black piece and pulling it out of the housing.

    To complete step 4, grab the wires close to the black housing as shown in the photo, and pull to slide all the cords out of the housing (as shown in the photo for step 5).

    Clue Less - Replica

  5. Asus Transformer Pad TF103C Screen Replacement: passo 5, immagine 1 di 2 Asus Transformer Pad TF103C Screen Replacement: passo 5, immagine 2 di 2
    • Carefully pry the battery out of the tablet with the opening tool.

    • Replace battery with a new +3.7V=19Wh Li-polymer Battery Pack C11P1328.

    • There may be some tape on the battery, so you may hear pulling as you pry.

    There may be some double-stick tape helping to hold the battery in place, so do not be surprised if you hear the tape being pulled away from the batter as you pry.

    Clue Less - Replica

  6. Asus Transformer Pad TF103C Screen Replacement, Screen: passo 6, immagine 1 di 2 Asus Transformer Pad TF103C Screen Replacement, Screen: passo 6, immagine 2 di 2
    • Remove two screws from each speaker with the +J000 screwdriver.

    • Keep the screws together and organized. (Label if necessary).

  7. Asus Transformer Pad TF103C Screen Replacement: passo 7, immagine 1 di 1
    • Unplug the wire from the top of the left speaker.

    • If you pull on the wire too much, it can break off.

    • If you break the wire off, you can solder it back on.

  8. Asus Transformer Pad TF103C Screen Replacement: passo 8, immagine 1 di 1
    • Remove the yellow tape and unplug the wire that attaches the speakers to the soundboard.

  9. Asus Transformer Pad TF103C Screen Replacement: passo 9, immagine 1 di 2 Asus Transformer Pad TF103C Screen Replacement: passo 9, immagine 2 di 2
    • Remove the two speakers from the device's frame

  10. Asus Transformer Pad TF103C Screen Replacement: passo 10, immagine 1 di 1
    • Use the +J000 screwdriver to remove the screw pictured. Then, remove the plastic cover that is labeled "M2".

    • Note: You will break the seal sticker on the screw.

  11. Asus Transformer Pad TF103C Screen Replacement: passo 11, immagine 1 di 1
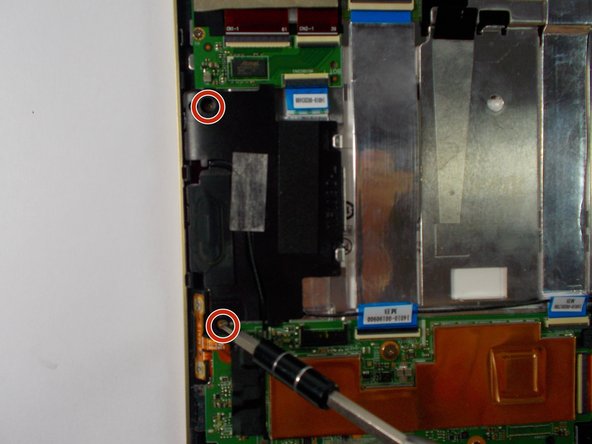
    • Remove the black tape from the ribbon cable and separate the cable from the soundboard.

    • Open the ribbon cable connector by lifting the white portion of the connectors up and to the left.

    The ribbon cable connector colours are reversed in my TF103C

    Shaun Hunter - Replica

  12. Asus Transformer Pad TF103C Screen Replacement: passo 12, immagine 1 di 1
    • Remove the screws from the soundboard with the +J000 screwdriver.

  13. Asus Transformer Pad TF103C Screen Replacement: passo 13, immagine 1 di 1
    • Remove the soundboard.

  14. Asus Transformer Pad TF103C Screen Replacement: passo 14, immagine 1 di 1
    • Remove the black tape from the motherboard. Unplug the ribbon cable from the volume and power buttons.

  15. Asus Transformer Pad TF103C Screen Replacement: passo 15, immagine 1 di 1
    • Remove the three screws from the motherboard with the +J000 screwdriver.

  16. Asus Transformer Pad TF103C Screen Replacement: passo 16, immagine 1 di 1
    • Unplug all three ribbon cables from the motherboard.

  17. Asus Transformer Pad TF103C Screen Replacement: passo 17, immagine 1 di 1
    • Unhook the camera's ribbon cable from the underside of the motherboard and then remove the motherboard.

  18. Asus Transformer Pad TF103C Screen Replacement: passo 18, immagine 1 di 1
    • Remove the two keyboard connector screws with the +J000 screwdriver.

  19. Asus Transformer Pad TF103C Screen Replacement: passo 19, immagine 1 di 1
    • Remove the tape from the charging port chip.

  20. Asus Transformer Pad TF103C Screen Replacement: passo 20, immagine 1 di 1
    • Unplug the two ribbon cables from the charging port chip.

  21. Asus Transformer Pad TF103C Screen Replacement: passo 21, immagine 1 di 1
    • Remove the two charging port screws with the +J000 screwdriver.

  22. Asus Transformer Pad TF103C Screen Replacement: passo 22, immagine 1 di 2 Asus Transformer Pad TF103C Screen Replacement: passo 22, immagine 2 di 2
    • Remove the charging port chip and the keyboard connector chip.

  23. Asus Transformer Pad TF103C Screen Replacement: passo 23, immagine 1 di 1
    • Remove all eight screws from the metal frame with the +J000 screwdriver.

  24. Asus Transformer Pad TF103C Screen Replacement: passo 24, immagine 1 di 1
    • Carefully unpeel the metallic tape from the left side of the frame.

    • Don't unpeel the left side of the tape

  25. Asus Transformer Pad TF103C Screen Replacement: passo 25, immagine 1 di 1
    • Carefully remove the frame and avoid getting it caught in the wires.

    • Watch out for the power and volume ribbon cables in the lower left corner.

  26. Asus Transformer Pad TF103C Screen Replacement: passo 26, immagine 1 di 1
    • Use the plastic opening tool to pry the display screen from the front panel.

    • For better results, use opening picks and glide them around the screen tape. Note: you may need to replace the tape.

    • Some cracking sounds might happen as you break the adhesive.

    • Be careful not to break the glass screen cover.

  27. Asus Transformer Pad TF103C Screen Replacement: passo 27, immagine 1 di 1
    • Replace the faulty display screen.

    Excellent, clear and concise instructions. The photos are first rate. Thank you.

    ekedwin - Replica

Conclusione

To reassemble your device, follow these instructions in reverse order.

Altre 9 persone hanno completato questa guida.

Tyler Ellis

Membro da: 10/28/15

668 Reputazione

4 Guide realizzate

Team

UMass Dartmouth, Team 3-6, Shastany Fall 2015 Membro di UMass Dartmouth, Team 3-6, Shastany Fall 2015

UMASSD-SHASTANY-F15S3G6

4 Membri

5 Guide realizzate

2 Commenti

For step 5 it said to replace with a new battery. Is that necessary? Will the battery life of the tablet be affected if the battery is taken out and that same battery is placed back?

malomoses - Replica

I was wondering if you could tell me which ribbon cable connects the screen, and in particular the touch input to the main board. I would guess that it is the one labeled 14010-00190900.

I am having the problem with intermittent touch input failure, and since my device is not on warranty, I thought I might try replacing the ribbon cable.

korokinopio - Replica

Aggiungi Commento

Visualizza Statistiche:

Ultime 24 Ore: 0

Ultimi 7 Giorni: 2

Ultimi 30 Giorni: 9

Tutti i Tempi: 9,183