Cosa ti serve
-
-
Remove the warning sticker that covers the battery plug and connecting cord.
-
Look for the widest gap on either side of the battery. Using the plastic opening tool carefully lift battery out.
-
Disconnect battery connecting cord using tweezers.
-
-
-
-
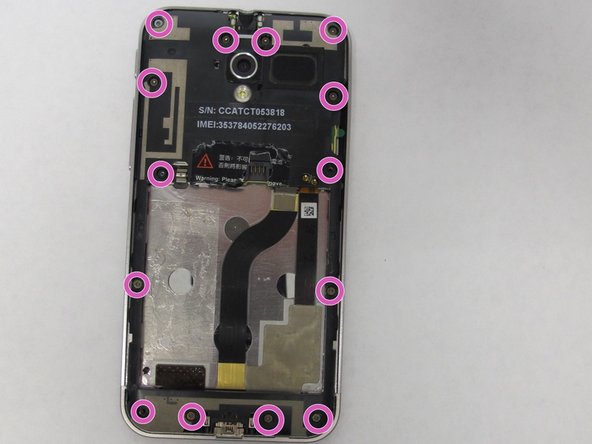
Use T5 Torx screwdriver to remove 14 screws from internal back plate.
-
Once screws are out, remove the plate.
-
-
-
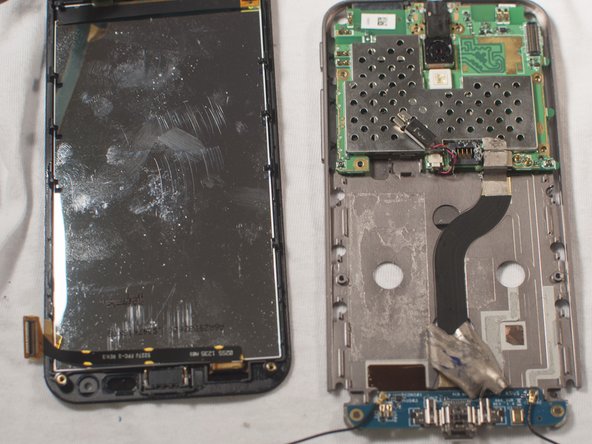
When the back cover is removed, the following 4 cables must be disconnected:
-
1. Multitouch cord.
-
2. Display cable. A lot of heat dispatching tape here. Peel off gently. To be pulled out towards the bottom of the phone.
-
3. Bottom board connector. Taped with heat dispatching tape, peel off, pop up, like the multitouch cord. You only need to disconnect it from the main board, do not remove the whole cord.
-
4. Antenna connectors. Lift up, pull up. Lift them out of the way.
-
-
-
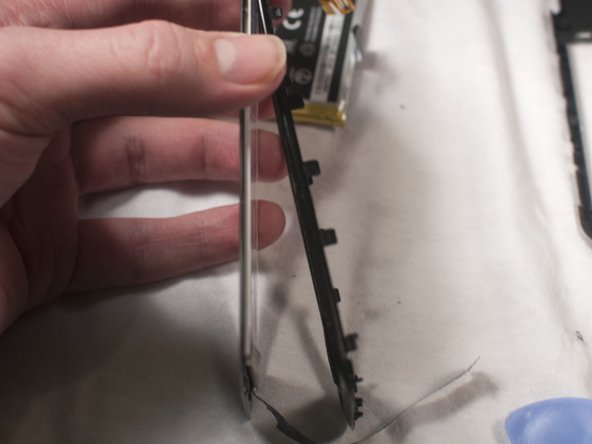
Place your plastic opening tool at the side of the screen. Make sure all chords are unplugged and not stuck anywhere. Remove the screen from the metal frame.
Better is remove motherboard, like on that video: https://www.youtube.com/watch?v=ZBDZ5syr...
In other way you could crack screen...
If you remove the motherboard a number of little pieces can drop out. It not clear which way around to place them back in. When you lift the mother board out you should take a photo of the pieces in place before turning anything over. The main description in this procedure should have included a photo of these pieces in their correct placement
-
-
-
To remove the screen from its frame, use the plastic opening tool.
Better is repair like on that video: https://www.youtube.com/watch?v=ZBDZ5syr...
In other way you could crack screen...
-
-
-
Eject the sim tray.
-
Install the new screen.
Hi, when you reassenble the device, are the new screen and the back cover of the phone sticking to the body of the phone or do you recommand to use some glue or double sided sticky tape?
-


To reassemble your device, follow these instructions in reverse order.
To reassemble your device, follow these instructions in reverse order.
Annulla: non ho completato questa guida.
Altre 21 persone hanno completato questa guida.
25 Commenti
Where did u buy the replacement screen? Im lookin on ebay and there is alot of them but they are not as good as the original i assume! or am i wrong?
I got "Full LCD Display+Touch Screen Digitizer Replacement Fix For ASUS Padfone 2" from seller hightechhk-com, http://www.ebay.co.uk/itm/Full-LCD-Displ...
At least at a brief glance they seem to have the same production ID. I bought another padfone 2 to have (I didn't want to be without phone), so I can do a serious comparison with test images later if it's interesting.
After a few months testing I can't spot any quality difference in the screen, other than that the phone with a replaced screen might run a little bit warmer. Don't know if it's a software difference, of if it's because of the hardware change, or because I didn't manage well enough with putting back the heat tape...
Mirar -
The hardest part of this guide was the first step, to insert the prying tool. I guess you just learn how to do it properly eventually, but this was the only phone I intended to repair.
The other thing is that the front-camera didn't want to come lose. You have to use a little bit of push in the right direction to get it out. I pulled the main board out of the camera first, then carefully lifted the camera out, put the camera back in, and then attached the screen. The screen cable needed some force to enter the connector all the way in for me. (Might want to add that to the mainboard part, last step.)
Then I had one really annoying LED cable that refused to be positioned correctly and I never realized until I had about one screw left of the frame...
The phone has a lot of random sticky tape so quite some few things you have to use a lot of force for.
Thanks for the guide!
Thank you Jonatan, your guide was extremely valuable.
A couple of notes:
1. Mirar is right: getting the casing off after unscrewing it is hard. Sliding it gently downwards towards the usb connector worked for me.
2. You have to lift the main board to get the multi touch cord through. This can also dislodge the on/off and volume controls so check they are properly in place before assembling it
3. In my case some of the glue came loose from the screen frame when I removed the screen. Luckily I had some double sided sticky tape handy that I cut into small strips so that I could glue in the new screen in otherwise there would have been hardly anything holding it in place.
Thank you very much for the guide, I tell them that in my padfone the image worked but the touch was not working, follow step by step guide and it now gives me no picture but the touch its working.
someone could tell me where I am failing
greetings.
pd: sorry my english
You didn't plug in the display cable correctly. I think it's the one next to the battery, and it's really rather tricky to get in correct. To even have a chance you need to lift up the main board and put it in viewing the connector, and it needs to be pushed in rather hard without damaging the cable...
Mirar -
Thank you for the guide, it was easy to follow,but i have one problem. The 3 menu buttons doesnt Work right. They have no backligt, and the touch funktion does only work in one of the buttons. Rest of the screen works as it should. But is my problem because I have done something wrong, or could it be, that the new screen allready was damaged !
same problem. But find my case, it was little board with leds that i forgot to put back in. But touch area is something else i guess, maybe cheap screen replacement..
The no-backlight problem is a connector not put back. If the touch isn't working properly, that's probably also a connector not put in correctly/all the way.
Mirar -
I didn't succeed! The touch is working, home buttons are working fine. Just no visual. what can be wrong? I think one of the (led) cable's might be damaged, cause i didn't be to carefull while i was pulling of the cover. But i'm not shure it is damaged, i don't see anything wrong on that cable.
I managed to replace my screen thanks to this guide.
Watch out! When reassembling the phone, note that there are two screws that are smaller than the others. These two screws must be screwed into both small sides near the battery.
The reason because of the screen replacement was screwing the wrong screws while reassembling the phone.
hi thanks for the instructions, but now my rear speaker seams to vibrate a lot what can i do to fix this?
Hi,
I also broke the glass of my PadFone 2.
I wonder if anyone know - the Screen+touch cost ~40$, while the LCD+Screen+touch cost above 100$.
Is it a must to buy the LCD too?
Jonathan, you said that the LCD apparently is fragile than the glass - that's what you meant?
I wonder if it's possible, just to replace the glass with the touch, and save money.
How can I know if anything happened to the LCD?
Thanks to any feedback.
Did you succeed in replacing the glass/digitalizer by yourself? How did you separate the glass from the LCD screen?
Jane -
Hi,
Thnx for the guide Jonathan.
I am planning to repair mine as well, my question is same as Ohad's, is it worth to try to change only the touch screen/glass(a.k.a. digitizer), without the lcd. I've read before that Asus service is changing them both, but why? I've found on padfone club forum that one guy had just the digitizer changed, but not himself, by a phone service technician. http://padfoneclub.com/pl/forum/forum_vi...
do you know how digitizer and lcd are fixed to each other?
can anybody who already changed the assembly, check from the old parts, if is it easy to seperate the digitizer and lcd?
Thanks for replies
This is a good guide.
That bit about the 2 little screws by Gijs on Jan 17 should be bolded in red in the guide. That was how I broke my screen in the first place when all I wanted to do was clean the camera from dust, and I suppose that's how I stumbled upon this guide.
Another thing is, in your guide you suggested just pulling out the display cable. I think this is a bad idea. One would need to lift the board up (before this step, please remove the simcard holder), then unlock the cable by lifting the white tab (it's a hinge mechanism), and after lifting the tab then safely pull out the display cable.
One would also need to lift the board to pass thru the touchscreen connector from the front to the connector at the back.
THe connectors labeled (4) look like the WiFi antennae connectors on normal asus netbooks. But I can't confirm this.
Lastly, my problem was I have the screen cracked, the gorilla glass touch panel is still fine. I can't seem to separate the touch panel and the screen =( Any ideas?
Thanks a lot for this guide! Some advice from me.
1. When doing step 4, gently pull the plate towards usb connector to take it away.
2. The little round glass that protects the camera and is situated on the plate may fall off, so check for it.
3. Display cable -- DO NOT pull it. After you disconnected all the cables but this one (number two), gently lift the green board and turn it upside down. The place of connection has a little white plug. Very gently move it into upright position (DO NOT tear it away from the black box it is attached to). When assembling, insert the new display cable there and put the white thing back in horizontal position.
4. Side buttons -- watch out, they may fall off.
5. The speaker -- in my case, it stayed on the old screen, so don't forget to put in this vital part. :-)
Also, you can switch the phone on to check all the connections while the plate is still unscrewed but hold the vibrating thing and the board with your fingers.
That's all folks!
Also: as for me, I still wonder how one can replace the glass only without damaging the LCD... I wasn't courageous enough to put it in the microwave oven as suggested by some people...
I find guides for replacing the entire screen, but not for replacing just the glass/digitalizer. This phone is not known in my area, and the technicians are wary whether these parts are meant to be separated.
Is this clearly doable, or just plain risky, or somewhere in between?
thanks
Jane -
ware i can buy the screen at malaysia
Hello. My padfone 2 tab screen seems not functioning. how to repair? thanks