Salta al contenuto principale

Asus MeMo Pad 10 ME102A Motherboard Replacement

Cosa ti serve

  1. Asus MeMo Pad 10 ME102A Motherboard Replacement, Back Panel: passo 1, immagine 1 di 1
    • Insert the blue plastic opening tool into the seam between the back panel and the chassis.

    • When removing the back panel, remember to keep the device face down on a flat surface in order to prevent dropping the device or anything inside of the device.

  2. Asus MeMo Pad 10 ME102A Motherboard Replacement: passo 2, immagine 1 di 1
    • Slide the plastic opener around the tablet. There will be spots of resistance. These should gently pop open as the tool slides through the seam.

  3. Asus MeMo Pad 10 ME102A Motherboard Replacement: passo 3, immagine 1 di 1
    • After all of the clips have been opened, the back panel should be free to remove by hand

  4. Asus MeMo Pad 10 ME102A Motherboard Replacement, Speakers: passo 4, immagine 1 di 1
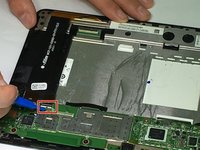
    • The right-hand speaker is labeled ME102A-R and is located by the battery plug. This is the first speaker removed in this guide, however if the left-hand speaker is the only one you need to replace please skip down to the left-hand speaker section.

    • Unplug the speaker cable by gently pushing it parallel to the motherboard with the flat side of the blue plastic opening tool.

  5. Asus MeMo Pad 10 ME102A Motherboard Replacement: passo 5, immagine 1 di 1
    • Unscrew the M2x4mm screw with the PH00 screwdriver attachment.

  6. Asus MeMo Pad 10 ME102A Motherboard Replacement: passo 6, immagine 1 di 1
    • Lift the speaker up by the end opposing the steel latch and slide it out from under the steel latch. The speaker has now been removed.

  7. Asus MeMo Pad 10 ME102A Motherboard Replacement: passo 7, immagine 1 di 2 Asus MeMo Pad 10 ME102A Motherboard Replacement: passo 7, immagine 2 di 2
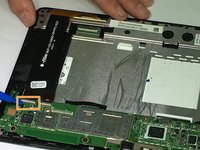
    • The left-hand speaker is designated by the lettering ME102A-L and is located by the silver and blue ribbon cable running across the top of the battery.

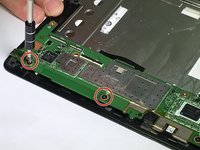
    • Remove the Ribbon cable labeled CN2 by gently prying up the white latch of the black and white plugs by using the small blue plastic opening tool.

    • Remove the Ribbon cable labeled CN1 by gently prying up the white latch of the black and white plugs by using the small blue plastic opening tool.

  8. Asus MeMo Pad 10 ME102A Motherboard Replacement: passo 8, immagine 1 di 1
    • Unplug the speaker cable by gently pushing it parallel to the motherboard with the flat side of the blue plastic opening tool.

  9. Asus MeMo Pad 10 ME102A Motherboard Replacement: passo 9, immagine 1 di 1
    • Unscrew the M2x4mm screw with the PH00 screwdriver attachment.

  10. Asus MeMo Pad 10 ME102A Motherboard Replacement: passo 10, immagine 1 di 1
    • Lift the speaker up by the end opposing the steel latch and slide it out from under the steel latch. The speaker has now been removed.

  11. Asus MeMo Pad 10 ME102A Motherboard Replacement, Motherboard: passo 11, immagine 1 di 1
    • Use the blue plastic opening tool to lift open the black latch connecting the blue ribbon cable to the motherboard.

  12. Asus MeMo Pad 10 ME102A Motherboard Replacement: passo 12, immagine 1 di 1
    • Using the blue plastic opening tool unplug the battery plug by gently pushing the plug out parallel to the motherboard.

  13. Asus MeMo Pad 10 ME102A Motherboard Replacement: passo 13, immagine 1 di 2 Asus MeMo Pad 10 ME102A Motherboard Replacement: passo 13, immagine 2 di 2
    • Using the PH00 screwdriver, remove the 4 black M2x4mm screws along the bottom of the motherboard.

  14. Asus MeMo Pad 10 ME102A Motherboard Replacement: passo 14, immagine 1 di 1
    • Using the PH00 screwdriver, remove the 2 silver M2x2mm screws along the top of the motherboard.

  15. Asus MeMo Pad 10 ME102A Motherboard Replacement: passo 15, immagine 1 di 1
    • Lift the motherboard gently from both sides.

Conclusione

To reassemble your device, follow these instructions in reverse order.

Altre 4 persone hanno completato questa guida.

Team

USF Tampa, Team 11-3, Blackwell Fall 2016 Membro di USF Tampa, Team 11-3, Blackwell Fall 2016

USFT-BLACKWELL-F16S11G3

4 Membri

10 Guide realizzate

Un commento

super flot hjælp tak tusinde gange

nielsnbc - Replica

Aggiungi Commento

Visualizza Statistiche:

Ultime 24 Ore: 0

Ultimi 7 Giorni: 1

Ultimi 30 Giorni: 3

Tutti i Tempi: 1,843