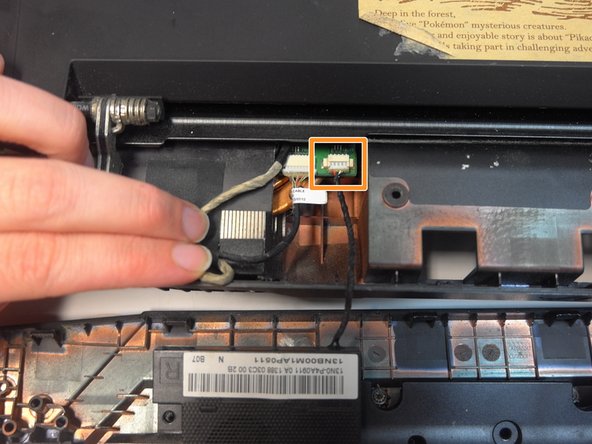
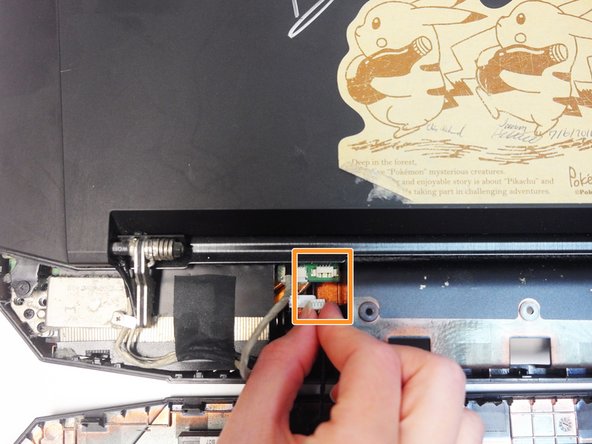
Salta al contenuto principale

Asus G750JW-BBI7N05 Left and Right Speaker Bar Replacement

Cosa ti serve

  1. Asus G750JW-BBI7N05 Left and Right Speaker Bar Replacement, Battery: passo 1, immagine 1 di 1
    • Power off and unplug your laptop, then turn it over.

  2. Asus G750JW-BBI7N05 Left and Right Speaker Bar Replacement: passo 2, immagine 1 di 1
    • Slide the battery release latch all the way to the right. This will cause the battery to "pop" out slightly.

  3. Asus G750JW-BBI7N05 Left and Right Speaker Bar Replacement: passo 3, immagine 1 di 1
    • Remove the battery from its compartment.

  4. Asus G750JW-BBI7N05 Left and Right Speaker Bar Replacement, Left and Right Speaker Bar: passo 4, immagine 1 di 2 Asus G750JW-BBI7N05 Left and Right Speaker Bar Replacement, Left and Right Speaker Bar: passo 4, immagine 2 di 2
    • Remove the rubber stoppers in the top left and right corners to expose two 9mm Phillips #00 screws. Unscrew and remove them.

    • Unscrew and remove the three 4mm Phillips #00 screws inside the battery compartment.

  5. Asus G750JW-BBI7N05 Left and Right Speaker Bar Replacement: passo 5, immagine 1 di 1
    • Carefully turn the laptop right-side up.

    • Using an opening tool, pry the outer edges of the hinge cover up and away from the laptop.

    • The hinge cover, located at the back of the laptop, is the long plastic plate that covers the hinges and speakers.

  6. Asus G750JW-BBI7N05 Left and Right Speaker Bar Replacement: passo 6, immagine 1 di 3 Asus G750JW-BBI7N05 Left and Right Speaker Bar Replacement: passo 6, immagine 2 di 3 Asus G750JW-BBI7N05 Left and Right Speaker Bar Replacement: passo 6, immagine 3 di 3
    • Without disconnecting the speaker cable, set the hinge cover upside-down.

    • Hold the speaker cable by its white connector, then pull to unplug it from the motherboard.

    • You may need to apply some force, as these connectors can be difficult to unplug.

  7. Asus G750JW-BBI7N05 Left and Right Speaker Bar Replacement: passo 7, immagine 1 di 1
    • The speaker is attached to the hinge cover by four 3.5mm Phillips #00 screws. Unscrew and remove them.

  8. Asus G750JW-BBI7N05 Left and Right Speaker Bar Replacement: passo 8, immagine 1 di 1
    • Lift the speaker to remove it.

Conclusione

To reassemble your device, follow these instructions in reverse order.

Altre 3 persone hanno completato questa guida.

0 Commenti

Aggiungi Commento

Visualizza Statistiche:

Ultime 24 Ore: 2

Ultimi 7 Giorni: 7

Ultimi 30 Giorni: 9

Tutti i Tempi: 728