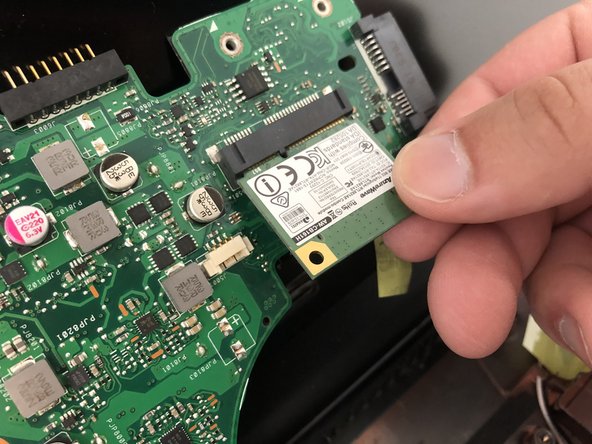
Salta al contenuto principale

Asus F555LA-AB31 Network Card Replacement

Cosa ti serve

  1. Asus F555LA-AB31 Network Card Replacement, CD Drive: passo 1, immagine 1 di 1
    • Turn off and unplug the device before starting repairing.

    • Use the Phillips #0 screwdriver head to remove the ten 18mm Phillips #0 screws on the laptop's bottom.

  2. Asus F555LA-AB31 Network Card Replacement: passo 2, immagine 1 di 2 Asus F555LA-AB31 Network Card Replacement: passo 2, immagine 2 di 2
    • Flip the laptop over and flip the screen up.

    • Pry upward on the edges of the faceplate in order to separate the keyboard and trackpad from the rest of the device.

    • Be cautious of the cables connecting the keyboard and trackpad to the motherboard.

  3. Asus F555LA-AB31 Network Card Replacement: passo 3, immagine 1 di 1
    • Disconnect the keyboard flex cable from its motherboard ZIF socket.

    • To unlock a ZIF connector, use the tip of a spudger or your fingernail to flip up the small, hinged locking flap. Carefully slide the unlocked cable out of the socket.

  4. Asus F555LA-AB31 Network Card Replacement: passo 4, immagine 1 di 2 Asus F555LA-AB31 Network Card Replacement: passo 4, immagine 2 di 2
    • Use the Phillips #0 screwdriver to unscrew the one Phillips #0 screw that connects the CD drive to the motherboard.

    • Slowly slide out the CD drive, keeping it level, to remove it.

  5. Asus F555LA-AB31 Network Card Replacement, Hard Drive: passo 5, immagine 1 di 1
    • Remove ten 18mm Phillips #0 screws from the backside of the device.

    • Removal of the RAM access panel is not necessary.

  6. Asus F555LA-AB31 Network Card Replacement: passo 6, immagine 1 di 3 Asus F555LA-AB31 Network Card Replacement: passo 6, immagine 2 di 3 Asus F555LA-AB31 Network Card Replacement: passo 6, immagine 3 di 3
    • Carefully fold the device open.

    • Begin to pry upward on the edges of the faceplate in order to separate the keyboard and trackpad from the rest of the device.

    • Be cautious of the cables connecting the keyboard and trackpad to the motherboard.

    • To remove the ZIF connector, gently lift upward on the blue tab to disconnect it from the motherboard.

  7. Asus F555LA-AB31 Network Card Replacement: passo 7, immagine 1 di 3 Asus F555LA-AB31 Network Card Replacement: passo 7, immagine 2 di 3 Asus F555LA-AB31 Network Card Replacement: passo 7, immagine 3 di 3
    • Fold the keyboard section of the laptop up towards the screen to fully expose the inside of the device.

    • Unscrew the four 4mm Phillips #0 screws holding down the hard drive.

  8. Asus F555LA-AB31 Network Card Replacement: passo 8, immagine 1 di 1
    • Disconnect the ZIF connector and lift the hard drive out of the space.

  9. Asus F555LA-AB31 Network Card Replacement, Battery: passo 9, immagine 1 di 2 Asus F555LA-AB31 Network Card Replacement, Battery: passo 9, immagine 2 di 2
    • Remove the four 4 mm Phillips #0 screws securing the battery.

  10. Asus F555LA-AB31 Network Card Replacement: passo 10, immagine 1 di 2 Asus F555LA-AB31 Network Card Replacement: passo 10, immagine 2 di 2
    • Lift up battery and remove it from the device.

  11. Asus F555LA-AB31 Network Card Replacement, Network Card: passo 11, immagine 1 di 1
    • Disconnect the two wires connected to the network card.

  12. Asus F555LA-AB31 Network Card Replacement: passo 12, immagine 1 di 3 Asus F555LA-AB31 Network Card Replacement: passo 12, immagine 2 di 3 Asus F555LA-AB31 Network Card Replacement: passo 12, immagine 3 di 3
    • Remove the seven Phillips #0 screws holding the motherboard down.

    • Lift the motherboard upwards, folding it towards the laptop chassis.

    • Unscrew the Phillips #0 screw holding down the network card, and slide it out.

Conclusione

To reassemble your device, follow these instructions in reverse order.

0 Commenti

Aggiungi Commento

Visualizza Statistiche:

Ultime 24 Ore: 0

Ultimi 7 Giorni: 1

Ultimi 30 Giorni: 8

Tutti i Tempi: 574