Salta al contenuto principale

Questa guida ha delle modifiche più recenti. Passa all'ultima versione non verificata.

Asus Eee PC 1005HA Fan Replacement

Cosa ti serve

  1. Asus Eee PC 1005HA Fan Replacement, Wifi Antenna: passo 1, immagine 1 di 2 Asus Eee PC 1005HA Fan Replacement, Wifi Antenna: passo 1, immagine 2 di 2
    • Remove the (6.65 mm) screw next to the RAM.

    • Remove the RAM door cover.

  2. Asus Eee PC 1005HA Fan Replacement: passo 2, immagine 1 di 1
    • Remove (6.65 mm) screw next to RAM.

    • Identify and disconnect touch pad ribbon cable which can be seen through a window at the bottom edge of the metal part of the top casing (in these photos the connector shows blue).

  3. Asus Eee PC 1005HA Fan Replacement: passo 3, immagine 1 di 2 Asus Eee PC 1005HA Fan Replacement: passo 3, immagine 2 di 2
    • Turn computer right side up, and open it.

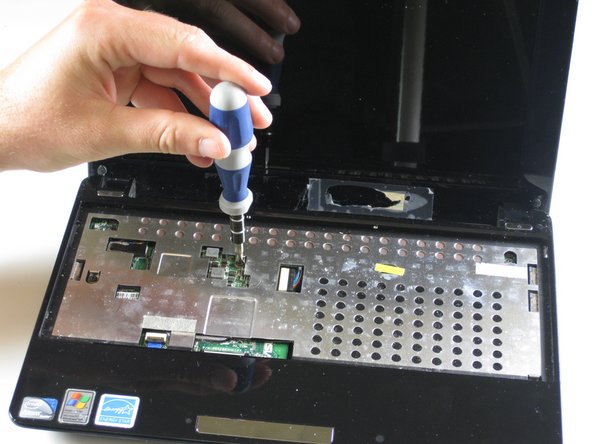
    • Remove 6 (5.5 mm) screws from inside covering.

    • Disconnect the touch pad ribbon cable.

  4. Asus Eee PC 1005HA Fan Replacement: passo 4, immagine 1 di 2 Asus Eee PC 1005HA Fan Replacement: passo 4, immagine 2 di 2
    • The palmrest plastic is fragile. Handle it carefully.

    • Two miniature LEDs will be exposed in the top edge of the bottom casing. Handle with caution to avoid damage.

    • Detach each of the 5 plastic clips. Run a plastic opening tool along the underside of the top half. You will hear the 'clicks' of the clips coming undone.

    • After the clips are loose, disconnect the palmrest flatflex and remove it.

  5. Asus Eee PC 1005HA Fan Replacement: passo 5, immagine 1 di 1
    • Raise black pad to detach trackpad ribbon if not done in step 4.

    • (Completing this step according to the directions in step 4 reduces the potential for damage.)

  6. Asus Eee PC 1005HA Fan Replacement: passo 6, immagine 1 di 3 Asus Eee PC 1005HA Fan Replacement: passo 6, immagine 2 di 3 Asus Eee PC 1005HA Fan Replacement: passo 6, immagine 3 di 3
    • Remove the hard drive ribbon by lifting the black clips upward.

    • Remove (4.6 mm) screws that hold the hard drive in place.

    • There may be only one of these screws, the one at bottom right. The upper position screw may already have been removed (The 4th red circle from the left in step 4).

  7. Asus Eee PC 1005HA Fan Replacement: passo 7, immagine 1 di 2 Asus Eee PC 1005HA Fan Replacement: passo 7, immagine 2 di 2
    • Gently pull the hard drive to the left by the black plastic ribbon. Slowly lift the hard drive up on the left and then out.

    • When re-inserting, use caution to ensure that the WiFi antenna cable (visible as a black loop below the disk in the 2nd photo) is not trapped under the leg of the drive encasing.

  8. Asus Eee PC 1005HA Fan Replacement: passo 8, immagine 1 di 2 Asus Eee PC 1005HA Fan Replacement: passo 8, immagine 2 di 2
    • Lift the black clips using the plastic opening tool to detach the ribbon that connects the SD card module.

  9. Asus Eee PC 1005HA Fan Replacement: passo 9, immagine 1 di 1
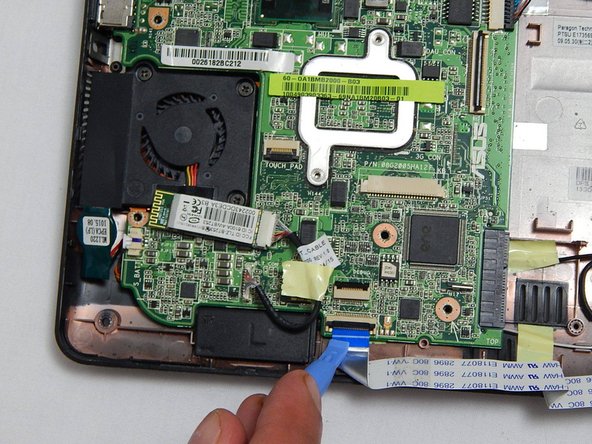
    • Remove the wifi antenna connection using the plastic opening tool.

  10. Asus Eee PC 1005HA Fan Replacement: passo 10, immagine 1 di 2 Asus Eee PC 1005HA Fan Replacement: passo 10, immagine 2 di 2
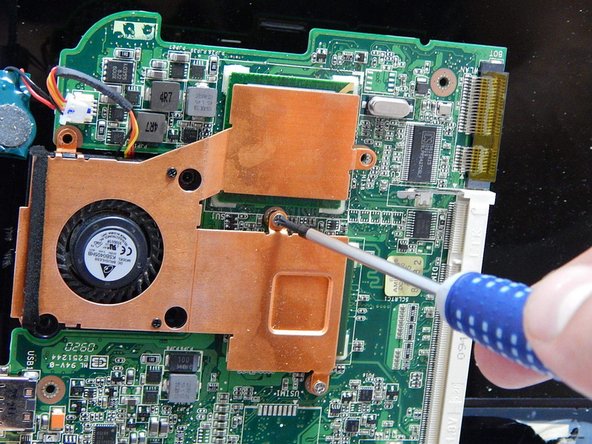
    • Remove this screw, which holds the wifi component in place, using the Phillips head screwdriver.

  11. Asus Eee PC 1005HA Fan Replacement: passo 11, immagine 1 di 1
    • Pull the Wi-Fi component to the right, and then slightly upward and finally out to remove the Wi-Fi antenna.

    • Move antenna cautiously to avoid damage.

  12. Asus Eee PC 1005HA Fan Replacement, Fan: passo 12, immagine 1 di 2 Asus Eee PC 1005HA Fan Replacement, Fan: passo 12, immagine 2 di 2
    • Detach the ribbon cable that connects the SD card module and the motherboard by lifting the black clips using the plastic opening tool.

  13. Asus Eee PC 1005HA Fan Replacement: passo 13, immagine 1 di 2 Asus Eee PC 1005HA Fan Replacement: passo 13, immagine 2 di 2
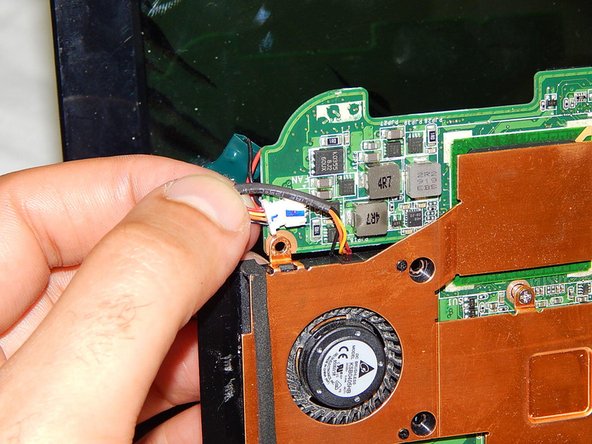
    • Detach the Bluetooth wire located below the fan by gently pulling it upward.

  14. Asus Eee PC 1005HA Fan Replacement: passo 14, immagine 1 di 2 Asus Eee PC 1005HA Fan Replacement: passo 14, immagine 2 di 2
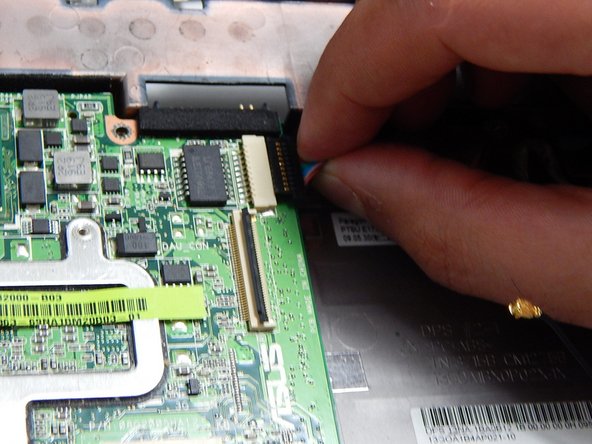
    • Detach the black structure connected to the input cables in the top right center of the motherboard by pulling them to the right, away from the fan.

  15. Asus Eee PC 1005HA Fan Replacement: passo 15, immagine 1 di 2 Asus Eee PC 1005HA Fan Replacement: passo 15, immagine 2 di 2
    • Remove the three 5.5 mm screws holding the motherboard to the motherboard plastic frame.

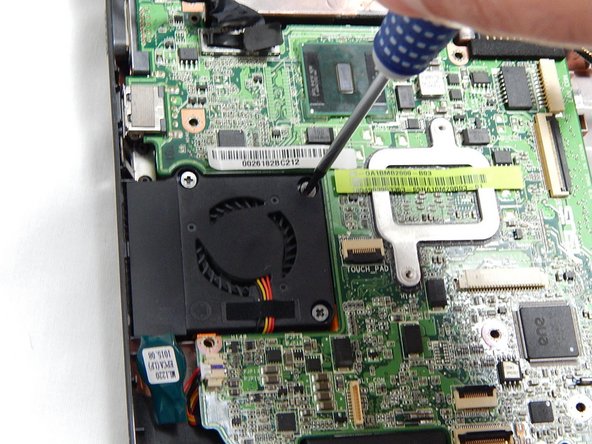
    • Remove the four 5.5 mm screws surrounding the fan.

  16. Asus Eee PC 1005HA Fan Replacement: passo 16, immagine 1 di 1
    • Gently lift the motherboard and hold it so that the bottom of the board is exposed.

  17. Asus Eee PC 1005HA Fan Replacement: passo 17, immagine 1 di 2 Asus Eee PC 1005HA Fan Replacement: passo 17, immagine 2 di 2
    • Disconnect the cable attaching the motherboard to the fan.

  18. Asus Eee PC 1005HA Fan Replacement: passo 18, immagine 1 di 3 Asus Eee PC 1005HA Fan Replacement: passo 18, immagine 2 di 3 Asus Eee PC 1005HA Fan Replacement: passo 18, immagine 3 di 3
    • Remove two 5.5 mm screws holding the fan and the brass frame to the motherboard.

Conclusione

To reassemble your device, follow these instructions in reverse order.

Altre 4 persone hanno completato questa guida.

0 Commenti

Aggiungi Commento

Visualizza Statistiche:

Ultime 24 Ore: 0

Ultimi 7 Giorni: 8

Ultimi 30 Giorni: 33

Tutti i Tempi: 11,633