Salta al contenuto principale

Asus Chromebook C101P Touchpad Replacement

Cosa ti serve

  1. Asus Chromebook C101P Touchpad Replacement, Keyboard: passo 1, immagine 1 di 1
    • Flip the Chromebook so that the bottom is facing up.

    • Remove the nine T5 Torx screws.

  2. Asus Chromebook C101P Touchpad Replacement: passo 2, immagine 1 di 1
    • Remove the four rubber grips on the bottom side of the Chromebook using an opening tool.

  3. Asus Chromebook C101P Touchpad Replacement: passo 3, immagine 1 di 1
    • Remove the four black screws where the rubber grips were.

  4. Asus Chromebook C101P Touchpad Replacement: passo 4, immagine 1 di 2 Asus Chromebook C101P Touchpad Replacement: passo 4, immagine 2 di 2
    • Reorient the Chromebook so the right side is facing upwards.

    • Wedge an opening tool or spudger between the keyboard (upper case) and the lower case of the bottom portion of the Chromebook.

  5. Asus Chromebook C101P Touchpad Replacement: passo 5, immagine 1 di 3 Asus Chromebook C101P Touchpad Replacement: passo 5, immagine 2 di 3 Asus Chromebook C101P Touchpad Replacement: passo 5, immagine 3 di 3
    • Pull back the black lever on the base of the cable. While pulling back, take your tweezers and pull back on the large ribbon cable.

    • Pull back the black lever on the base of the cable. While pulling back, take your tweezers and pull back on the small ribbon cable.

    • Separate the keyboard from the rest of the laptop.

  6. Asus Chromebook C101P Touchpad Replacement, Touchpad: passo 6, immagine 1 di 3 Asus Chromebook C101P Touchpad Replacement, Touchpad: passo 6, immagine 2 di 3 Asus Chromebook C101P Touchpad Replacement, Touchpad: passo 6, immagine 3 di 3
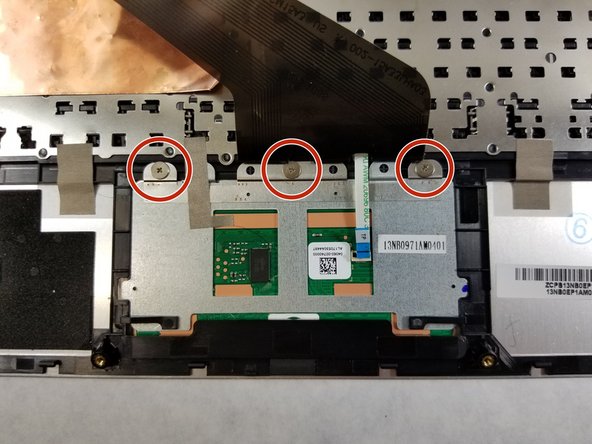
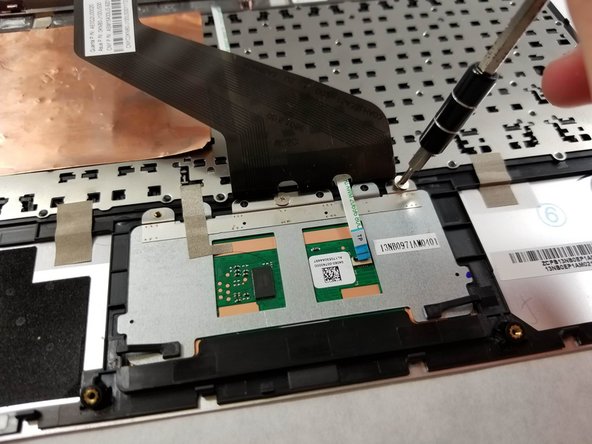
    • Remove the three Phillips #0 screws holding the trackpad in place.

  7. Asus Chromebook C101P Touchpad Replacement: passo 7, immagine 1 di 3 Asus Chromebook C101P Touchpad Replacement: passo 7, immagine 2 di 3 Asus Chromebook C101P Touchpad Replacement: passo 7, immagine 3 di 3
    • Using tweezers, pull the cable free from the touchpad.

    • Using tweezers, pry off the tape holding the touchpad down.

Conclusione

To reassemble your device, follow these instructions in reverse order.

Bryan Acosta

Membro da: 10/25/19

329 Reputazione

3 Guide realizzate

Team

0 Commenti

Aggiungi Commento

Visualizza Statistiche:

Ultime 24 Ore: 0

Ultimi 7 Giorni: 2

Ultimi 30 Giorni: 9

Tutti i Tempi: 360