Salta al contenuto principale

Artemide Tolomeo switch replacement

Cosa ti serve

  1. Artemide Tolomeo switch replacement, Switch: passo 1, immagine 1 di 1
    • Never forget to disconnect the power plug before starting repairs.

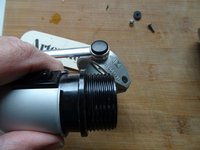
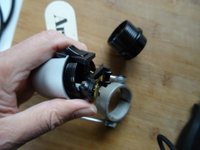
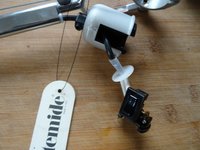
    • Unscrew the Phillips screw on the clamp. You may have to hold the nut on the opposite side.

  2. Artemide Tolomeo switch replacement: passo 2, immagine 1 di 1
    • Carefully press the clamp apart, using a suitable tool if necessary.

    • Lift the flanged edge of the lampshade out of the clamp.

    • Remove the lampshade.

  3. Artemide Tolomeo switch replacement: passo 3, immagine 1 di 2 Artemide Tolomeo switch replacement: passo 3, immagine 2 di 2
    • The cover of the socket also has a flanged edge. Lift the cover together with the socket out of the clamp.

  4. Artemide Tolomeo switch replacement: passo 4, immagine 1 di 3 Artemide Tolomeo switch replacement: passo 4, immagine 2 di 3 Artemide Tolomeo switch replacement: passo 4, immagine 3 di 3
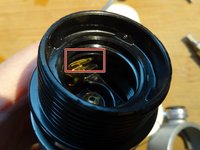
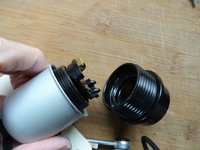
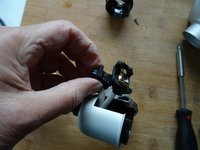
    • The socket is fixed at the top with a wide ring. This ring is secured against unscrewing by a small brass catch.

    • Press the brass catch with a small flat-blade screwdriver about 1 mm toward the center of the socket. Do not bend the brass catch too much.

    • Depending on the socket, the notch may look different. You may have to push it down.

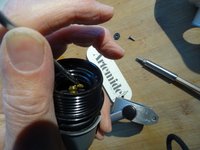
    • Then unscrew the wide ring on the lamp socket.

  5. Artemide Tolomeo switch replacement: passo 5, immagine 1 di 1
    • The cable is secured by a strain relief on the outside. Unscrew the plastic Allen screw until the cable is loose.

  6. Artemide Tolomeo switch replacement: passo 6, immagine 1 di 3 Artemide Tolomeo switch replacement: passo 6, immagine 2 di 3 Artemide Tolomeo switch replacement: passo 6, immagine 3 di 3
    • Slide the unit out of the switch and lamp socket.

  7. Artemide Tolomeo switch replacement: passo 7, immagine 1 di 3 Artemide Tolomeo switch replacement: passo 7, immagine 2 di 3 Artemide Tolomeo switch replacement: passo 7, immagine 3 di 3
    • Loosen the two small screws that connect the inner part of the socket and the switch to the two power supply lines.

    • Replace the unit.

  8. Artemide Tolomeo switch replacement: passo 8, immagine 1 di 2 Artemide Tolomeo switch replacement: passo 8, immagine 2 di 2
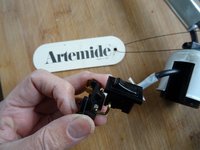
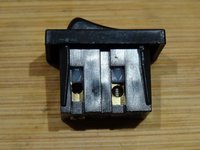
    • Here is a picture of the switch. You can buy the complete set quite expensive from Artemide, because the socket has been machined by hand. This has the advantage that you can also renew the socket.

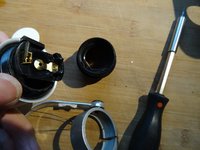
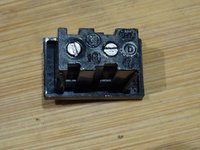
    • You may also find the switch on its own, which is cheaper. It is a snap-in rocker switch with screw connection. The cutout size is 20 x 14 mm, 15 mm installation depth from the frame. The frame is 3 mm high with the dimensions 26x16 mm. This one could fit.

Conclusione

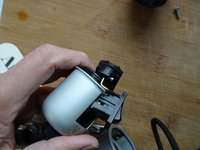
Work through the steps in reverse order to reassemble your device.

Altre 7 persone hanno completato questa guida.

Un ringraziamento speciale a questi traduttori:

de en

100%

oldturkey03 ci sta aiutando ad aggiustare il mondo! Vuoi partecipare?
Inizia a tradurre ›

VauWeh

Membro da: 10/19/15

205.313 Reputazione

250 Guide realizzate

Team

Repair is War on Entropy Membro di Repair is War on Entropy

Community

25 Membri

1.148 Guide realizzate

9 Commenti

Thanks for the article. When I get to step 5, I don't see an Allen screw. See the linked images. Do you know how I would remove the cable from the socket?

Socket photo 1

Socket photo 2

Thanks!

John E. - Replica

OK, I figured it out, needed to press down on the metal clip in photo 3.

John E. -

Fixed with a white switch.

New white switch.

John E. -

Well done, like it.

VauWeh -

Aggiungi Commento

Visualizza Statistiche:

Ultime 24 Ore: 13

Ultimi 7 Giorni: 70

Ultimi 30 Giorni: 333

Tutti i Tempi: 6,696