Salta al contenuto principale

Apple Studio Display M2454 CCFL Inverter Replacement

Cosa ti serve

  1. Apple Studio Display M2454 CCFL Inverter Replacement, CCFL Inverter: passo 1, immagine 1 di 2 Apple Studio Display M2454 CCFL Inverter Replacement, CCFL Inverter: passo 1, immagine 2 di 2
    • First remove the three 2mm hex screws from the top of the monitors stand.

    • Then, remove the four 2mm hex screws on the corners of the back panel.

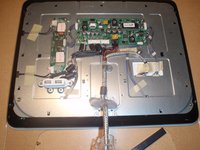
    • Finally, the back panels can be removed by pulling the main cable through the opening and sliding the panels away.

  2. Apple Studio Display M2454 CCFL Inverter Replacement: passo 2, immagine 1 di 1
    • Remove the metal backing.

    • Remove the single screw at the top and the two screws at the bottom of the monitor with #2 philips head screwdriver.

    • With the screws removed, push metal backing toward back of monitor to release its clips and pull away.

  3. Apple Studio Display M2454 CCFL Inverter Replacement: passo 3, immagine 1 di 2 Apple Studio Display M2454 CCFL Inverter Replacement: passo 3, immagine 2 di 2
    • The CCFL inverter board is the smaller of the two circuit boards with two wires and a ribbon cable running out of it.

    • Remove the two cables on the left side of the board, using a pin to insert into the two small holes and then pull out.

    • This step may be easier with two people.

    • Do not insert pin in hole with force or you risk damaging the connector.

  4. Apple Studio Display M2454 CCFL Inverter Replacement: passo 4, immagine 1 di 1
    • Remove the ribbon cable on the right side of board by pulling it away from the LCD main board with hand.

  5. Apple Studio Display M2454 CCFL Inverter Replacement: passo 5, immagine 1 di 1
    • Remove the top philips head screws holding the board to the monitor with #2 philips head screwdriver.

  6. Apple Studio Display M2454 CCFL Inverter Replacement: passo 6, immagine 1 di 1
    • Remove the bottom philips head screw and pull the CCFL Inverter board away from monitor.

    • To replace this part with a new one, simply follow these directions in reverse using the new board.

Linea Traguardo

Un'altra persona ha completato questa guida.

Dylan Perry

Membro da: 01/20/10

177 Reputazione

5 Guide realizzate

Team

Cal Poly, Team 13-27, Maness Winter 2010 Membro di Cal Poly, Team 13-27, Maness Winter 2010

CPSU-MANESS-W10S13G27

4 Membri

9 Guide realizzate

0 Commenti

Aggiungi Commento

Visualizza Statistiche:

Ultime 24 Ore: 2

Ultimi 7 Giorni: 6

Ultimi 30 Giorni: 15

Tutti i Tempi: 6,697