Salta al contenuto principale

Questa guida ha delle modifiche più recenti. Passa all'ultima versione non verificata.

Apple AirPort Extreme Model A1034 Motherboard Replacement

Cosa ti serve

  1. Apple AirPort Extreme Model A1034 Motherboard Replacement, Outer Case: passo 1, immagine 1 di 1
    • Remove the three 14.3mm T7 Torx screws from the bottom of AirPort.

  2. Apple AirPort Extreme Model A1034 Motherboard Replacement: passo 2, immagine 1 di 1
    • Remove the 5.1mm Phillips screw from the bottom of the AirPort. This screw is located under the identification sticker. You will have to remove the sticker or make a hole to remove it.

  3. Apple AirPort Extreme Model A1034 Motherboard Replacement: passo 3, immagine 1 di 2 Apple AirPort Extreme Model A1034 Motherboard Replacement: passo 3, immagine 2 di 2
    • Lift the bottom and top casing straight apart and then lift metal casing straight up from the bottom plastic casing.

  4. Apple AirPort Extreme Model A1034 Motherboard Replacement: passo 4, immagine 1 di 1
    • Unplug the black connector on the top of the metal casing by gently pulling horizontally.

  5. Apple AirPort Extreme Model A1034 Motherboard Replacement, Motherboard: passo 5, immagine 1 di 1
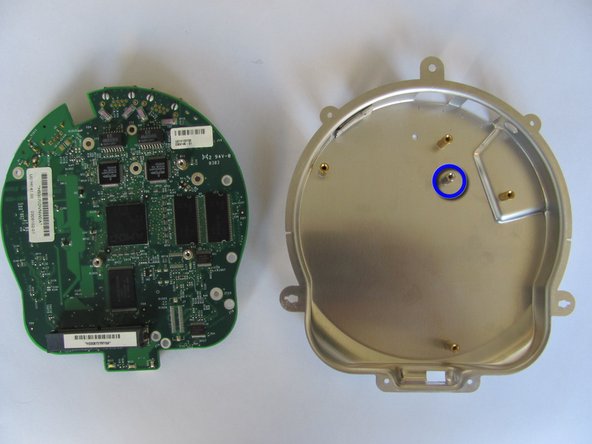
    • Remove the four 4.3mm phillips screws from the bottom of the metal casing.

  6. Apple AirPort Extreme Model A1034 Motherboard Replacement: passo 6, immagine 1 di 1
    • Lift and separate the top and bottom of the metal casing. You will now expose the motherboard and the AirPort card.

    • To remove the AirPort card, gently pull the plastic tab horizontally.

  7. Apple AirPort Extreme Model A1034 Motherboard Replacement: passo 7, immagine 1 di 1
    • Locate and remove the three 5.0mm phillips screws from the heat sink.

    • Lift to remove the heat sink from the motherboard.

  8. Apple AirPort Extreme Model A1034 Motherboard Replacement: passo 8, immagine 1 di 2 Apple AirPort Extreme Model A1034 Motherboard Replacement: passo 8, immagine 2 di 2
    • Locate and remove the five 7.5mm phillips screws from the motherboard.

    • Lift and separate the motherboard from the bottom metal casing.

    • There will be a loose hexagonal female screw extender under the motherboard.

Conclusione

To reassemble your device, follow these instructions in reverse order.

Altre 2 persone hanno completato questa guida.

Team

Cal Poly, Team 17-15, Regan Fall 2011 Membro di Cal Poly, Team 17-15, Regan Fall 2011

CPSU-REGAN-F11S17G15

3 Membri

13 Guide realizzate

0 Commenti

Aggiungi Commento

Visualizza Statistiche:

Ultime 24 Ore: 0

Ultimi 7 Giorni: 1

Ultimi 30 Giorni: 7

Tutti i Tempi: 5,971