Salta al contenuto principale

Apalus Digital Hair Straightening Brush LCD Screen Replacement

Cosa ti serve

  1. Apalus Digital Hair Straightening Brush LCD Screen Replacement, LCD Screen: passo 1, immagine 1 di 1
    • Remove the seven 5mm Phillips #1 screws on the comb-side of the brush.

  2. Apalus Digital Hair Straightening Brush LCD Screen Replacement: passo 2, immagine 1 di 1
    • Now that the screws are taken out, remove the backside of the comb.

  3. Apalus Digital Hair Straightening Brush LCD Screen Replacement: passo 3, immagine 1 di 1
    • Unplug the power cord from the insert inside of the brush.

    • Be careful not to tug on the wires. Hold the insert when removing the power cord.

  4. Apalus Digital Hair Straightening Brush LCD Screen Replacement: passo 4, immagine 1 di 1
    • Remove the circuit board and heating element from the handle.

    • This will make it easier to work on for later steps.

  5. Apalus Digital Hair Straightening Brush LCD Screen Replacement: passo 5, immagine 1 di 1
    • Locate the LED screen on the top side of the circuit board

  6. Apalus Digital Hair Straightening Brush LCD Screen Replacement: passo 6, immagine 1 di 1
    • Flip the circuit board to start soldering.

  7. Apalus Digital Hair Straightening Brush LCD Screen Replacement: passo 7, immagine 1 di 2 Apalus Digital Hair Straightening Brush LCD Screen Replacement: passo 7, immagine 2 di 2
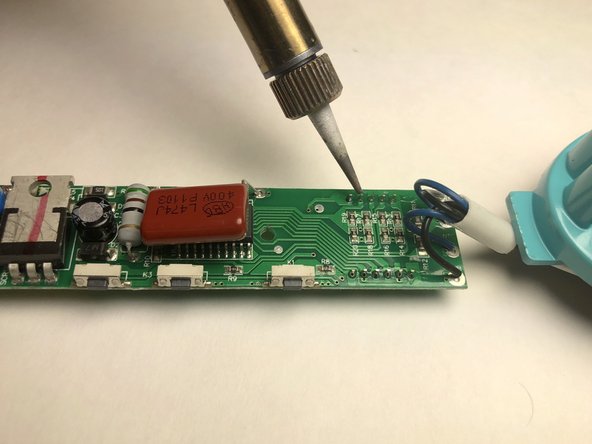
    • Using the soldering tool, melt the solder holding the LCD screen on the circuit board.

    • The screen is soldered in 11 places on the circuit board. Melt each of these points and remove the screen.

    • Soldering Technique Guide

  8. Apalus Digital Hair Straightening Brush LCD Screen Replacement: passo 8, immagine 1 di 2 Apalus Digital Hair Straightening Brush LCD Screen Replacement: passo 8, immagine 2 di 2
    • Now that the LCD screen is removed, use a soldering tool and solder to install the new screen on the circuit board.

    • Solder at the same 11 points where you previously melted to remove the screen.

Conclusione

To reassemble your device, follow these instructions in reverse order.

Malak

Membro da: 11/06/17

101 Reputazione

1 Guida realizzata

Team

IUPUI, Team S1-G3, Harley Fall 2017 Membro di IUPUI, Team S1-G3, Harley Fall 2017

IUPUI-HARLEY-F17S1G3

3 Membri

3 Guide realizzate

0 Commenti

Aggiungi Commento

Visualizza Statistiche:

Ultime 24 Ore: 0

Ultimi 7 Giorni: 2

Ultimi 30 Giorni: 6

Tutti i Tempi: 487