Salta al contenuto principale
Unisciti alla Community delle riparazioni - Crea un account

Altec Lansing Mini Lifejacket 2 Speaker Replacement

Cosa ti serve

  1. Altec Lansing Mini Lifejacket 2 Speaker Replacement, Back Panel: passo 1, immagine 1 di 3 Altec Lansing Mini Lifejacket 2 Speaker Replacement, Back Panel: passo 1, immagine 2 di 3 Altec Lansing Mini Lifejacket 2 Speaker Replacement, Back Panel: passo 1, immagine 3 di 3
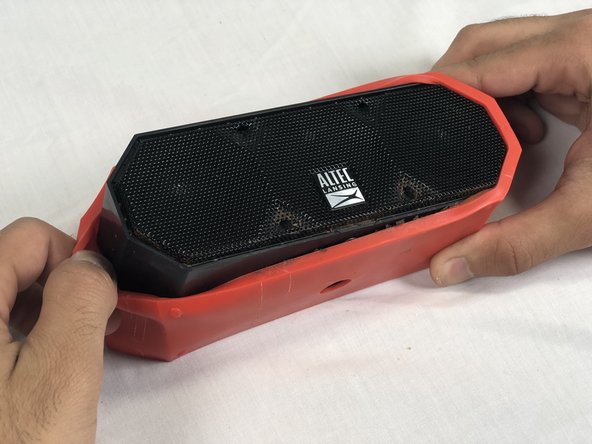
    • Use the spudger to remove the eight black pins from the front and back of the wire screens.

    Chiedi a FixBot

    Aggiungi Commento

  2. Altec Lansing Mini Lifejacket 2 Speaker Replacement: passo 2, immagine 1 di 3 Altec Lansing Mini Lifejacket 2 Speaker Replacement: passo 2, immagine 2 di 3 Altec Lansing Mini Lifejacket 2 Speaker Replacement: passo 2, immagine 3 di 3
    • Detach the eight secondary pins from the front and back of the wire mesh plates with a spudger.

    • Removing the secondary pins from the rubber casing is optional.

    Chiedi a FixBot

    Aggiungi Commento

  3. Altec Lansing Mini Lifejacket 2 Speaker Replacement: passo 3, immagine 1 di 2 Altec Lansing Mini Lifejacket 2 Speaker Replacement: passo 3, immagine 2 di 2
    • Remove both black and orange layers from the speaker body.

    Chiedi a FixBot

    Aggiungi Commento

  4. Altec Lansing Mini Lifejacket 2 Speaker Replacement: passo 4, immagine 1 di 3 Altec Lansing Mini Lifejacket 2 Speaker Replacement: passo 4, immagine 2 di 3 Altec Lansing Mini Lifejacket 2 Speaker Replacement: passo 4, immagine 3 di 3
    • Remove the single 7.8mm Phillips #2 screw from the mounting plate located under the device.

    • Slide the mounting plate out to remove it.

    Chiedi a FixBot

    Aggiungi Commento

  5. Altec Lansing Mini Lifejacket 2 Speaker Replacement: passo 5, immagine 1 di 2 Altec Lansing Mini Lifejacket 2 Speaker Replacement: passo 5, immagine 2 di 2
    • Pry off the wire mesh on both sides using a metal spudger.

    • Be gentle to avoid bending the mesh.

    Chiedi a FixBot

    Aggiungi Commento

  6. Altec Lansing Mini Lifejacket 2 Speaker Replacement: passo 6, immagine 1 di 2 Altec Lansing Mini Lifejacket 2 Speaker Replacement: passo 6, immagine 2 di 2
    Strumento utilizzato in questo passaggio:
    Tweezers
    $4.99
    • Using tweezers, remove the four rubber stoppers in each corner of the rear panel.

    Chiedi a FixBot

    Aggiungi Commento

  7. Altec Lansing Mini Lifejacket 2 Speaker Replacement: passo 7, immagine 1 di 1
    • Remove the four 13.7mm Phillips #1 screws located underneath the rubber stoppers.

    Chiedi a FixBot

    Aggiungi Commento

  8. Altec Lansing Mini Lifejacket 2 Speaker Replacement: passo 8, immagine 1 di 1
    • Pull the case apart to access the interior components.

    Chiedi a FixBot

    Aggiungi Commento

  9. Altec Lansing Mini Lifejacket 2 Speaker Replacement: passo 9, immagine 1 di 3 Altec Lansing Mini Lifejacket 2 Speaker Replacement: passo 9, immagine 2 di 3 Altec Lansing Mini Lifejacket 2 Speaker Replacement: passo 9, immagine 3 di 3
    • To remove the back panel, gently pull out its wire harness.

    Chiedi a FixBot

    Aggiungi Commento

  10. Altec Lansing Mini Lifejacket 2 Speaker Replacement, Speaker: passo 10, immagine 1 di 2 Altec Lansing Mini Lifejacket 2 Speaker Replacement, Speaker: passo 10, immagine 2 di 2
    • Remove the three 9.3 mm Phillips #1 screws on the speaker cover.

    Chiedi a FixBot

    Aggiungi Commento

  11. Altec Lansing Mini Lifejacket 2 Speaker Replacement: passo 11, immagine 1 di 3 Altec Lansing Mini Lifejacket 2 Speaker Replacement: passo 11, immagine 2 di 3 Altec Lansing Mini Lifejacket 2 Speaker Replacement: passo 11, immagine 3 di 3
    • To remove the speaker, gently pull out the its wire harness.

    Chiedi a FixBot

    Aggiungi Commento

  12. Altec Lansing Mini Lifejacket 2 Speaker Replacement: passo 12, immagine 1 di 2 Altec Lansing Mini Lifejacket 2 Speaker Replacement: passo 12, immagine 2 di 2
    • Remove the rubber ring from the rim of the speaker.

    • This ring helps keep water from entering the device. Be careful to position it correctly during reassembly.

    Chiedi a FixBot

    Aggiungi Commento

Conclusione

To reassemble your device, follow these instructions in reverse order.

Annulla: non ho completato questa guida.

Un'altra persona ha completato questa guida.

Team

USF Tampa, Team S3-G2, Nance Spring 2018 Membro di USF Tampa, Team S3-G2, Nance Spring 2018

USFT-NANCE-S18S3G2

4 Membri

4 guide realizzate

3Commenti sulla guida

What speaker should we be getting to replace the faulty speaker, including the wires needed to plug into the slots on the board?

russell rogge - Rispondi Condividi

Where can I get this speaker parts?

T Rex movies - Rispondi Condividi

Where can I get a complete power circuit board from for a Imw575 as mine is completely broken thank you

Paul Williams - Rispondi Condividi

Aggiungi Commento

Visualizza statistiche:

Ultime 24 ore: 2

Ultimi 7 giorni: 12

Ultimi 30 giorni: 51

Tutti i Tempi: 4,917