Salta al contenuto principale

Alienware M15x Hard-Drive Replacement

Cosa ti serve

  1. Alienware M15x Hard-Drive Replacement, Turn the Computer: passo 1, immagine 1 di 1
    • WARNING: Before working inside your computer, read the safety information that shipped with your computer.

    • Turn the computer over.

  2. Alienware M15x Hard-Drive Replacement, Sliding the Battery: passo 2, immagine 1 di 1
    • Slide the battery latch to the unlock position as shown.

  3. Alienware M15x Hard-Drive Replacement, Removing the Battery Pack: passo 3, immagine 1 di 1
    • After the Battery Pack pops up, remove the Battery Pack.

  4. Alienware M15x Hard-Drive Replacement, Aligning the Battery Pack Tabs: passo 4, immagine 1 di 1
    • Align the battery pack tabs with the slots in the battery bay.

  5. Alienware M15x Hard-Drive Replacement, Pushing the Battery Pack: passo 5, immagine 1 di 1
    • Push the NEW battery pack into the battery bay until the battery pack clicks into place.

  6. Alienware M15x Hard-Drive Replacement, Loosen the Screws: passo 6, immagine 1 di 1
    • WARNING: Before working inside your computer, read the safety information that shipped with your computer.

    • WARNING: If you remove the hard drive from the computer when the drive is hot, do not touch the metal housing of the hard drive.

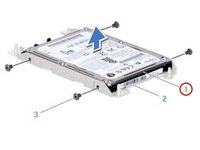
    • Loosen the four captive screws that secure the hard-drive assembly.

  7. Alienware M15x Hard-Drive Replacement, Lifting the Hard-Drive Assembly: passo 7, immagine 1 di 1
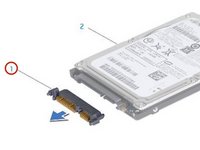
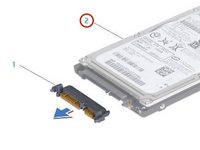
    • Using the pull-tab, lift the hard-drive assembly out of the hard-drive bay.

  8. Alienware M15x Hard-Drive Replacement, Remove the Screws: passo 8, immagine 1 di 1
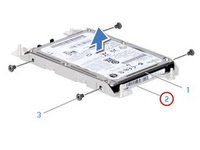
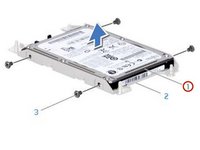
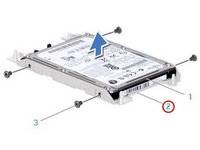
    • Remove the four screws that secure the hard drive to the hard-drive bracket.

  9. Alienware M15x Hard-Drive Replacement, Lifting the Hard Drive: passo 9, immagine 1 di 2 Alienware M15x Hard-Drive Replacement, Lifting the Hard Drive: passo 9, immagine 2 di 2
    • Lift the hard drive out of the hard-drive bracket.

  10. Alienware M15x Hard-Drive Replacement, Disconnect the Interposer: passo 10, immagine 1 di 2 Alienware M15x Hard-Drive Replacement, Disconnect the Interposer: passo 10, immagine 2 di 2
    • Disconnect the interposer from the hard drive.

  11. Alienware M15x Hard-Drive Replacement, Connecting the Interposer: passo 11, immagine 1 di 2 Alienware M15x Hard-Drive Replacement, Connecting the Interposer: passo 11, immagine 2 di 2
    • Connect the interposer to the NEW hard drive.

  12. Alienware M15x Hard-Drive Replacement, Placing the Hard-Drive in the Bracket: passo 12, immagine 1 di 2 Alienware M15x Hard-Drive Replacement, Placing the Hard-Drive in the Bracket: passo 12, immagine 2 di 2
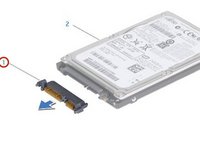
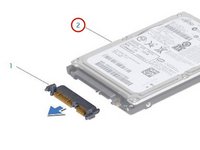
    • Place the hard drive in the hard-drive bracket.

  13. Alienware M15x Hard-Drive Replacement, Replace the Four Screws: passo 13, immagine 1 di 1
    • Replace the four screws that secure the hard drive to the hard-drive bracket.

  14. Alienware M15x Hard-Drive Replacement, Placing the Hard-Drive Assembly: passo 14, immagine 1 di 1
    • Place the hard-drive assembly in the hard-drive bay.

  15. Alienware M15x Hard-Drive Replacement, Aligning and Tightening the Screws: passo 15, immagine 1 di 1
    • Align and tighten the four captive screws that secure the hard-drive assembly to the hard-drive bay.

Conclusione

To reassemble your device, follow these instructions in reverse order.

Terrence15

Membro da: 12/18/17

79.121 Reputazione

441 Guide realizzate

Team

RampUP America, Inc. Membro di RampUP America, Inc.

Community

42 Membri

1.985 Guide realizzate

0 Commenti

Aggiungi Commento

Visualizza Statistiche:

Ultime 24 Ore: 0

Ultimi 7 Giorni: 0

Ultimi 30 Giorni: 2

Tutti i Tempi: 482