Salta al contenuto principale

Alienware 17 R2 Hard Drive Replacement

Cosa ti serve

  1. Alienware 17 R2 Hard Drive Replacement, Hard Drive: passo 1, immagine 1 di 1
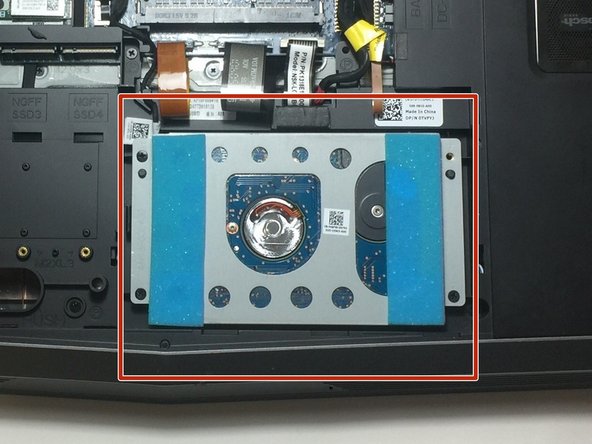
    • Make sure the laptop is unplugged from any power source.

    • Put the laptop facing down on a hard surface.

  2. Alienware 17 R2 Hard Drive Replacement: passo 2, immagine 1 di 3 Alienware 17 R2 Hard Drive Replacement: passo 2, immagine 2 di 3 Alienware 17 R2 Hard Drive Replacement: passo 2, immagine 3 di 3
    • Unscrew the two 6mm screws on the bottom side of the laptop.

    • Lift up the back cover and slide towards you.

  3. Alienware 17 R2 Hard Drive Replacement: passo 3, immagine 1 di 2 Alienware 17 R2 Hard Drive Replacement: passo 3, immagine 2 di 2
    • Locate the Hard Drive

  4. Alienware 17 R2 Hard Drive Replacement: passo 4, immagine 1 di 1
    • Remove the screws that connect the SSD Bay to the laptop

  5. Alienware 17 R2 Hard Drive Replacement: passo 5, immagine 1 di 1
    • Unscrew the three screws holding the hard drive

  6. Alienware 17 R2 Hard Drive Replacement: passo 6, immagine 1 di 2 Alienware 17 R2 Hard Drive Replacement: passo 6, immagine 2 di 2
    • Unscrew the four screws on the long sides of the hard drive casing

  7. Alienware 17 R2 Hard Drive Replacement: passo 7, immagine 1 di 3 Alienware 17 R2 Hard Drive Replacement: passo 7, immagine 2 di 3 Alienware 17 R2 Hard Drive Replacement: passo 7, immagine 3 di 3
    • Now that the hard drive casing is off, carefully unplug the hard drive from the laptop

    • Your hard drive has now been successfully removed from your device

Conclusione

To reassemble your device, follow these instructions in reverse order.

0 Commenti

Aggiungi Commento

Visualizza Statistiche:

Ultime 24 Ore: 0

Ultimi 7 Giorni: 4

Ultimi 30 Giorni: 15

Tutti i Tempi: 1,483