Salta al contenuto principale

Alcatel One Touch Evolve 2 Rear-Facing Camera Replacement

Cosa ti serve

  1. Alcatel One Touch Evolve 2 Rear-Facing Camera Replacement, Rear-Facing Camera: passo 1, immagine 1 di 2 Alcatel One Touch Evolve 2 Rear-Facing Camera Replacement, Rear-Facing Camera: passo 1, immagine 2 di 2
    • Before disassembling your Alcatel One Touch Evolve 2, be sure it is powered off.

    • Make sure your nylon spudger is pressed thin at the tip. Nylon spudgers tend to dull after use, and a dull spudger will be more difficult to use in this repair.

    • Take a nylon spudger and pry apart the back plastic casing of the phone. Begin with the gap in the bottom right hand corner, and pry the spudger around the outside of the phone until it dislodges from the body.

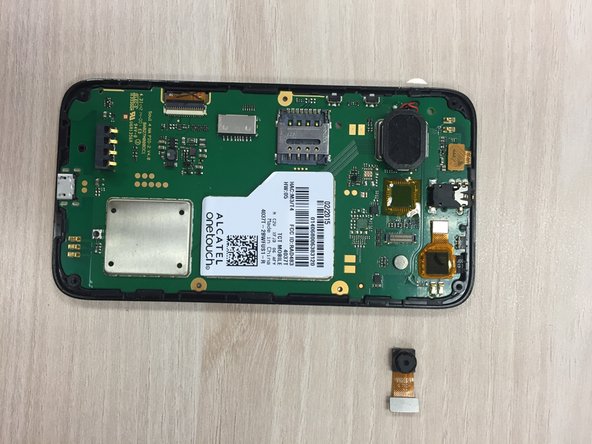
    • Once separated, remove the plastic backing from the phone and set it aside.

  2. Alcatel One Touch Evolve 2 Rear-Facing Camera Replacement: passo 2, immagine 1 di 3 Alcatel One Touch Evolve 2 Rear-Facing Camera Replacement: passo 2, immagine 2 di 3 Alcatel One Touch Evolve 2 Rear-Facing Camera Replacement: passo 2, immagine 3 di 3
    • Remove battery from the back of device by prying the spudger underneath the battery, via the semicircular indentation at the top of the battery pack

  3. Alcatel One Touch Evolve 2 Rear-Facing Camera Replacement: passo 3, immagine 1 di 1
    • Using a J000 screwdriver, remove the four screws from the four corners of the back of the phone body. Keep the screws together and set aside.

  4. Alcatel One Touch Evolve 2 Rear-Facing Camera Replacement: passo 4, immagine 1 di 2 Alcatel One Touch Evolve 2 Rear-Facing Camera Replacement: passo 4, immagine 2 di 2
    • This step may prove difficult as there are many pressure points holding the plastic backing in place. Use moderate force to pry them apart, but be careful not to snap the plastic or scratch the inside of the phone.

    • Use the nylon spudger to pry the plastic backing from the rest of the phone. Begin by using the indentation at the top left side of the of the phone as an access point. Work counter clockwise around the outside of the phone until the backing is dislodged.

    • There are plastic latches that secure the cover to the rest of the phone. These points prove difficult to dislodge. Use the gaps between them to create leverage.

  5. Alcatel One Touch Evolve 2 Rear-Facing Camera Replacement: passo 5, immagine 1 di 2 Alcatel One Touch Evolve 2 Rear-Facing Camera Replacement: passo 5, immagine 2 di 2
    • The camera should detach easily. If you are experiencing difficulty detaching it, stop and make sure the correct piece is being worked on.

    • Use the nylon spudger to gently dislodge the broken camera from the inside of the phone. Insert the spudger underneath the corner of the metal plug, and pry upwards.

Conclusione

Follow the above steps in reverse to reassemble the device.

Altre 2 persone hanno completato questa guida.

Emma Crane

Membro da: 02/11/16

21 Reputazione

1 Guida realizzata

Team

Ohio State, Team 1-2, Burgess Spring 2016 Membro di Ohio State, Team 1-2, Burgess Spring 2016

OSU-BURGESS-S16S1G2

4 Membri

2 Guide realizzate

Un commento

Wow! what a great guide!

Colan Callahan - Replica

Aggiungi Commento

Visualizza Statistiche:

Ultime 24 Ore: 0

Ultimi 7 Giorni: 1

Ultimi 30 Giorni: 4

Tutti i Tempi: 570