Introduzione
- Può causare un kernel panic con l'ibernazione su alcuni MacBook Air, Questa guida è solo per i modelli di inizio 2015*
- I MacBook Air del 2015 hanno solo 4 corsie PCIe, quindi non potrai utilizzare appieno i dischi NVMe*
Cosa ti serve
-
-
MacBook Air Late 2010 - Funzionante - High Sierra, Catalina, M2 Samsung Evo 860, Adattattore.
-
MacBook Air 2011 - Funzionante - High Sierra, M.2 Transcend MTS830S SATA III, Adattattore Lungo.
-
MacBook Air 2012 - Funzionante - Catalina, M.2 Transcend MTS830S SATA III, Adattattore Lungo.
-
MacBook Air 2013 - Sconosciuta
-
MacBook Air 2014 - WD_black 500 + adattatore Sintech, funziona MacOS Big Sur
-
MacBook Air Early 2015 - FUNZIONANTE- Da Mojave 10.14.3 a Big Sur 11.0.1- SSD Crucial P1 NVME, adattatore.
-
MacBook Air 2017 - FUNZIONANTE - High Sierra, Catalina and Big Sur, Monterey - Transcend MTE250S PCIe 4.0 4x NVMe, Adattatore Lungo + Nastro Kapton.
-
MacBook Air 2018 e successivi: NON funzionerà perchè l'SSD non è rimovibile.
-
-
-
Usa un cacciavite P5 Pentalobe per rimuovere le dieci viti che tengono in posizione il case inferiore, delle seguenti lunghezze:
-
Due viti da 9 mm
-
Otto viti da 2,6 mm
-
-
-
-
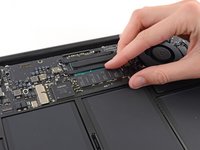
Afferra la piccola striscia di plastica trasparente attaccata al connettore della batteria e tirala parallelamente alla scheda verso il bordo anteriore dell'Air.
-
-
-
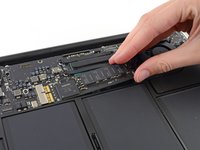
Rimuovi la singola vite Torx T5 da 2,9 mm che fissa l'SSD alla scheda madre.
-
-
-
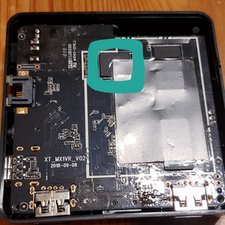
Infila attentamente il nuovo SSD nell'adattatore, facendo riferimento alla lunghezza del disco originale per capire quando l'SSD è infilato del tutto nell'adattatore. La lunghezza dovrebbe essere la stessa.
-
Infila l'SSD e l'adattatore nella presa, spingendolo parallelamente alla scheda.
-
Mentre reinstalli l'SSD, assicurati che sia posizionato correttamente prima di avvitare la sua vite di bloccaggio.
-


Per rimontare il tuo dispositivo, segui le istruzioni in ordine inverso.
Per rimontare il tuo dispositivo, segui le istruzioni in ordine inverso.
Annulla: non ho completato questa guida.
Altre 21 persone hanno completato questa guida.
Un ringraziamento speciale a questi traduttori:
100%
Daniele Carminati ci sta aiutando ad aggiustare il mondo! Vuoi partecipare?
Inizia a tradurre ›
17 Commenti
Please advise ! I installed the Crucial P1 ssd with the adapter, i booted with the option/alt key and the ssd is not present, only the bootable usb ! On a MacBook Air early 2015
The disk will not be seen by the Disk Utility. But if you boot from a USB disk (option_r during boot) and start the Disk Utility program you’ll be able to see the new unformatted disk. Erase the drive. Then you can restore from a Time Machine backup or restart without the USB….This worked for me.
I also have the same problem, do i need latest operating system to detect these new drives?
Why does the guide recommend 5 hours?
After reading, I think this should take 30-45 minutes or possibly a bit less. Maybe I overlooked a step, or something in particular takes extra long? I’m interested to hear how this went for others who have tried.
excellent write up tho, I didn’t know there were NVME adapters available for these, awesome!
The hardware only takes about a half hour, the installing the OS is what takes the time! To speed it up setup an external OS installer drive the faster the drive & interface the faster the install! A thunderbolt RAID’ed SSD is about as fast as you can get it takes just about an hour with it.
Dan -