Salta al contenuto principale

Acer Spin 5 SP515-51GN-807G Hard Drive Replacement

Cosa ti serve

  1. Acer Spin 5 SP515-51GN-807G Hard Drive Replacement, Back Cover: passo 1, immagine 1 di 1
    • Remove the eleven 6.5 mm screws that secure the back case using a Phillips #1 screwdriver.

  2. Acer Spin 5 SP515-51GN-807G Hard Drive Replacement: passo 2, immagine 1 di 3 Acer Spin 5 SP515-51GN-807G Hard Drive Replacement: passo 2, immagine 2 di 3 Acer Spin 5 SP515-51GN-807G Hard Drive Replacement: passo 2, immagine 3 di 3
    • Use a plastic opening tool to gently pry open the back cover.

  3. Acer Spin 5 SP515-51GN-807G Hard Drive Replacement: passo 3, immagine 1 di 1
    • Gently remove the back cover from the device.

  4. Acer Spin 5 SP515-51GN-807G Hard Drive Replacement, Battery: passo 4, immagine 1 di 3 Acer Spin 5 SP515-51GN-807G Hard Drive Replacement, Battery: passo 4, immagine 2 di 3 Acer Spin 5 SP515-51GN-807G Hard Drive Replacement, Battery: passo 4, immagine 3 di 3
    Attrezzo utilizzato in questo passaggio:
    Tweezers
    $4.99
    Compra
    • Using tweezers, remove the piece of black tape over the battery cable connector.

  5. Acer Spin 5 SP515-51GN-807G Hard Drive Replacement: passo 5, immagine 1 di 3 Acer Spin 5 SP515-51GN-807G Hard Drive Replacement: passo 5, immagine 2 di 3 Acer Spin 5 SP515-51GN-807G Hard Drive Replacement: passo 5, immagine 3 di 3
    • Remove the piece of black tape that covers the battery.

  6. Acer Spin 5 SP515-51GN-807G Hard Drive Replacement: passo 6, immagine 1 di 2 Acer Spin 5 SP515-51GN-807G Hard Drive Replacement: passo 6, immagine 2 di 2
    • Grip the battery cable on both sides with your fingertips and gently pull it away from the port.

    • If needed, use the plastic opening tool to remove the cord from its port.

  7. Acer Spin 5 SP515-51GN-807G Hard Drive Replacement: passo 7, immagine 1 di 3 Acer Spin 5 SP515-51GN-807G Hard Drive Replacement: passo 7, immagine 2 di 3 Acer Spin 5 SP515-51GN-807G Hard Drive Replacement: passo 7, immagine 3 di 3
    • Remove the two 3.5 mm screws that secure the battery using a Phillips #00 screwdriver (PH00 bit).

  8. Acer Spin 5 SP515-51GN-807G Hard Drive Replacement: passo 8, immagine 1 di 2 Acer Spin 5 SP515-51GN-807G Hard Drive Replacement: passo 8, immagine 2 di 2
    • Carefully place your fingers under the plastic lip where the screws were removed.

    • Lift upwards to remove the battery.

    • Do not bend or puncture the lithium ion battery as it poses a fire hazard.

  9. Acer Spin 5 SP515-51GN-807G Hard Drive Replacement, Hard Drive: passo 9, immagine 1 di 2 Acer Spin 5 SP515-51GN-807G Hard Drive Replacement, Hard Drive: passo 9, immagine 2 di 2
    • Use a Phillips #1 screwdriver to remove the three 3.8 mm screws from the hard drive brackets.

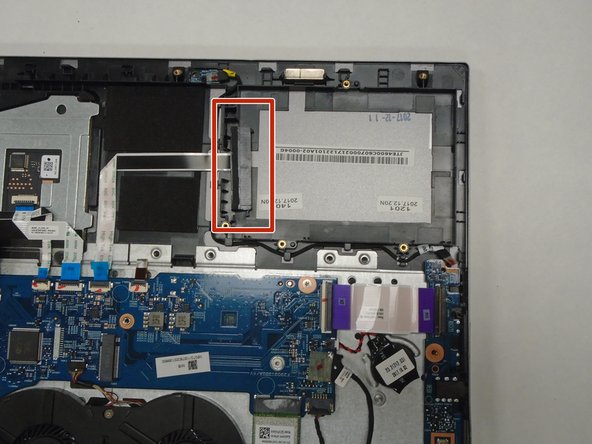
    • Unplug the hard drive cable.

    • Lift the hard drive out from the device.

Conclusione

To reassemble your device, follow these instructions in reverse order.

0 Commenti

Aggiungi Commento

Visualizza Statistiche:

Ultime 24 Ore: 1

Ultimi 7 Giorni: 4

Ultimi 30 Giorni: 16

Tutti i Tempi: 1,055