Salta al contenuto principale

Acer Iconia Tablet A100 Screen Cover Glass Replacement

Cosa ti serve

  1. Acer Iconia Tablet A100 Screen Cover Glass Replacement, Screen Cover Glass: passo 1, immagine 1 di 1
    • Begin with the screen facing in the upward position.

  2. Acer Iconia Tablet A100 Screen Cover Glass Replacement: passo 2, immagine 1 di 1
    • Remove the four side pieces of the tablet.

    • Start with either side and work your way around the tablet.

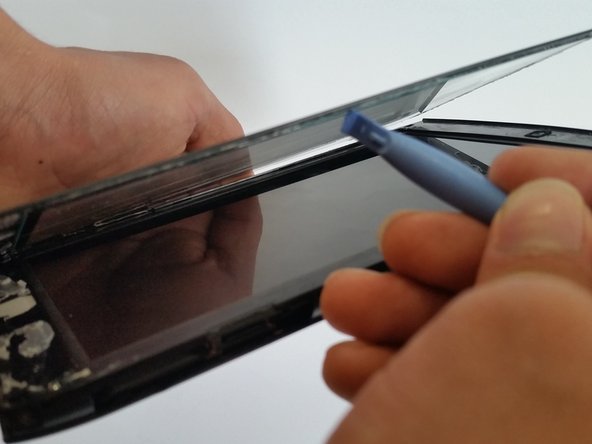
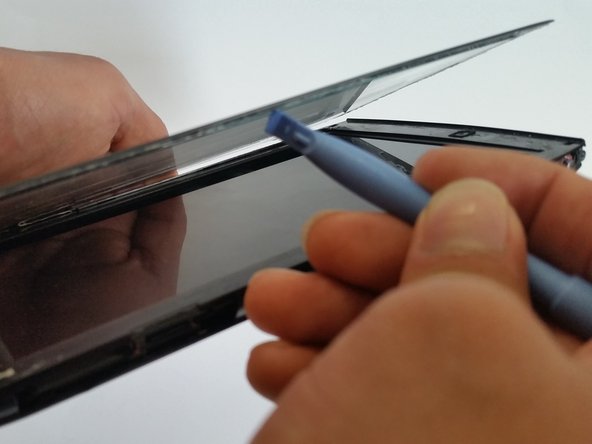
  3. Acer Iconia Tablet A100 Screen Cover Glass Replacement: passo 3, immagine 1 di 3 Acer Iconia Tablet A100 Screen Cover Glass Replacement: passo 3, immagine 2 di 3 Acer Iconia Tablet A100 Screen Cover Glass Replacement: passo 3, immagine 3 di 3
    • Separate the screen from the device with a plastic opening tool (four sides in total).

    • Start with a plastic opening tool along the top perimeter of the tablet, the thin line, and remove the screen.

  4. Acer Iconia Tablet A100 Screen Cover Glass Replacement: passo 4, immagine 1 di 1
    • Grab the new screen, and place on top of the tablet.

    • Position it to where everything is aligned correctly.

  5. Acer Iconia Tablet A100 Screen Cover Glass Replacement: passo 5, immagine 1 di 1
    • Put the four side pieces back in its original place.

Conclusione

To reassemble your device, follow these instructions in reverse order.

Altre 2 persone hanno completato questa guida.

0 Commenti

Aggiungi Commento

Visualizza Statistiche:

Ultime 24 Ore: 1

Ultimi 7 Giorni: 1

Ultimi 30 Giorni: 8

Tutti i Tempi: 1,181