Questa versione può contenere modifiche errate. Passa all'ultima istantanea verificata.
Cosa ti serve
-
Questo passaggio è privo di traduzione. Aiuta a tradurlo
-
Remove the thirteen 6.0mm screws on the back panel using your Phillips #1 screwdriver.
-
-
Questo passaggio è privo di traduzione. Aiuta a tradurlo
-
Pry the back panel open with the plastic opening tool.
-
-
Questo passaggio è privo di traduzione. Aiuta a tradurlo
-
Remove the two 6.0mm screws securing the battery with your Phillips #1 screwdriver.
-
-
Questo passaggio è privo di traduzione. Aiuta a tradurlo
-
Carefully pull out the battery wire connected to the battery port.
-
-
Questo passaggio è privo di traduzione. Aiuta a tradurlo
-
Slowly lift the battery to remove it from the Chromebook.
-
-
-
Questo passaggio è privo di traduzione. Aiuta a tradurlo
-
Unplug the speaker wire from the motherboard.
-
-
Questo passaggio è privo di traduzione. Aiuta a tradurlo
-
Carefully pull out the speakers from each side of the Chromebook.
-
-
Questo passaggio è privo di traduzione. Aiuta a tradurlo
-
Remove the three 6.0mm screws using the Phillips #1 screwdriver.
-
Remove the two 3.0mm screws using the Phillips #1 screwdriver.
-
-
Questo passaggio è privo di traduzione. Aiuta a tradurlo
-
Position the spudger under the switch that connects the ribbon cable to the motherboard.
-
Flick the spudger up to flip the switch up.
-
-
Questo passaggio è privo di traduzione. Aiuta a tradurlo
-
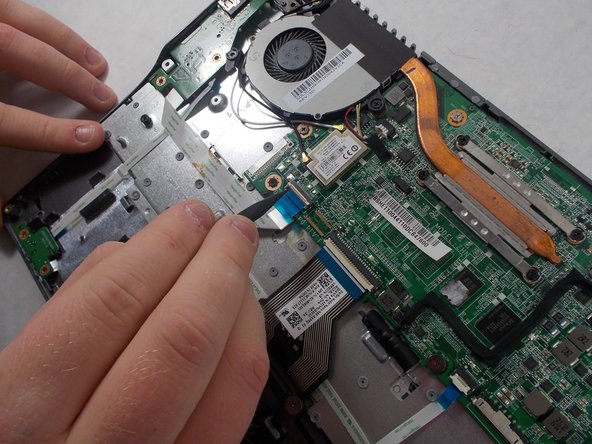
Pull the blue tab on the ribbon cable to remove it.
-
-
Questo passaggio è privo di traduzione. Aiuta a tradurlo
-
Grab the edges of each piece of circuitry that is included with the SD Card Reader and USB Port.
-
Pull each piece of circuitry out of the Chromebook and remove it from the device.
-
-
Questo passaggio è privo di traduzione. Aiuta a tradurlo
-
Position the spudger under the switch.
-
Flick the spudger up to flip the switch up.
-
-
Questo passaggio è privo di traduzione. Aiuta a tradurlo
-
Pull on the blue tab of the ribbon cable to remove the ribbon cable.
-
Repeat the previous step and this step with the other ribbon cable that is attached to the SD Card Reader/USB Port.
-


Annulla: non ho completato questa guida.
Un'altra persona ha completato questa guida.
Team

UMass Dartmouth, Team S4-G7, Julie Fall 2017 Membro di UMass Dartmouth, Team S4-G7, Julie Fall 2017
UMASSD-JULIE-F17S4G7
1 Membro
7 Guide realizzate