Salta al contenuto principale

Acer Aspire V5-122P-0468 Touchpad Replacement

Cosa ti serve

  1. Acer Aspire V5-122P-0468 Touchpad Replacement, Battery: passo 1, immagine 1 di 2 Acer Aspire V5-122P-0468 Touchpad Replacement, Battery: passo 1, immagine 2 di 2
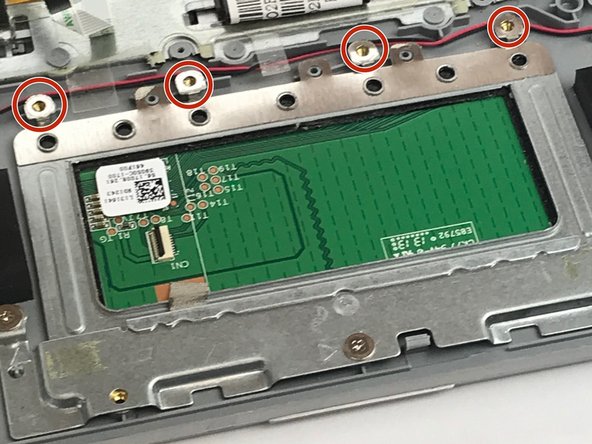
    • Remove the nine 4mm screws with a PH0 screwdriver.

    • Remove the two 6mm screws with a PH0 screwdriver.

  2. Acer Aspire V5-122P-0468 Touchpad Replacement: passo 2, immagine 1 di 2 Acer Aspire V5-122P-0468 Touchpad Replacement: passo 2, immagine 2 di 2
    • Remove the black rubber tab on the back of the computer

    • Remove the 4mm screw hidden underneath the black tab with a PH0 screwdriver.

  3. Acer Aspire V5-122P-0468 Touchpad Replacement: passo 3, immagine 1 di 2 Acer Aspire V5-122P-0468 Touchpad Replacement: passo 3, immagine 2 di 2
    • Orient the computer upside down, with the hinges facing away from you.

    • Find the black plastic piece in the SD card slot on the right side of the computer.

    • Remove the plastic piece by sliding it out of the SD card slot.

  4. Acer Aspire V5-122P-0468 Touchpad Replacement: passo 4, immagine 1 di 3 Acer Aspire V5-122P-0468 Touchpad Replacement: passo 4, immagine 2 di 3 Acer Aspire V5-122P-0468 Touchpad Replacement: passo 4, immagine 3 di 3
    • Insert a spudger at these eight locations to disengage the plastic tabs from the housing cover, and pry apart.

    • Continue around the entire perimeter of the cover with the spudger.

    • Use a spudger to pry the cover around I/O ports.

  5. Acer Aspire V5-122P-0468 Touchpad Replacement: passo 5, immagine 1 di 3 Acer Aspire V5-122P-0468 Touchpad Replacement: passo 5, immagine 2 di 3 Acer Aspire V5-122P-0468 Touchpad Replacement: passo 5, immagine 3 di 3
    • Remove the two 4mm screws using a PH0 screwdriver.

    • Depress the tabs holding the battery with a spudger.

    • Disconnect the battery connector from the motherboard using a spudger.

    • Pull the battery up and away from the laptop to remove.

  6. Acer Aspire V5-122P-0468 Touchpad Replacement, Touchpad: passo 6, immagine 1 di 1
    • Use the spudger to pop up the latch on the ZIF connector.

    • Pull out the ribbon cable.

  7. Acer Aspire V5-122P-0468 Touchpad Replacement: passo 7, immagine 1 di 3 Acer Aspire V5-122P-0468 Touchpad Replacement: passo 7, immagine 2 di 3 Acer Aspire V5-122P-0468 Touchpad Replacement: passo 7, immagine 3 di 3
    • Remove the three 2mm PH #0 screws.

    • Lift the metal tape up and off of the mounting bracket.

  8. Acer Aspire V5-122P-0468 Touchpad Replacement: passo 8, immagine 1 di 1
    • Remove the metal mounting bracket from the bottom of the touchpad

  9. Acer Aspire V5-122P-0468 Touchpad Replacement: passo 9, immagine 1 di 2 Acer Aspire V5-122P-0468 Touchpad Replacement: passo 9, immagine 2 di 2
    • Carefully remove the foam pad from along the top edge of touchpad using a spudger.

    • This pad can be reused.

    • Remove the four 2mm PH #0 screws.

  10. Acer Aspire V5-122P-0468 Touchpad Replacement: passo 10, immagine 1 di 1
    • Remove the touchpad from the laptop using a spudger.

Conclusione

To reassemble your device, follow these instructions in reverse order.

Un'altra persona ha completato questa guida.

Team

USF Tampa, Team S16-G1, Boczar Spring 2018 Membro di USF Tampa, Team S16-G1, Boczar Spring 2018

USFT-BOCZAR-S18S16G1

5 Membri

10 Guide realizzate

0 Commenti

Aggiungi Commento

Visualizza Statistiche:

Ultime 24 Ore: 2

Ultimi 7 Giorni: 7

Ultimi 30 Giorni: 26

Tutti i Tempi: 1,664