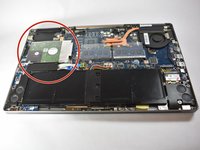
Salta al contenuto principale

Acer Aspire R7-572-6423 Hard Drive Replacement

Cosa ti serve

  1. Acer Aspire R7-572-6423 Hard Drive Replacement, Hard Drive: passo 1, immagine 1 di 1
    • Turn off the laptop and disconnect the power adapter before attempting this guide. Failure to do so can result in a shock hazard.

  2. Acer Aspire R7-572-6423 Hard Drive Replacement: passo 2, immagine 1 di 3 Acer Aspire R7-572-6423 Hard Drive Replacement: passo 2, immagine 2 di 3 Acer Aspire R7-572-6423 Hard Drive Replacement: passo 2, immagine 3 di 3
    • Remove the top and middle grips that conceal 3 additional screws.

    • Remove the 5 6mm T9 screws.

    • Remove the 8 10mm T9 screws.

  3. Acer Aspire R7-572-6423 Hard Drive Replacement: passo 3, immagine 1 di 1
    • Remove the back cover.

  4. Acer Aspire R7-572-6423 Hard Drive Replacement: passo 4, immagine 1 di 3 Acer Aspire R7-572-6423 Hard Drive Replacement: passo 4, immagine 2 di 3 Acer Aspire R7-572-6423 Hard Drive Replacement: passo 4, immagine 3 di 3
    • Unscrew the four 4mm PH0 screws holding the hard drive in place.

  5. Acer Aspire R7-572-6423 Hard Drive Replacement: passo 5, immagine 1 di 1
    • Tilt the hard drive up and pull it away and out of its base.

    • Do not use too much force on the hard drive or tilt it so much that the base is broken.

Conclusione

To reassemble your device, follow these instructions in reverse order.

0 Commenti

Aggiungi Commento

Visualizza Statistiche:

Ultime 24 Ore: 0

Ultimi 7 Giorni: 1

Ultimi 30 Giorni: 6

Tutti i Tempi: 1,332