Salta al contenuto principale

Acer Aspire R7 Speakers Replacement

Cosa ti serve

  1. Acer Aspire R7 Speakers Replacement, Cover: passo 1, immagine 1 di 1
    • Shut down the laptop and disconnect the power cord.

    • Failing to disconnect or shut down the laptop could result in damage to the laptop or a shock hazard.

    • Turn the laptop over.

  2. Acer Aspire R7 Speakers Replacement: passo 2, immagine 1 di 3 Acer Aspire R7 Speakers Replacement: passo 2, immagine 2 di 3 Acer Aspire R7 Speakers Replacement: passo 2, immagine 3 di 3
    • Remove seven 10 mm T7 screws.

    • Remove four 6 mm T7 screws.

    • Use the blue plastic opening tool to carefully remove both rubber pads which cover the four remaining screws.

    • Remove the remaining four 10 mm T7 screws.

  3. Acer Aspire R7 Speakers Replacement: passo 3, immagine 1 di 1
    • Carefully lift the cover upwards.

    • If the cover seems stuck, use a spudger tool to pry the sides.

  4. Acer Aspire R7 Speakers Replacement, Speakers: passo 4, immagine 1 di 2 Acer Aspire R7 Speakers Replacement, Speakers: passo 4, immagine 2 di 2
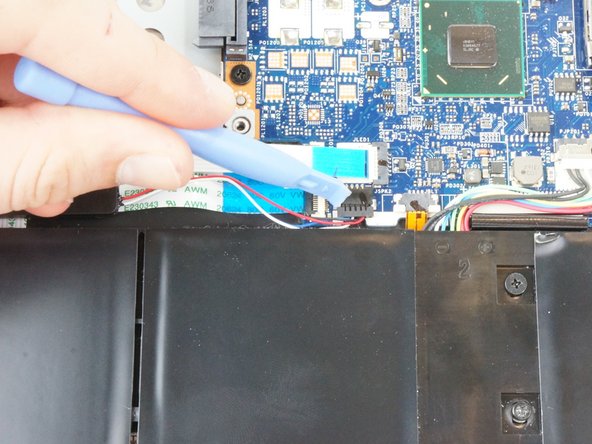
    • Locate the clip attaching the right-side speakers to the motherboard.

    • Carefully pull on the clip until it detaches from the motherboard.

    • Use a plastic opening tool if needed.

  5. Acer Aspire R7 Speakers Replacement: passo 5, immagine 1 di 2 Acer Aspire R7 Speakers Replacement: passo 5, immagine 2 di 2
    • Remove the two 3.5mm #00 Phillips screws which hold the speaker in place.

    • Carefully lift the right-side speaker assembly away from the motherboard.

  6. Acer Aspire R7 Speakers Replacement: passo 6, immagine 1 di 2 Acer Aspire R7 Speakers Replacement: passo 6, immagine 2 di 2
    • Locate the clip attaching the left-side speakers to the motherboard.

    • Carefully pull on the clip until it detaches from the motherboard.

    • Use a plastic opening tool if needed.

  7. Acer Aspire R7 Speakers Replacement: passo 7, immagine 1 di 2 Acer Aspire R7 Speakers Replacement: passo 7, immagine 2 di 2
    • Remove the two 3.5mm #00 Phillips screws which hold the speaker in place.

    • Carefully lift the left-side speaker assembly away from the motherboard.

Conclusione

To reassemble your device, follow these instructions in reverse order.

Andrew Rodiek

Membro da: 01/13/15

601 Reputazione

4 Guide realizzate

Team

USF Tampa, Team 3-4, Hickman Winter 2015 Membro di USF Tampa, Team 3-4, Hickman Winter 2015

USFT-HICKMAN-W15S3G4

4 Membri

7 Guide realizzate

0 Commenti

Aggiungi Commento

Visualizza Statistiche:

Ultime 24 Ore: 1

Ultimi 7 Giorni: 6

Ultimi 30 Giorni: 11

Tutti i Tempi: 696