Salta al contenuto principale

Acer Aspire R5-471T-52EE Fan Replacement

Cosa ti serve

  1. Acer Aspire R5-471T-52EE Fan Replacement, Back Cover: passo 1, immagine 1 di 2 Acer Aspire R5-471T-52EE Fan Replacement, Back Cover: passo 1, immagine 2 di 2
    • Unplug the laptop and turn it off.

    • Remove the twelve 3mm screws using the Phillips #1 screwdriver.

  2. Acer Aspire R5-471T-52EE Fan Replacement: passo 2, immagine 1 di 1
    • With the hinges of the laptop pointing away from you, gently begin to pull on the portion between the two hinges towards yourself until you feel the cover pop off.

    • Remove the back cover from the device.

  3. Acer Aspire R5-471T-52EE Fan Replacement, Motherboard: passo 3, immagine 1 di 1
    • Remove seven 3 mm screws using the Phillips #00 screwdriver.

  4. Acer Aspire R5-471T-52EE Fan Replacement: passo 4, immagine 1 di 1
    • Once the screws are removed, disconnect seven plugs from the motherboard.

    • Keep in mind that a majority of these wires are extremely thin and fragile. Disconnect them with light force and care.

  5. Acer Aspire R5-471T-52EE Fan Replacement: passo 5, immagine 1 di 1
    • Flip up the small black portion the connectors are connected to and disconnect them from the motherboard.

    • Grab the yellow piece of tape to easily remove the connection from the motherboard with nothing more than some gentle force.

    • Remove the large black ribbon wire by gently pulling on the white tab towards yourself.

    • Remove the large white ribbon wire by pulling up on the small black tab.

  6. Acer Aspire R5-471T-52EE Fan Replacement: passo 6, immagine 1 di 1
    • Remove the four remaining screws located on the fan using the Phillips #00 screwdriver.

  7. Acer Aspire R5-471T-52EE Fan Replacement, Fan: passo 7, immagine 1 di 2 Acer Aspire R5-471T-52EE Fan Replacement, Fan: passo 7, immagine 2 di 2
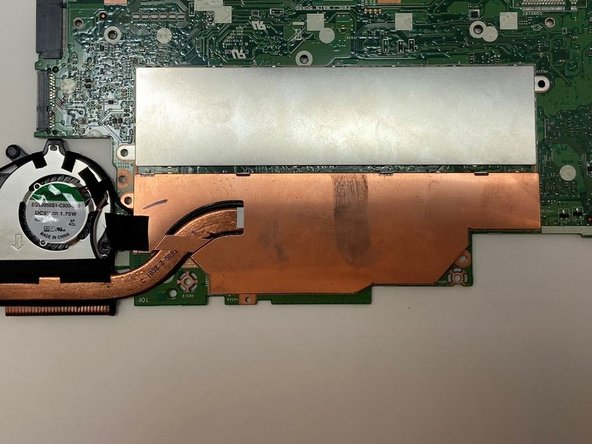
    • Flip the motherboard over so that the silver and copper covers are exposed.

    • Use the opening tool to gently lift the copper cover off the board by sliding the tool underneath the edge.

  8. Acer Aspire R5-471T-52EE Fan Replacement: passo 8, immagine 1 di 1
    • Unplug the two power cables for the fans from the motherboard.

    • Remove the four mounting screws from the motherboard using a Phillips #00 screwdriver.

  9. Acer Aspire R5-471T-52EE Fan Replacement: passo 9, immagine 1 di 1
    • Gently remove the fans from the motherboard.

Conclusione

To reassemble your device, follow these instructions in reverse order.

Un'altra persona ha completato questa guida.

0 Commenti

Aggiungi Commento

Visualizza Statistiche:

Ultime 24 Ore: 0

Ultimi 7 Giorni: 1

Ultimi 30 Giorni: 1

Tutti i Tempi: 299