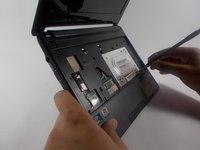
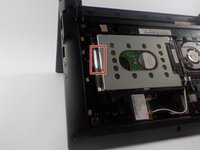
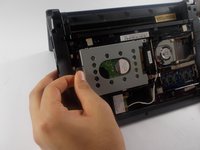
Salta al contenuto principale

Acer Aspire One D255E Hard Drive Replacement

Cosa ti serve

  1. Acer Aspire One D255E Hard Drive Replacement, Keyboard: passo 1, immagine 1 di 1
    • Start by removing the battery found on the back of the device.

    • The battery must be removed in order to ensure the device does not have power! Make sure you do not skip this step!

  2. Acer Aspire One D255E Hard Drive Replacement: passo 2, immagine 1 di 2 Acer Aspire One D255E Hard Drive Replacement: passo 2, immagine 2 di 2
    • Using plastic opening tools press down the 6 clips located around the keyboard.

  3. Acer Aspire One D255E Hard Drive Replacement: passo 3, immagine 1 di 3 Acer Aspire One D255E Hard Drive Replacement: passo 3, immagine 2 di 3 Acer Aspire One D255E Hard Drive Replacement: passo 3, immagine 3 di 3
    • Using a plastic opening tool or spudger move the keyboard out of position.

    • There is a thin cable on the backside of the keyboard. Make sure when you move the keyboard out of position you do so slowly to prevent damage to this cable.

    • If you use a spudger it is recommended that you use a plastic spudger to reduce the chance of damaging any internal parts.

  4. Acer Aspire One D255E Hard Drive Replacement: passo 4, immagine 1 di 1
    • Using a spudger gently push the tab on the port forward then pull out the cable.

    • Be careful to do so as gently as possible. You do not want to damage the port.

  5. Acer Aspire One D255E Hard Drive Replacement, Back Panel: passo 5, immagine 1 di 2 Acer Aspire One D255E Hard Drive Replacement, Back Panel: passo 5, immagine 2 di 2
    • Unscrew seven 1.2 mm Phillips #1 screws from the back of the device

  6. Acer Aspire One D255E Hard Drive Replacement: passo 6, immagine 1 di 2 Acer Aspire One D255E Hard Drive Replacement: passo 6, immagine 2 di 2
    • Unscrew eight more 1.2 mm Phillips #1 screws from the front of the computer.

  7. Acer Aspire One D255E Hard Drive Replacement: passo 7, immagine 1 di 3 Acer Aspire One D255E Hard Drive Replacement: passo 7, immagine 2 di 3 Acer Aspire One D255E Hard Drive Replacement: passo 7, immagine 3 di 3
    • Using a spudger carefully push though the hole to dislodge the panel on the back of the device then remove the panel by hand.

    • It is recommended that you use a plastic spudger to reduce the chance of damaging any internal parts.

  8. Acer Aspire One D255E Hard Drive Replacement, Hard Drive: passo 8, immagine 1 di 2 Acer Aspire One D255E Hard Drive Replacement, Hard Drive: passo 8, immagine 2 di 2
    • Remove the single 1.2 mm Phillips #1 screw from the Hard Drive.

  9. Acer Aspire One D255E Hard Drive Replacement: passo 9, immagine 1 di 2 Acer Aspire One D255E Hard Drive Replacement: passo 9, immagine 2 di 2
    • Using the tab on the side of the Hard Drive, pull out the Hard Drive.

Conclusione

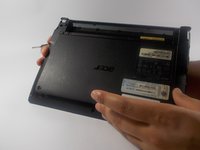
To reassemble your device, follow these instructions in reverse order.

Altre 13 persone hanno completato questa guida.

Brian

Membro da: 03/19/16

1.248 Reputazione

5 Guide realizzate

Team

4 Commenti

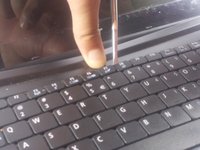
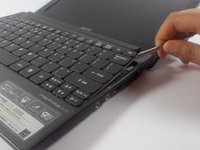
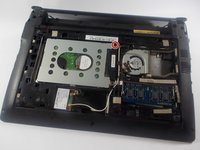
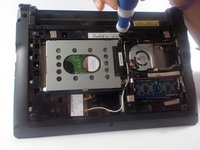
It is not at all necessary to remove all those screws! Only the 4 marked DOOR under the keyboard are required to pop off the back cover and access the HDD.

Colin - Replica

Thank you very much, i thought, must to unscrew all the screws like to disassembly all the mini. I THINK is not nessesary neither, the keyboard

Gabo -

The keyboard ribbon was a pain but it worked out in the end.

Terry - Replica

Bonjour il n est pas nécessaire d ôter le clavier pour atteindre le disque dur et la carte mémoire par contre il y a un tout petit boulon à ôter en plus de la vis pour enlever le disque dur

frecer patricia - Replica

Aggiungi Commento

Visualizza Statistiche:

Ultime 24 Ore: 2

Ultimi 7 Giorni: 5

Ultimi 30 Giorni: 51

Tutti i Tempi: 10,450