Salta al contenuto principale

Acer Aspire E5-571-58CG CPU Fan Replacement

Cosa ti serve

  1. Acer Aspire E5-571-58CG CPU Fan Replacement, Battery: passo 1, immagine 1 di 2 Acer Aspire E5-571-58CG CPU Fan Replacement, Battery: passo 1, immagine 2 di 2
    • Make sure the laptop is powered off.

    • Flip the laptop over and locate the battery release switch.

    • Insert the pointed end of the spudger into the battery release switch.

    • Push the battery release switch to the right.

  2. Acer Aspire E5-571-58CG CPU Fan Replacement: passo 2, immagine 1 di 3 Acer Aspire E5-571-58CG CPU Fan Replacement: passo 2, immagine 2 di 3 Acer Aspire E5-571-58CG CPU Fan Replacement: passo 2, immagine 3 di 3
    • While the battery release switch is pushed to the right, carefully slide the battery out of its socket.

  3. Acer Aspire E5-571-58CG CPU Fan Replacement, CPU Fan: passo 3, immagine 1 di 3 Acer Aspire E5-571-58CG CPU Fan Replacement, CPU Fan: passo 3, immagine 2 di 3 Acer Aspire E5-571-58CG CPU Fan Replacement, CPU Fan: passo 3, immagine 3 di 3
    • Remove the top panel of the laptop with the plastic opening tool.

  4. Acer Aspire E5-571-58CG CPU Fan Replacement: passo 4, immagine 1 di 2 Acer Aspire E5-571-58CG CPU Fan Replacement: passo 4, immagine 2 di 2
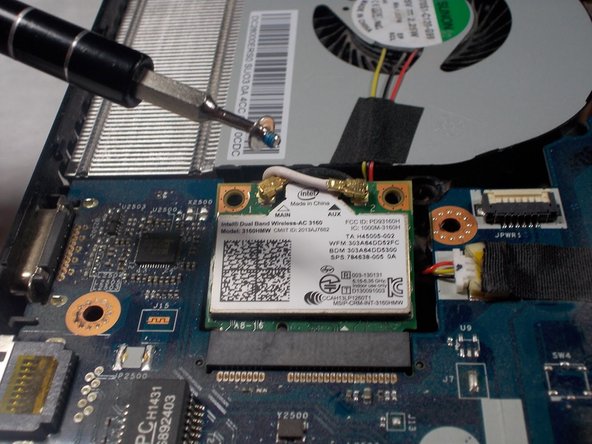
    • Use a JIS #000 screw bit to remove the marked screw.

  5. Acer Aspire E5-571-58CG CPU Fan Replacement: passo 5, immagine 1 di 2 Acer Aspire E5-571-58CG CPU Fan Replacement: passo 5, immagine 2 di 2
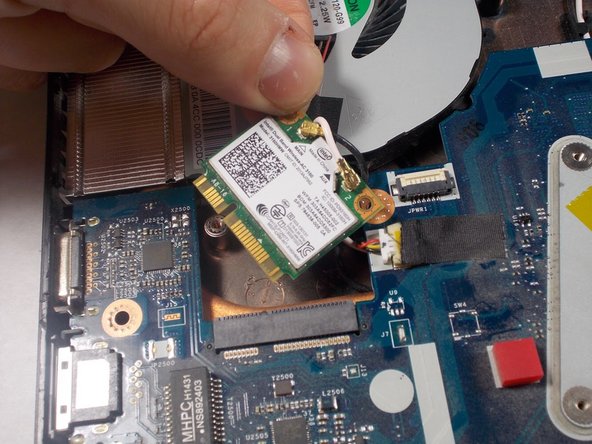
    • Carefully pull the marked green chip out of the motherboard.

  6. Acer Aspire E5-571-58CG CPU Fan Replacement: passo 6, immagine 1 di 2 Acer Aspire E5-571-58CG CPU Fan Replacement: passo 6, immagine 2 di 2
    • Use tweezers to unplug the wire connecting the fan to the motherboard.

  7. Acer Aspire E5-571-58CG CPU Fan Replacement: passo 7, immagine 1 di 3 Acer Aspire E5-571-58CG CPU Fan Replacement: passo 7, immagine 2 di 3 Acer Aspire E5-571-58CG CPU Fan Replacement: passo 7, immagine 3 di 3
    • Use a JIS #00 screw bit to remove the marked screws around the CPU fan.

    • Carefully remove the CPU fan.

Conclusione

To reassemble your device, follow these instructions in reverse order.

Brendan Cuthill

Membro da: 10/29/18

121 Reputazione

1 Guida realizzata

Team

0 Commenti

Aggiungi Commento

Visualizza Statistiche:

Ultime 24 Ore: 1

Ultimi 7 Giorni: 4

Ultimi 30 Giorni: 7

Tutti i Tempi: 299