Questa versione può contenere modifiche errate. Passa all'ultima istantanea verificata.
Cosa ti serve
-
Questo passaggio è privo di traduzione. Aiuta a tradurlo
-
Move the battery catch to the "unlocked" position.
-
Pull back the second spring-loaded battery catch until the battery pops up.
-
Remove the battery.
-
-
Questo passaggio è privo di traduzione. Aiuta a tradurlo
-
Turn the notebook around to face you.
-
There are two Phillips #00 screws securing the cover panel to the rest of the notebook. Remove these screws.
-
-
Questo passaggio è privo di traduzione. Aiuta a tradurlo
-
Use a spudger to release the panel from the plastic retaining clips keeping it in place.
-
Remove the panel and set it aside.
-
-
-
Questo passaggio è privo di traduzione. Aiuta a tradurlo
-
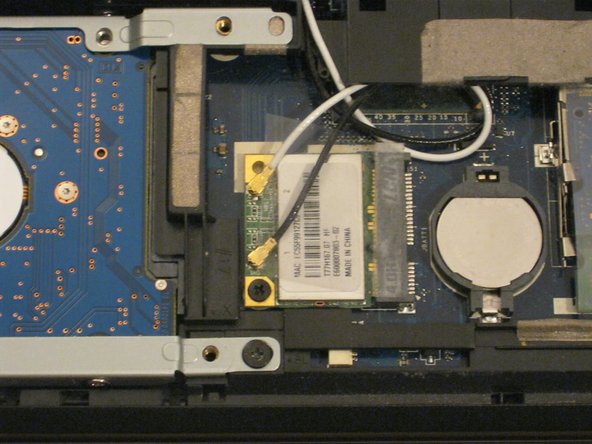
The WLAN card is protected by a transparent cellophane cover.
-
Lift this cover away from the WLAN card. It will not come free from the WLAN card socket.
-
-
Questo passaggio è privo di traduzione. Aiuta a tradurlo
-
Use the pointy end of a spudger to remove the antenna connectors from the WLAN card.
-
-
Questo passaggio è privo di traduzione. Aiuta a tradurlo
-
There is one Phillips #00 screw keeping the WLAN card attached to the notebook.
-
Remove this screw.
-
The WLAN card will spring up from the notebook at an angle.
-
-
Questo passaggio è privo di traduzione. Aiuta a tradurlo
-
Just like RAM, hold the WLAN card by the edges and pull it out at an angle.
-
-
Questo passaggio è privo di traduzione. Aiuta a tradurlo
-
You might also want to put the antenna cables back in using the flat end of a spudger.
-


Annulla: non ho completato questa guida.
Altre 13 persone hanno completato questa guida.
4 Commenti
If your laptop only came with a black wire, it should be fine just to re-connect that. The white one looks like it's a second antenna, so that might not be present in the 5742G model of the laptop - mine was a 5742Z, and it's what I used to create the guide. As always, your mileage may vary - but let me know how it goes and I'll update the guide.
Running Win7 Home on Acer 5749Z and windows seems to think it's the router, where the problem is. I disagree, since running 2 other computers from the router, one Win7 laptop and the other is an Acer 4720Z WinXP. The both show very strong signals.
Tried recovery, update driver, resetting router. All to no available.
Have USB Wireless adapter and connection is slower but strong.