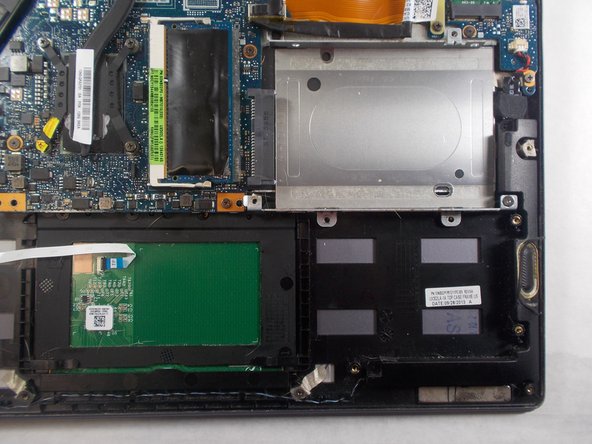
Salta al contenuto principale

ASUS ZenBook UX302LA-BHI5T08 Hard Drive Replacement

Cosa ti serve

  1. ASUS ZenBook UX302LA-BHI5T08 Hard Drive Replacement, Back Cover: passo 1, immagine 1 di 2 ASUS ZenBook UX302LA-BHI5T08 Hard Drive Replacement, Back Cover: passo 1, immagine 2 di 2
    • Flip the laptop over so the model stickers face the ceiling.

  2. ASUS ZenBook UX302LA-BHI5T08 Hard Drive Replacement: passo 2, immagine 1 di 2 ASUS ZenBook UX302LA-BHI5T08 Hard Drive Replacement: passo 2, immagine 2 di 2
    • Remove eleven 7mm Phillips #00 screws that secure the back cover.

    • Two screws are under the rubber pad.

  3. ASUS ZenBook UX302LA-BHI5T08 Hard Drive Replacement: passo 3, immagine 1 di 2 ASUS ZenBook UX302LA-BHI5T08 Hard Drive Replacement: passo 3, immagine 2 di 2
    • Using a spudger, carefully remove the back cover.

  4. ASUS ZenBook UX302LA-BHI5T08 Hard Drive Replacement, Battery: passo 4, immagine 1 di 2 ASUS ZenBook UX302LA-BHI5T08 Hard Drive Replacement, Battery: passo 4, immagine 2 di 2
    • Remove the six 3mm Phillips #00 screws holding the battery in place.

  5. ASUS ZenBook UX302LA-BHI5T08 Hard Drive Replacement: passo 5, immagine 1 di 2 ASUS ZenBook UX302LA-BHI5T08 Hard Drive Replacement: passo 5, immagine 2 di 2
    • Disconnect the battery wires from the motherboard by pulling on the black tab using a spudger or your hands.

  6. ASUS ZenBook UX302LA-BHI5T08 Hard Drive Replacement: passo 6, immagine 1 di 1
    • Carefully lift the battery up and out of the laptop.

  7. ASUS ZenBook UX302LA-BHI5T08 Hard Drive Replacement, Hard Drive: passo 7, immagine 1 di 3 ASUS ZenBook UX302LA-BHI5T08 Hard Drive Replacement, Hard Drive: passo 7, immagine 2 di 3 ASUS ZenBook UX302LA-BHI5T08 Hard Drive Replacement, Hard Drive: passo 7, immagine 3 di 3
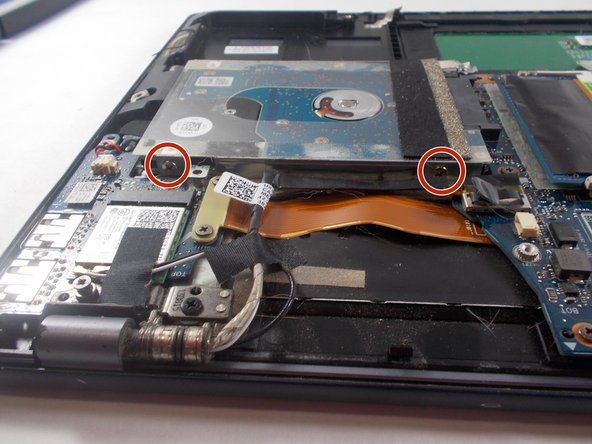
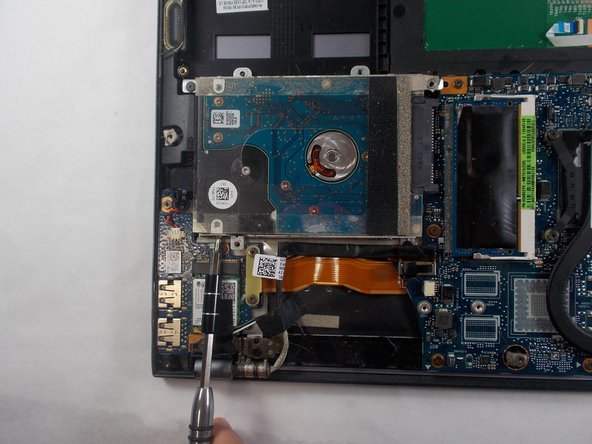
    • Remove four 3 mm Phillips screws (two on each side) holding the hard drive in the frame

  8. ASUS ZenBook UX302LA-BHI5T08 Hard Drive Replacement: passo 8, immagine 1 di 2 ASUS ZenBook UX302LA-BHI5T08 Hard Drive Replacement: passo 8, immagine 2 di 2
    • Grip the side of the hard drive and slide it out of the device.

Conclusione

To reassemble your device, follow these instructions in reverse order.

Un'altra persona ha completato questa guida.

Team

0 Commenti

Aggiungi Commento

Visualizza Statistiche:

Ultime 24 Ore: 1

Ultimi 7 Giorni: 5

Ultimi 30 Giorni: 8

Tutti i Tempi: 549