Salta al contenuto principale

ASUS U57A-BBL4 Display Assembly Replacement

Cosa ti serve

  1. ASUS U57A-BBL4 Display Assembly Replacement, Display Assembly: passo 1, immagine 1 di 2 ASUS U57A-BBL4 Display Assembly Replacement, Display Assembly: passo 1, immagine 2 di 2
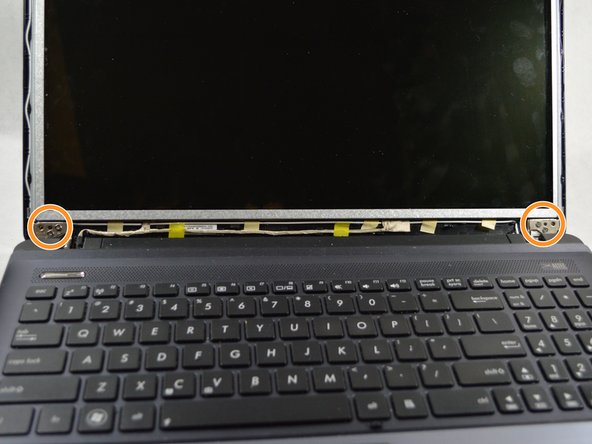
    • Carefully pry the two rubber covers at the bottom of the screen off with a metal sprudger.

  2. ASUS U57A-BBL4 Display Assembly Replacement: passo 2, immagine 1 di 1
    • Remove the two 1.84 mm Phillips head screws at the bottom of the screen using PH00 screw driver.

  3. ASUS U57A-BBL4 Display Assembly Replacement: passo 3, immagine 1 di 1
    • Starting from one of the corners, use your fingers to pry the bezel from the screen.

    • There is a popping sound when the bezel is loosened from the screen.

  4. ASUS U57A-BBL4 Display Assembly Replacement: passo 4, immagine 1 di 3 ASUS U57A-BBL4 Display Assembly Replacement: passo 4, immagine 2 di 3 ASUS U57A-BBL4 Display Assembly Replacement: passo 4, immagine 3 di 3
    • Remove the top two 2 mm Phillips head screws.

    • Remove the four 2 mm Phillips head screws on the bottom.

    • Remove the eight 2 mm Phillips head screws on the sides of the screen. There are four on each side.

    • There are 14 screws in total: two on the top, four on the bottom, and four on each side. Use PH00 screw-driver for removing all 14 screws.

  5. ASUS U57A-BBL4 Display Assembly Replacement: passo 5, immagine 1 di 2 ASUS U57A-BBL4 Display Assembly Replacement: passo 5, immagine 2 di 2
    • Don't tear off the bottom of the screen or you might damage the connector cable.

    • Carefully lower the screen from the casing with your fingers, making sure to keep the bottom intact and lay it face down on the keyboard.

  6. ASUS U57A-BBL4 Display Assembly Replacement: passo 6, immagine 1 di 2 ASUS U57A-BBL4 Display Assembly Replacement: passo 6, immagine 2 di 2
    • Disconnect the connector cable at the bottom by loosening the adhesive tape and lifting up.

    • Gently slide the cable out of the ridges to free the screen from the casing.

Conclusione

To reassemble your device, follow these instructions in reverse order.

Un'altra persona ha completato questa guida.

Team

0 Commenti

Aggiungi Commento

Visualizza Statistiche:

Ultime 24 Ore: 0

Ultimi 7 Giorni: 0

Ultimi 30 Giorni: 2

Tutti i Tempi: 249